background image

Protocol Settings

3-17

3

Using a TC

P/IP Netw

or

k

IMPORTANT


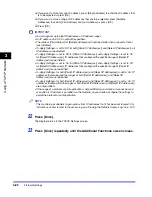
If you are using the optional Color Network Multi-PDL Printer Kit (Standard equipment for the iR 
C3220N), you can print a file in the PDF or PS format by specifying its URL on a web browser 
(Remote UI). To use this function, you need to make the following settings.
- [Use HTTP]: [On] (See step 19.)
- [Proxy Settings]: The settings suitable for your environment (Set in this step.)
- [LPD Settings]: [On] (See step 13.)

21

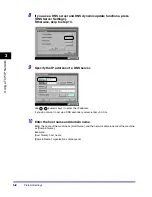
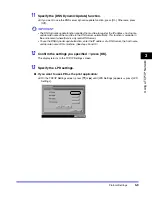
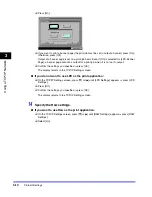
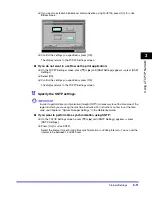
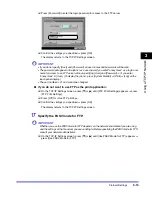
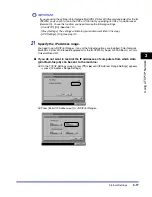
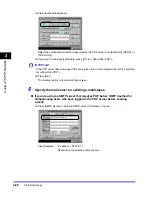
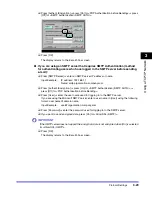
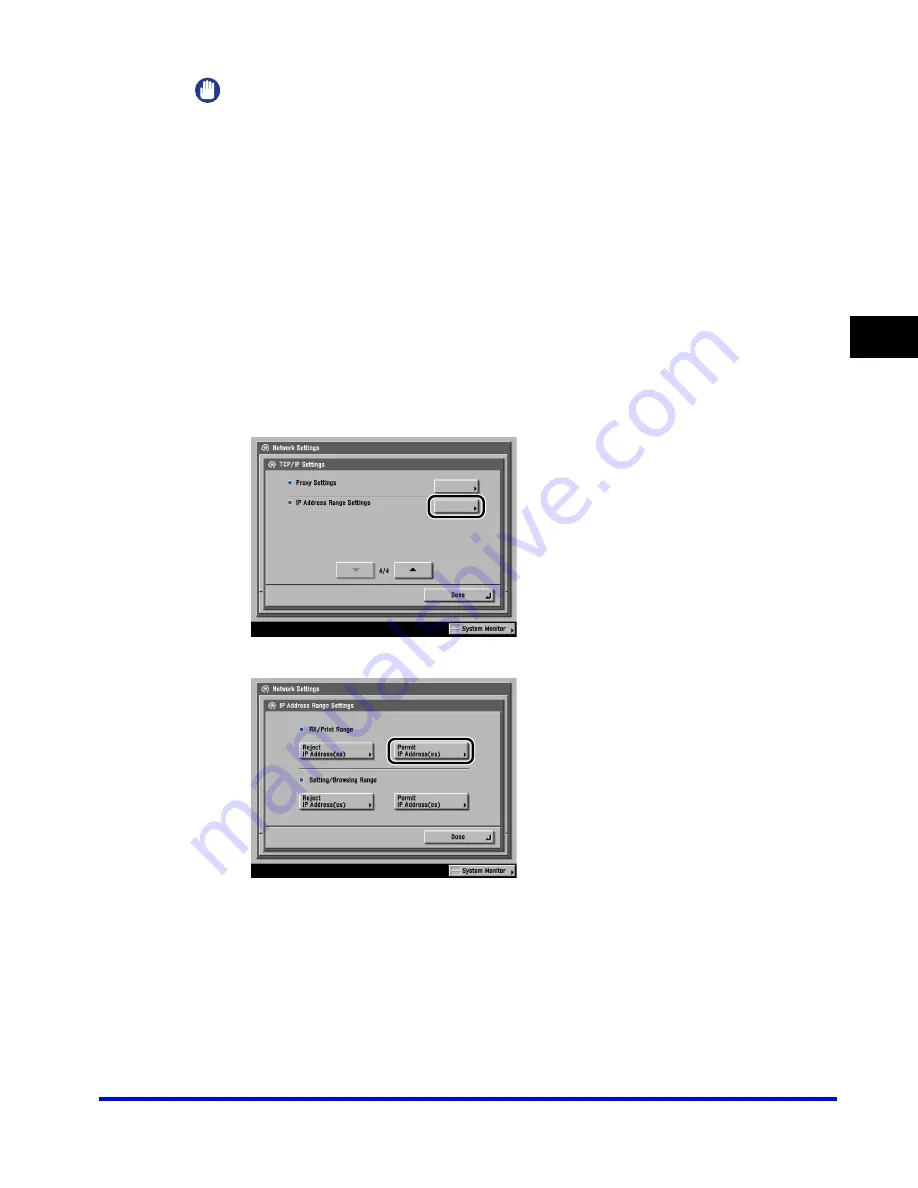
Specify the IP address range.

You need to set <RX/Print Range> if any of the following options are installed: Color Network 
Multi-PDL Printer Kit (Standard equipment for the iR C3220N), Super G3 FAX Board, or Color 
Universal Send Kit.

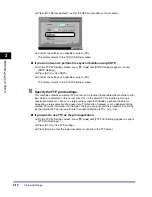
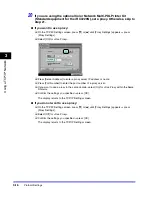
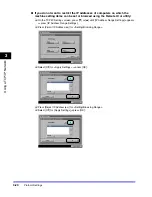
If you do not want to restrict the IP addresses of computers from which data 
(print/fax/I-fax job) can be sent to the machine:

On the TCP/IP Settings screen, press [

] or [

] until [IP Address Range Settings] appears 

 press [IP Address Range Settings].

Press [Permit IP Address(es)] for <RX/Print Range>.

Summary of Contents for CLC 3220

Page 1: ...Please read this guide before operating this equipment After you finish reading this guide store it in a safe place for future reference ENG Network Guide Network Guide ...

Page 2: ......

Page 3: ...CLC3220 iR C3220N Network Guide 0 Ot ...

Page 4: ... CD ROM Sending and Fax Instructions Sending and Facsimile Guide CD ROM Setting Up the Network Connection and Installing the CD ROM Software Network Quick Start Guide Remote User Interface Instructions Remote UI Guide CD ROM Network Connectivity and Setup Instructions Network Guide This Document CD ROM Color Network ScanGear Installation and Instructions Color Network ScanGear User s Guide CD ROM ...

Page 5: ...plications and Using the Login Service MEAP SMS Administrator Guide CD ROM To view the manual in PDF format Adobe Reader Adobe Acrobat Reader is required If Adobe Reader Adobe Acrobat Reader is not installed on your system please download it from the Adobe Systems Incorporated website ...

Page 6: ... Network Macintosh Chapter 7 Using the Network and Device Settings with Utilities Chapter 8 Troubleshooting Chapter 9 Appendix Includes the network settings specifications and index How This Manual Is Organized Considerable effort has been made to ensure that this manual is free of inaccuracies and omissions However as we are constantly improving our products if you need an exact specification ple...

Page 7: ...em Environment Requirements 1 6 Checking Your Network Environment 1 8 Sample Windows Network 1 8 With a NetWare Server 1 8 Without a NetWare Server 1 9 Sample Macintosh Network 1 10 Sample UNIX Network 1 11 Using a Network with Various Types of Computers 1 12 Chapter 2 Settings Common to the Network Protocols Network Environment Setup Procedures 2 2 Connecting the Machine to a Computer or Network ...

Page 8: ...inistrator in the NDS Queue Server Mode or the Remote Printer Mode NetWare 4 x or Later 4 5 Using PCONSOLE in the Queue Server Mode or Remote Printer Mode in the Bindery Mode NetWare 3 2 4 6 Protocol Settings 4 9 Settings from the Control Panel 4 9 Setting Up a Computer for Printing Sending a Fax 4 17 Connecting to a NetWare Network 4 17 Printer Connection Method 4 17 Setting Up a Computer as a Fi...

Page 9: ...2 NetSpot Console 7 3 Chapter 8 Troubleshooting Network Connection Problems and Remedies 8 2 Printing Problems and Remedies 8 4 Data Sending File Sharing Problems and Remedies 8 9 Chapter 9 Appendix Network Setting Items 9 2 Available Software for Network Settings 9 11 Confirming Settings 9 12 Viewing the Network Access Log 9 13 Specifications 9 14 Ethernet Interface Adaptor 9 14 Hardware Specific...

Page 10: ...autions and instructions that should be observed for safety CAUTION Indicates a caution concerning operations that may lead to injury to persons or damage to property if not performed correctly In order to use the machine safely always pay attention to these cautions IMPORTANT Indicates operational requirements and restrictions Be sure to read these items carefully in order to operate the product ...

Page 11: ...y button names are a few examples of how keys and buttons to be clicked or pressed are expressed in this manual Control Panel Keys Key icon Touch Panel Display Keys Key Name Buttons on Computer Operation Screens Button Name Examples Examples Cancel Done Examples OK Add ...

Page 12: ...actually see depending on the operating system and options that come with your machine The keys or buttons which you should click or press are marked with a as shown below When multiple buttons or keys can be clicked or pressed they will be highlighted and mentioned in the order in which they should be clicked or pressed ...

Page 13: ...ystem Windows 98 Microsoft Windows Millennium Edition operating system Windows Me Microsoft Windows NT operating system Windows NT Microsoft Windows 2000 operating system Windows 2000 Microsoft Windows XP operating system Windows XP Microsoft Windows Server 2003 operating system Windows Server 2003 Microsoft Windows operating system Windows PostScript 3 emulation PS Novell NetWare NetWare ...

Page 14: ...countries Netscape and Netscape Navigator are trademarks of Netscape Communications Corporation NetWare and Novell are registered trademarks of Novell Inc IPX SPX NDS NDPS and Novell Client are trademarks of Novell Inc Solaris Sun SunOS and Sun Microsystems are trademarks of Sun Microsystems in the United States and other countries Ethernet is a trademark of Xerox Corporation UNIX is a registered ...

Page 15: ...sclaimers The information in this document is subject to change without notice CANON INC MAKES NO WARRANTY OF ANY KIND WITH REGARD TO THIS MATERIAL EITHER EXPRESS OR IMPLIED EXCEPT AS PROVIDED HEREIN INCLUDING WITHOUT LIMITATION THEREOF WARRANTIES AS TO MARKETABILITY MERCHANTABILITY FITNESS FOR A PARTICULAR PURPOSE OF USE OR AGAINST INFRINGEMENT OF ANY PATENT CANON INC SHALL NOT BE LIABLE FOR ANY ...

Page 16: ...xiv ...

Page 17: ...tible and how to check the network environment you are using Optional Equipment and System Environment Requirements 1 2 Printing or Sending a Fax from a Computer 1 2 Using E Mail I Fax 1 5 Sending Data 1 6 Checking Your Network Environment 1 8 Sample Windows Network 1 8 Sample Macintosh Network 1 10 Sample UNIX Network 1 11 Using a Network with Various Types of Computers 1 12 ...

Page 18: ...using the iR C3220N The optional equipment is unnecessary If you are using the CLC3220 either one of the following optional equipment Color Network Multi PDL Printer Kit If you want to use the UFR PS PCL printer driver Color Network Printer Unit If you want to use the PS printer driver Sending a Fax Super G3 FAX Board Resolution Switching Board Color Image Reader IMPORTANT For more information on ...

Page 19: ...rosoft Windows Server 2003 Solaris Version 1 1x SunOS Version 4 1x or later Solaris Version 2 5x SunOS Version 5 5x or later Compatible Computers Windows IBM PC compatibles With a NetBIOS Network Compatible OS Microsoft Windows 98 Me Microsoft Windows NT Server 4 0 Microsoft Windows NT Workstation 4 0 Microsoft Windows 2000 Server Microsoft Windows 2000 Professional Microsoft Windows XP Profession...

Page 20: ...herTalk Phase 2 See the Driver Guide for compatible operating systems and computers With a Server Based Computing Environment Compatible Windows Terminal Server Services Microsoft WIndows NT 4 0 Terminal Server Edition Microsoft Windows 2000 Server Microsoft Windows Server 2003 Compatible Software Citrix MetaFrame 1 8 Citrix MetaFrame XP IMPORTANT If you are using the optional Color Network Printe...

Page 21: ...r later Lotus Domino R4 6 or later Windows Compatible mail receiving server software Qpopper 2 53 or later UNIX Microsoft Exchange Server Windows Microsoft Exchange Server 5 5 Service Pack 1 or later Lotus Domino R4 6 or later Windows IMPORTANT If you are using Windows NT 4 0 you need to install Service Pack 6a or later If you are using Windows 2000 you need to install Service Pack 2 or later NOTE...

Page 22: ... The following network and system environments apply when sending data from the machine to a file server depending on the type of network used With a TCP IP Network Using FTP Compatible servers Microsoft Windows NT Server 4 0 and Internet Information Server 4 0 Microsoft Windows 2000 Server and Internet Information Services 5 0 Microsoft Windows XP Professional and Internet Information Services 5 ...

Page 23: ...2 2 8a or later UNIX Linux Compatible protocol NetBIOS over TCP IP With a NetWare Network Compatible server Novell NetWare Version 3 2 4 11 4 2 5 5 1 6 Compatible protocol IPX IMPORTANT If you are using the optional Color Universal Send Kit the optional Resolution Switching Board and the optional Color Image Reader with the optional Color Network Printer Unit see the manual provided with the optio...

Page 24: ...etwork With a NetWare Server In a network environment like the one below a TCP IP NetWare or NetBIOS NetBIOS over TCP IP protocol can be used Multiple protocols can also be used at the same time To use the e mail I fax function a TCP IP protocol is required After configuring the settings in accordance with Chapter 2 Settings Common to the Network Protocols see the following depending on the protoc...

Page 25: ...er In a network environment like the one below either TCP IP or NetBIOS NetBIOS over TCP IP protocol can be used Multiple protocols can also be used at the same time After configuring the settings in accordance with Chapter 2 Settings Common to the Network Protocols see the following depending on the protocol Chapter 3 Using a TCP IP Network Chapter 5 Using a NetBIOS Network IMPORTANT The machine ...

Page 26: ... settings in accordance with Chapter 2 Settings Common to the Network Protocols see the following depending on the protocol Chapter 6 Using an AppleTalk Network Macintosh Chapter 3 Using a TCP IP Network IMPORTANT To use the e mail I fax functions or data sending functions for the machine the optional equipment must be installed For the equipment needed see Optional Equipment and System Environmen...

Page 27: ...ample UNIX Network With UNIX computers the TCP IP protocol is used After configuring the settings in accordance with Chapter 2 Settings Common to the Network Protocols see the following Chapter 3 Using a TCP IP Network Solaris SunOS Protocol TCP IP The Machine ...

Page 28: ...tocol is required To use the data sending function a TCP IP NetWare or NetBIOS protocol is required After configuring the settings in accordance with Chapter 2 Settings Common to the Network Protocols see the following depending on the protocol Chapter 3 Using a TCP IP Network Chapter 4 Using a NetWare Network Windows Chapter 5 Using a NetBIOS Network IMPORTANT To use the e mail I fax functions or...

Page 29: ...ure to set items explained in this chapter If you are using the optional Color Network Printer Unit see the manual provided with the optional Color Network Printer Unit Network Environment Setup Procedures 2 2 Connecting the Machine to a Computer or Network 2 3 Connecting to a Network 2 4 Connecting to a USB Interface Optional 2 7 Interface Settings 2 9 Settings from the Control Panel 2 10 Communi...

Page 30: ...ttings See Interface Settings on p 2 9 Specify the interface settings for communication between the machine and computers on your network To specify the settings use The machine s control panel A web browser Remote UI 3 Communication Environment Setup See Communication Environment Setup on p 2 17 Set up a configuration for communication between the machine and computers on your network IMPORTANT I...

Page 31: ...wer cord from the power supply IMPORTANT External USB devices i e memory keyboard mouse etc are not supported by the optional USB Interface Board A USB cable or a network cable are not included in this package Please obtain a suitable cable for your computer or network The machine supports both Ethernet and Token Ring networks however you cannot use the machine to connect to both types of networks...

Page 32: ...rt using a Category 5 twisted pair LAN cable IMPORTANT The machine supports both Ethernet and Token Ring networks however you cannot use the machine to connect to both types of network at the same time If the machine has both network boards Ethernet and Token Ring installed you need to remove the Token Ring Board For more information consult your local authorized Canon dealer You cannot use the ma...

Page 33: ...ide Set the network settings Install a printer driver if necessary See the PCL Driver Guide the PS Driver Guide or the UFR Driver Guide Using Token Ring Optional The optional Token Ring Board has two connectors One is an RJ 45 connector and the other is a DB9 connector Use only one of these connectors to connect to the network Do not connect anything to the other connector You cannot use both conn...

Page 34: ...connector of the optional Token Ring Board that is installed on the machine to a hub or MAU port using an IBM Type 1 or Type 1A STP cable Every computer connected to this network must have Token Ring capability IMPORTANT The use of an STP cable is required to comply with the limits for a Class B digital device pursuant to EN55022 1998 when you connect the machine to a Token Ring network If the mac...

Page 35: ...e PCL Driver Guide the PS Driver Guide or the UFR Driver Guide CAUTION If you connect or disconnect the USB cable while the main power switch is ON do not touch the metal parts around the connector as this may result in electrical shock IMPORTANT Do not connect or disconnect the USB cable in the following situations as it may cause your computer or the machine to operate poorly When installing the...

Page 36: ... a USB cable you can print a document from your computer using the printer driver or send a fax from your computer using the fax driver You cannot specify the computer connected to the machine through a USB connection as a destination of the send jobs or forwarded jobs Also with that computer you cannot use Remote UI and the Network Scan function ...

Page 37: ...on p 2 13 IMPORTANT If you configure the interface settings for the first time use the control panel of this machine After configuring the protocol settings you can change the content by using a web browser Remote UI If you use Token Ring it is necessary to purchase the optional Token Ring Network Interface Adapter You cannot use Ethernet and Token Ring at the same time When a Token Ring board is ...

Page 38: ...e procedure NOTE For instructions on how to enter characters using the touch panel display see Chapter 2 Basic Operations in the Reference Guide Setting Up the Ethernet Driver 1 Press 2 Press System Settings NOTE If the message Enter the System Manager ID and Password using the numeric keys appears on the touch panel display enter the System Manager ID and password For instructions on how to enter...

Page 39: ...erface Settings 2 11 2 Settings Common to the Network Protocols 3 Press Network Settings 4 Press or until Ethernet Driver Settings appears press Ethernet Driver Settings 5 Select On or Off for Auto Detect ...

Page 40: ...o a different Ethernet hub with the power ON the Auto Detect function will not work even if you set Auto Detect to On Connect the cable with the power OFF NOTE The default setting is On Use the Off setting to specify a particular Ethernet setting 6 Specify Communication Mode on the Ethernet Driver Settings screen If you want to alternately send and receive Select Half Duplex If you want to simulta...

Page 41: ... ON again NOTE For instructions on how to turn ON OFF the machine see Chapter 1 Before You Start Using This Machine in the Reference Guide The Ethernet driver settings are complete Setting Up the Token Ring 1 Press 2 Press System Settings NOTE If the message Enter the System Manager ID and Password using the numeric keys appears on the touch panel display enter the System Manager ID and password F...

Page 42: ...ork Protocols 3 Press Network Settings 4 Press or until Token Ring Settings appears press Token Ring Settings 5 Select the appropriate ring speed and the communication method for your environment from the Ring Speed and Communication Method drop down list ...

Page 43: ...of Token Ring Settings Use Source Routing All Broadcast Request and All Broadcast Response Notice are shown below Off invalid invalid On On invalid On Off On On Off Off IMPORTANT If the machine does not perform source routing correctly on a local network select Off for Use Source Routing 8 To perform all broadcast request select On for All Broadcast Request If you select On for All Broadcast Reque...

Page 44: ...ess displayed on the touch panel display is unique to the Token Ring board and is set independently of the MAC address of the Ethernet board 11 Confirm the settings you specified press OK The display returns to the Network Settings screen 12 Press Done repeatedly until the Additional Functions screen closes 13 Restart the machine Turn OFF the machine wait at least 10 seconds and then turn it ON ag...

Page 45: ...TE After configuring TCP IP settings you can change the content by using a web browser Remote UI Settings from the Control Panel The procedure for specifying the settings from the control panel is as follows 1 Specify the SNMP settings If you want to set or browse each item of the machine with a utility that uses SNMP to obtain information Press System Settings Network Settings Press or until SNMP...

Page 46: ...d press OK If you do not want to do the above Press System Settings Network Settings Press or until SNMP Settings appears press SNMP Settings Select Off Confirm the settings you specified press OK 2 Specify the port setting If you want to set or browse detailed information on the machine with a Canon driver or utility On the Network Settings screen press or until Enable Dedicated Port appears pres...

Page 47: ... you want to use a Canon driver or utility select On for both Use SNMP and Enable Dedicated Port You can restrict the IP addresses of computers on which items can be set or browsed If you restrict the IP addresses it is not possible to set or browse detailed information concerning the machine on computers other than the ones of which the IP addresses are allowed even if both Use SNMP and Enable De...

Page 48: ...fore starting printing On the Network Settings screen press or until Use Spooler appears press Use Spooler Select Off IMPORTANT If you are using the optional Color Network Multi PDL Printer Kit Standard equipment for the iR C3220N take note of the following If the print job is sent from a Macintosh computer to a PS printer you cannot specify whether to spool under this option Spooling is determine...

Page 49: ...t job of the machine you can use the touch panel display of the machine a web browser Remote UI or the print queue provided with Windows to display a job list or delete a job 4 Confirm the settings you specified press OK 5 Press Done repeatedly until the Additional Functions screen closes 6 Restart the machine Turn OFF the machine wait at least 10 seconds and then turn it ON again NOTE For instruc...

Page 50: ...Communication Environment Setup 2 22 2 Settings Common to the Network Protocols ...

Page 51: ...etwork TCP IP Network Setup Procedures 3 2 Protocol Settings 3 3 Settings from the Control Panel 3 4 Setting Up a Computer for Printing Sending a Fax Windows UNIX 3 33 Printer Connection Method LPD Raw 3 35 Printer Connection Method IPP 3 46 Printer Connection Method FTP 3 51 Setting Up a Computer as a File Server 3 53 FTP Server Settings 3 54 ...

Page 52: ... File Server on p 3 53 Specify the settings of the computer receiving data sent from the machine To send data the optional equipment must be installed For the equipment needed see Optional Equipment and System Environment Requirements on p 1 2 IMPORTANT If you are using the optional Color Network Printer Unit for step 2 see the manual provided with the optional Color Network Printer Unit It is rec...

Page 53: ...esses of computers on which items for the machine can be set or browsed it is not possible to use a web browser Remote UI on computers of which the IP addresses are not allowed a utility on the computers cannot be used to set or browse detailed information concerning the machine Also once you set the range of IP addresses of computers from which data print fax I fax job can be sent to the machine ...

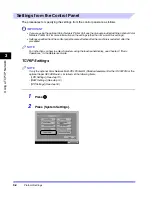
Page 54: ...il I fax settings Settings specified from the control panel become effective after the machine is restarted after the procedure NOTE For instructions on how to enter characters using the touch panel display see Chapter 2 Basic Operations in the Reference Guide TCP IP Settings NOTE If only the optional Color Network Multi PDL Printer Kit Standard equipment for the iR C3220N or the optional Super G3...

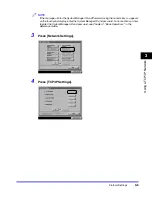
Page 55: ...ger ID and Password using the numeric keys appears on the touch panel display enter the System Manager ID and password For instructions on how to enter the System Manager ID and password see Chapter 2 Basic Operations in the Reference Guide 3 Press Network Settings 4 Press TCP IP Settings ...

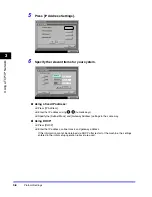
Page 56: ... Press IP Address Enter the IP address using numeric keys Specify the Subnet Mask and Gateway Address settings in the same way Using DHCP Press DHCP Enter the IP address subnet mask and gateway address If this information cannot be obtained via DHCP after restart of the machine the settings entered in the initial setup operation above are used ...

Page 57: ...or RARP server the settings entered from the control panel are used If the machine is restarted after settings are made to use any of DHCP BOOTP or RARP the TCP IP Settings screen displays the IP address setting values obtained from the DHCP BOOTP or RARP server If the IP address host name and domain name have been set previously these will be overwritten by the setting values obtained from DHCP B...

Page 58: ... 13 9 Specify the IP address of a DNS server Use numeric keys to enter the IP address If you do not want to set up a DNS secondary server enter 0 0 0 0 10 Enter the host name and domain name Enter the name of the machine as Host Name and the network domain name of the machine as Domain Name Example Host Name host_name Domain Name organization company com ...

Page 59: ... the DNS server automatically This function is available in the environment where there is a dynamic DNS server To use the DNS dynamic update function enter the IP address of a DNS server the host name and domain name of this machine See steps 9 and 10 12 Confirm the settings you specified press OK The display returns to the TCP IP Settings screen 13 Specify the LPD settings If you want to use LPD...

Page 60: ... set to output Confirm the settings you specified press OK The display returns to the TCP IP Settings screen If you do not want to use LPD as the print application On the TCP IP Settings screen press or until LPD Settings appears press LPD Settings Press Off Confirm the settings you specified press OK The display returns to the TCP IP Settings screen 14 Specify the Raw settings If you want to use ...

Page 61: ...he display returns to the TCP IP Settings screen 15 Specify the SNTP settings IMPORTANT In order to perform time synchronization through SNTP it is necessary to set the time zone of the region in which you are using the machine in advance For instructions on how to set the time zone see Chapter 6 System Manager Settings in the Reference Guide If you want to perform time synchronization using SNTP ...

Page 62: ...l FTP server and a function that enables the machine to print jobs which are uploaded to this server from PCs on the network This function is for use in special environments such as in a large scale system that includes a printing function for processing a large amount of business data This function however is not a general printing method For more information on the type of data you can print and...

Page 63: ... System Monitor Print Log on the touch panel display The port number is 21 and cannot be changed If you do not want to use FTP as the print application On the TCP IP Settings screen press or until FTP Print Settings appears press FTP Print Settings Press Off for Use FTP printing Confirm the settings you specified press OK The display returns to the TCP IP Settings screen 17 Specify the PASV mode f...

Page 64: ...lication On the TCP IP Settings screen press or until IPP Settings appears press IPP Settings Select On Selecting On for IPP Settings automatically sets Use HTTP to On If you are using IPP authentication press On for Use Authentication enter the user name to use for IPP authentication in User and the password to use for IPP authentication in Password Confirm the settings you specified press OK The...

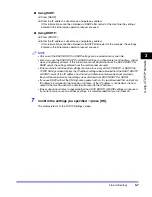
Page 65: ...PP select On Selecting Off for Use HTTP automatically sets Remote UI and IPP Settings to Off Confirm the settings you specified press OK The display returns to the TCP IP Settings screen IMPORTANT If you are using the optional Color Network Multi PDL Printer Kit Standard equipment for the iR C3220N you can print a file in the PDF or PS format by specifying its URL on a web browser Remote UI To use...

Page 66: ...er Address to enter a proxy server IP address or name Press Port Number to enter the port number of a proxy server If you want to use a proxy in the same domain select On for Use Proxy within the Same Domain Confirm the settings you specified press OK The display returns to the TCP IP Settings screen If you do not want to use a proxy On the TCP IP Settings screen press or until Proxy Settings appe...

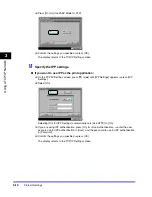
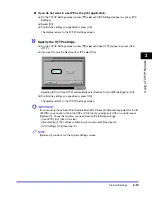
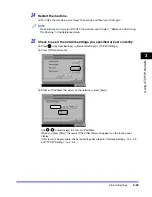
Page 67: ...e for your environment Set in this step LPD Settings On See step 13 21 Specify the IP address range You need to set RX Print Range if any of the following options are installed Color Network Multi PDL Printer Kit Standard equipment for the iR C3220N Super G3 FAX Board or Color Universal Send Kit If you do not want to restrict the IP addresses of computers from which data print fax I fax job can be...

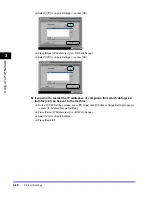
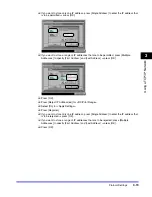
Page 68: ...for Apply Settings press OK If you want to restrict the IP addresses of computers from which data print fax I fax job can be sent to the machine On the TCP IP Settings screen press or until IP Address Range Settings appears press IP Address Range Settings Press Permit IP Address es for RX Print Range Select On for Apply Settings Press Register ...

Page 69: ...s Multiple Addresses to specify First Address and Last Address press OK Press OK Press Reject IP Address es for RX Print Range Select On for Apply Settings Press Register If you want to store only one IP address press Single Address to enter the IP address that is to be rejected press OK If you want to store a range of IP addresses that are to be rejected press Multiple Addresses to specify First ...

Page 70: ...n be set or browsed using the Remote UI or utility On the TCP IP Settings screen press or until IP Address Range Settings appears press IP Address Range Settings Press Permit IP Address es for Setting Browsing Range Select Off for Apply Settings press OK Press Reject IP Address es for Setting Browsing Range Select Off for Apply Settings press OK ...

Page 71: ...s Range Settings Press Permit IP Address es for Setting Browsing Range Select On for Apply Settings Press Register If you want to store only one IP address press Single Address to enter the IP address that is to be permitted press OK If you want to store a range of IP addresses that are to be permitted press Multiple Addresses to specify First Address and Last Address press OK Press OK Press Rejec...

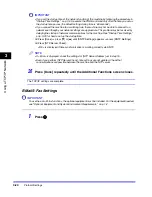
Page 72: ...ress es and Apply Settings is set to Off for Reject IP Address es IP addresses that are beyond the specified range of Permit IP Address es are not permitted If Apply Settings for both Permit IP Address es and Reject IP Address es is set to On IP addresses that are beyond the ranges of both Permit IP Address es and Reject IP Address es are not permitted If Apply Settings for both Permit IP Address ...

Page 73: ...ence Guide 25 Check to see if the network settings you specified are set correctly Press System Settings Network Settings TCP IP Settings Press PING Command Enter an IP address that exists on the network press Start Use numeric keys to enter an IP address When you press Start the result of the PING command appears on the touch panel display If this result is inappropriate check the settings descri...

Page 74: ...artup Time Settings on p 3 30 for how to set up the startup time Press Done press or until SNTP Settings appears press SNTP Settings Press NTP Server Check OK is displayed if time synchronization is working correctly via SNTP NOTE If Error is displayed check the settings for NTP Server Address set in step 15 Even if you perform NTP Server Check time settings are not updated Check that communicatio...

Page 75: ...age Enter the System Manager ID and Password using the numeric keys appears on the touch panel display enter the System Manager ID and password For instructions on how to enter the System Manager ID and password see Chapter 2 Basic Operations in the Reference Guide 3 Press Network Settings ...

Page 76: ...using the machine s own SMTP receiving function Register the host name of the machine with the DNS server Press On for SMTP Receipt press Off for POP Press E mail Address enter the e mail address your machine will use You can specify any user name the part of the address located in front of the symbol Enter the host name after the symbol in the e mail address Input Example ifax host_name organizat...

Page 77: ...r IP address or name Input Example IP address 192 168 1 1 Name pop_server organization company com Press POP Address enter the login name for access to the POP server Input Example account1 Press POP Password enter the password for access to the POP server Press and or use numeric keys to set POP Interval at the interval you want the POP server to check for incoming e mail If the interval is set t...

Page 78: ...port SSL encryption data is not encrypted when On is selected for Allow SSL POP Press OK The display returns to the E mail I Fax screen 6 Specify the mail server for sending e mail I faxes If you are using an SMTP server that requires POP before SMTP method for authenticating users who have logged in the POP server before sending e mail Press SMTP Server enter an SMTP server IP address or name Inp...

Page 79: ...ganization company com Press Authent Encryption press On for SMTP Authentication SMTP AUTH press Off for POP Authentication before Sending Press User enter the user name used for logging in to the SMTP server If you are using the Microsoft SMTP server enter a user name in User using the following format user name domain name Input Example user organization company com Press Password enter the pass...

Page 80: ...en closes 9 Restart the machine Turn OFF the machine wait at least 10 seconds and then turn it ON again NOTE For instructions on how to turn ON OFF the machine see Chapter 1 Before You Start Using This Machine in the Reference Guide The e mail I fax settings are complete Startup Time Settings If you connect the machine to a switching hub it may not be able to connect to a network even though your ...

Page 81: ...up Time Settings 3 Set the time period required to delay the startup of network communications for the machine Press or to set the time period 4 Confirm the settings you specified press OK The display returns to the Network Settings screen 5 Press Done repeatedly until the Additional Functions screen closes ...

Page 82: ...art the machine Turn OFF the machine wait at least 10 seconds and then turn it ON again NOTE For instructions on how to turn ON OFF the machine see Chapter 1 Before You Start Using This Machine in the Reference Guide The startup time settings are complete ...

Page 83: ...ding on the print application used for printing or sending a fax Use the following information as a guide to determine the print application you are using and then perform the necessary operations LPD This is the print application generally used with TCP IP See Printer Connection Method LPD Raw on p 3 35 Raw This is a print application used with Windows It can send a job to the machine at higher s...

Page 84: ...lay the Canon LPR2 User s Guide see the Network Quick Start Guide If Windows NT 2000 XP Server 2003 is on your network the following procedure enables you to set up a print server for more efficient management of network printers Once a print server is set up print jobs can be managed by the print server Also by setting up an alternate driver for the print server printer drivers can be installed i...

Page 85: ... the PS Driver Guide If you want to use the UFR printer driver See the procedure for dynamic installation in Chapter 2 Getting Started in the UFR Driver Guide If you want to use the fax driver See the procedure for dynamic installation in Chapter 2 Getting Started in the Fax Driver Guide IMPORTANT If your computer fails to transmit data to the printer during installation of the driver when the err...

Page 86: ...ol settings DIRECT The machine prints without spooling a print job on the hard disk regardless of its spool settings The installation of the driver and the port settings is complete Windows 2000 XP Server 2003 Installing a New Driver 1 Install the driver Install the driver according to the following procedures indicated in the manual for each driver If you want to use the PCL printer driver See th...

Page 87: ... Canon LPR2 the port changes are complete IMPORTANT If you want to use LPD enter one of the following in LPR Queue Name in the Add Port dialog box of Canon LPR2 LP The machine prints according to its spool settings Normally enter LP as a print queue SPOOL The machine prints only after spooling a print job on the hard disk regardless of its spool settings DIRECT The machine prints without spooling ...

Page 88: ... click the icon of the printer you installed click Properties 4 Click the Ports tab to display the Ports sheet 5 Click Add Port to open the Printer Ports dialog box 6 From Available ports types select Standard TCP IP Port click New Port The Add Standard TCP IP Printer Port Wizard starts 7 Click Next ...

Page 89: ...the Completing the Add Standard TCP IP Printer Port Wizard window appears click Finish If the dialog box displays Additional Port Information Required follow the instructions on the screen to search again or click Standard click Canon Network Printing Device with P9100 under Device type click Next to exit the Wizard 9 Click Close to close the Printer Ports dialog box 10 If you want to use LPD chan...

Page 90: ... The following three print queues are available LP The machine prints according to its spool settings Normally enter LP as a print queue SPOOL The machine prints only after spooling a print job on the hard disk regardless of its spool settings DIRECT The machine prints without spooling a print job on the hard disk regardless of its spool settings 11 Click OK The installation of the driver and the ...

Page 91: ...ck the Services tab to display the Services sheet If Microsoft TCP IP Printing is not included in Network Services proceed to step 2 otherwise skip to step 3 2 If Microsoft TCP IP Printing is not installed install it Click Add Select Microsoft TCP IP Printing from Network Services click OK When asked to insert the Windows NT setup disk insert the disk After the files have been copied the Network d...

Page 92: ...e will be set to LP if the driver has been installed according to the above procedures This machine enables you to specify print queues other than LP For details on print queues and instructions on how to change the settings see Changing the Port after Installing the Driver on p 3 42 Changing the Port after Installing the Driver 1 Install Canon LPR2 and change the port settings If you do not want ...

Page 93: ...e steps 2 to 9 2 On the Start menu point to Settings click Printers 3 Right click the icon of the printer you installed click Properties 4 Click the Ports tab to display the Ports sheet 5 Click Add Port to open the Printer Port dialog box 6 From Available Printer Ports select LPR Port click New Port The Add LPR compatible printer dialog box opens IMPORTANT If LPR Port is not displayed you need to ...

Page 94: ...ue on that server The following three print queues are available LP The machine prints according to its spool settings Normally enter LP as a print queue SPOOL The machine prints only after spooling a print job on the hard disk regardless of its spool settings DIRECT The machine prints without spooling a print job on the hard disk regardless of its spool settings 9 Click OK The installation of the...

Page 95: ...ng Solaris 1 x Add the following to the etc printcap file Print queue name comment Input Example print_queue_name comments Example using Solaris 2 x Start the admintool utility Select Browse Printers Select Edit Add Access to Printer In Printer Server enter the IP address or printer host name Click OK lp device special file sd spool directory rm printer IP address or host name lp var spool print_q...

Page 96: ...ine prints without spooling a print job on the hard disk regardless of its spool settings When the job record appears on the touch panel display of this machine unknown may be displayed as Document Name and User Name of printing data transmitted to this machine over UNIX network To display the job record press System Monitor Print Log on the touch panel display in this order The print settings are...

Page 97: ...e 3 Install the driver Install the driver according to the following procedures indicated in the manual for each driver If you want to use the PCL printer driver See the procedure for standard installation in Chapter 2 Getting Started in the PCL Driver Guide If you want to use the PS printer driver See the procedure for standard installation in Chapter 2 Getting Started in the PS Driver Guide If y...

Page 98: ...r more information see the Canon LPR2 User s Guide PDF manual For instructions on how to display the Canon LPR2 User s Guide see the Network Quick Start Guide 1 Check the settings for RX Print Range in IP Address Range Settings to see whether the IP address of the computer in which a driver is to be installed is permitted See step 21 in TCP IP Settings on p 3 4 IMPORTANT If the settings for RX Pri...

Page 99: ...Home Edition On the Start menu click Control Panel Click Printers and Other Hardware click Printers and Faxes In the Printer Tasks menu select Add a printer If you are using Windows Server 2003 On the Start menu click Printers and Faxes Double click the Add a printer icon 3 Enter the URL of your printer Click Next A dialog box for selecting the printer connection method appears If you are using Wi...

Page 100: ... a printer on the Internet or on a home or office network Enter the following URL in URL http the IP address or host name of the machine ipp Click Next A dialog box for selecting the printer manufacturer and printer name appears Click Have Disk specify the folder on the CD ROM that contains the printer driver 4 Follow the instructions on the screen to complete the installation The installation of ...

Page 101: ...r Since jobs uploaded to the FTP server are printed without passing through a printer driver if you upload application data it does not pass through a printer driver and therefore will never be printed correctly The following is the procedure for printing via FTP 1 Go to the MS DOS prompt or the Command prompt log in to the machine s FTP server For details on user names and passwords see step 16 i...

Page 102: ...ser_name User login 331 Password required to login Password Enter password 230 User user_name logged in ftp bin Set file type 200 Type set to IMAGE binary ftp put print txt Upload print file 200 PORT command successful 150 Opened BINARY data connection for file transfer 226 Transfer complete ftp bye Cut off server connection 221 Server closing down connection You cannot perform manipulation of fil...

Page 103: ...hared folder see Setting Up a Computer as a File Server in Chapter 5 Using a NetBIOS Network See p 5 16 IMPORTANT To send data from the machine the optional equipment must be installed For the equipment needed see Optional Equipment and System Environment Requirements on p 1 2 Samba 2 2 8a or later is supported This section describes only the procedures for setting up a computer to receive data se...

Page 104: ...ires the installation of Microsoft Internet Information Services 6 0 IIS 6 0 If IIS is not installed in the computer you are using you will need to install IIS before entering these settings For installation procedures see the manuals provided with your operating system Verification of users for access to FTP servers is done by referencing the local account database of Windows 2000 Server XP Profe...

Page 105: ...f you are using Windows Server 2003 on the Start menu point to Administrative Tools click Internet Information Services Manager 3 Enter the FTP site settings Right click the Default FTP Site icon click Properties In Windows Server 2003 the Default FTP Site icon is displayed under FTP Sites In the Default FTP Site Properties dialog box click the Security Accounts tab to display the Security Account...

Page 106: ...ry sheet select both Read and Write Click OK to close the Default FTP Site Properties dialog box 4 Confirm Full computer name If you are using Windows 2000 Right click the My Computer icon on the screen click Properties Click the Network Identification tab to display the Network Identification sheet confirm Full computer name ...

Page 107: ...ck Properties Click the Computer Name tab to display the Computer Name sheet confirm Full computer name Click Cancel to close the dialog box 5 Set up the users and passwords for access to the FTP server If you are using Windows 2000 right click the My Computer icon click Manage If you are using Windows XP Server 2003 on the Start menu right click My Computer click Manage The Computer Management wi...

Page 108: ...r name enter the password in Password re enter the password in Confirm Password Enter a user name and a password not longer than 24 alphanumeric characters If User must change password at next logon is selected any new users added must change their passwords in order to send data from the machine You cannot change the password from the control panel Confirm the settings click Create Close the Comp...

Page 109: ...sing the control panel Sample recipient setting Server side settings The machine s recipient settings Full Computer Name starfish organization company com Create a directory named share in the specified FTP server s home directory lnetpub ftproot and then set share as the data destination Protocol FTP Host Name starfish organization company com File Path share User User name entered in step 5 Pass...

Page 110: ...ify recipient address settings see Chapter 2 Basic Sending Methods in the Sending and Facsimile Guide The settings for sending data to the FTP server are complete Windows NT 4 0 IMPORTANT It is recommended that the network manager configure Windows NT Server 4 0 The use of Windows NT Server as an FTP server requires the installation of Microsoft Internet Information Server 4 0 IIS 4 0 If IIS 4 0 i...

Page 111: ...NOTE Depending on your environment the access rights settings for a drive or directory may differ For details see the Windows NT Server 4 0 manual 2 Start IIS 4 0 3 Enter the FTP site settings Right click the Default FTP Site icon click Properties In the Default FTP Site Properties dialog box click the Security Accounts tab to display the Security Accounts sheet deselect Allow Anonymous Connection...

Page 112: ...isplay the Home Directory sheet select both Read and Write Click OK to close the Default FTP Site Properties dialog box 4 Confirm Host Name and Domain Right click the Network Neighborhood icon on the screen click Properties In the Network dialog box click the Protocols tab to display the Protocols sheet ...

Page 113: ...s a File Server 3 63 3 Using a TCP IP Network In Network Protocols double click TCP IP Protocol Click the DNS tab to display the DNS sheet confirm the host name and domain settings Click Cancel to close the Network dialog box ...

Page 114: ...ger than 24 alphanumeric characters If User Must Change Password at Next Logon is selected any new users added must change their password in order to send data from the machine You cannot change the password from the control panel Confirm the settings you entered click Add Exit the User Manager 6 Set a recipient address using the control panel Sample recipient setting Server side settings set usin...

Page 115: ...e control panel Use strings no more than 128 characters long for the corresponding items on the server If you switch the language of the touch panel display Host Name and File Path may not be displayed correctly If the FTP port number is set to a value other than 21 specify the following for Host Name IP address of FTP server Port number Example 192 168 1 21 21000 NOTE For instructions on how to s...

Page 116: ...your network manager 1 Log in to a workstation as a superuser 2 Set up the users who send documents from the machine and their passwords Enter a user name and a password not longer than 24 alphanumeric characters 3 Create a shared directory to be used for recipient addresses and then enable read access and write access by the users who will be sending data 4 Set a recipient address using the contr...

Page 117: ...or the corresponding items on the server If you switch the language of the touch panel display Host Name and File Path may not be displayed correctly If the FTP port number is set to a value other than 21 specify the following for Host Name IP address of FTP server Port number Example 192 168 1 21 21000 NOTE For instructions on how to specify recipient address settings see Chapter 2 Basic Sending ...

Page 118: ... Users window enter the name of the user to whom you want to send data from the machine through Mac OS X enter the password Enter a user name and a password not longer than 24 alphanumeric characters Close the Users window 4 Create a shared folder to which files are to be sent Sample setting Create a folder named iR_Folder in the Public folder in the Home folder 5 Grant access to the shared folder...

Page 119: ... more than 128 characters long for the item If you switch the language of the touch panel display Host Name and File Path may not be displayed correctly If the FTP port number is set to a value other than 21 specify the following for Host Name IP address of FTP server Port number Example 192 168 1 21 21000 NOTE For instructions on how to specify recipient address settings see Chapter 2 Basic Sendi...

Page 120: ...P server for iW Gateway export destination data For details about the settings see the iW Gateway User s Guide IMPORTANT A DNS server is needed to use an FQDN format for example starfish organization company com for the FTP server address A DNS server is also required if the machine and the FTP server are in the same subnet If you have not set up a DNS server use IP addresses Up to 128 alphanumeri...

Page 121: ...rs enter the System Manager ID in User Name and password in Password If you switch the language of the touch panel display Host Name and File Path may not be displayed correctly If the FTP port number is set to a value other than 21 specify the following for Host Name IP address of FTP server Port number Example 192 168 1 21 21000 NOTE For instructions on how to specify recipient address settings ...

Page 122: ...Setting Up a Computer as a File Server 3 72 3 Using a TCP IP Network ...

Page 123: ...Setup Procedures 4 2 NetWare Print Service Settings 4 3 Types of Print Service 4 4 Setup Using NetWare Administrator or PCONSOLE 4 5 Protocol Settings 4 9 Settings from the Control Panel 4 9 Setting Up a Computer for Printing Sending a Fax 4 17 Connecting to a NetWare Network 4 17 Printer Connection Method 4 17 Setting Up a Computer as a File Server 4 18 ...

Page 124: ...le Canon utility 3 Computer Settings for Printing See Setting Up a Computer for Printing Sending a Fax on p 4 17 Specify the settings of each computer you use for printing or sending a fax To print or send a fax from a computer the optional equipment must be installed For the equipment needed see Optional Equipment and System Environment Requirements on p 1 2 4 Computer Settings for a File Server ...

Page 125: ...Client NetWare Client by Novell installed To specify the print service settings using NetSpot Console the computer with NetSpot Console installed must have Novell Client NetWare Client by Novell installed and TCP IP protocol must be supported by your network environment The following procedures describe a sample NetWare setup Depending on your environment the actual setup procedure may differ NOTE...

Page 126: ...ppropriate mode according to the network environment you are using If you are using NetWare 3 2 only the Bindery mode is available Queue Server Mode and Remote Printer Mode The machine supports both the queue server mode and the remote printer mode Queue Server Mode If the machine is used in the queue server mode all print server functions are provided by the machine itself no other print server h...

Page 127: ...erver from the list box Under Printer enter the printer name in Name From Type select the printer connection method If you are using the queue server mode select Other Unknown from Type If you are using the remote printer mode select Parallel from Type click Communication to open the Parallel Communication dialog box select LPT1 from Port and Manual load under Connection type Under Interrupts spec...

Page 128: ... a print server yet set up the print server On the Available Options menu select Print Server Information press ENTER on the keyboard Press INSERT on the keyboard Enter the name of the print server you are setting up press ENTER on the keyboard Press ESC on the keyboard to return to the Available Options menu NOTE Be sure to remember the name of the print server You need it to specify the printer ...

Page 129: ...he number of the printer you want to use press ENTER on the keyboard 5 Specify the printer name type etc In Name enter the name you want to use for the printer press ENTER on the keyboard If you are using the queue server mode select Defined elsewhere from Type If you are using the remote printer mode select Remote Parallel LPT1 from Type Specify the remaining items press ESC on the keyboard In th...

Page 130: ... server If you are using a NetWare file server as a print server enter LOAD PSERVER NLM print server name on the file server press ENTER on the keyboard If you are using a dedicated print server enter PSERVER EXE enter the print server name on the print server press ENTER on the keyboard NOTE This step is not required if you are using the queue server mode NetWare print service settings are comple...

Page 131: ...th NetSpot Device Installer or NetSpot Console see Network Setting Items on p 9 2 The following procedure describes sample settings using the control panel NOTE For instructions on how to enter settings using a web browser Remote UI see Chapter 3 Customizing Settings in the Remote UI Guide For more information on NetSpot Device Installer or NetSpot Console see Chapter 7 Using the Network and Devic...

Page 132: ...message Enter the System Manager ID and Password using the numeric keys appears on the touch panel display enter the System Manager ID and password For instructions on how to enter the System Manager ID and password see Chapter 2 Basic Operations in the Reference Guide 3 Press Network Settings ...

Page 133: ...NetWare 6 Select the frame type for your environment from the Frame Type drop down list If you select Auto Detect the frame type is automatically determined 7 Select the print service from the Print Service drop down list Specify the same settings specified in NetWare Print Service Settings on p 4 3 ...

Page 134: ...cify the print service settings either by selecting the desired options from the list on the screen displayed by pressing Browse or by entering the desired character string for each item To select from the Browse screen proceed to step 9 to enter character strings skip to step 10 9 On the Browse screen specify the print service details Specify the same tree context file server and print server nam...

Page 135: ...ing NDS PServer or NPrinter If the browse right is limited to the specific user Press Browse In the Browse screen select the tree to which you log in press Down Select the context to which you log in press Down repeatedly if necessary Press Log In If the browse right is limited to the specific user it is necessary to log in to NetWare as a user to whom the browse right is granted In the Enter Netw...

Page 136: ... Down In the Enter Network Password screen enter the name and password of a user on the file server press OK If the password is not specified leave Password blank Select the desired print server press OK For Bindery PServer specify each item on the screen for setting Bindery PServer if necessary Press OK to return to the screen for setting NetWare Press OK Skip to step 11 IMPORTANT If you use Brow...

Page 137: ... the name of the tree to which the desired print server belongs Press Context to enter the name of the context to which the desired print server belongs For NDS PServer specify each of the other items if necessary Press OK to return to the screen for setting NetWare Press OK Setting Bindery PServer or RPrinter Press Print Server to enter the name of the desired print server Press File Server to en...

Page 138: ...12 Restart the machine Turn OFF the machine wait at least 10 seconds and then turn it ON again NOTE For instructions on how to turn ON OFF the machine see Chapter 1 Before You Start Using This Machine in the Reference Guide The protocol settings are complete ...

Page 139: ...rating system manuals Printer Connection Method Install the driver according to the following procedures indicated in the manual for each driver If you want to use the PCL printer driver See the procedure for standard installation in Chapter 2 Getting Started in the PCL Driver Guide If you want to use the PS printer driver See the procedure for standard installation in Chapter 2 Getting Started in...

Page 140: ... Frame type suitable for your environment This section describes only the procedures for setting up a computer receiving data sent from the machine To send data from the machine to a server on the network you must enter an address setting from the control panel For instructions on how to specify recipient address settings see Chapter 2 Basic Sending Methods in the Sending Guide In some environment...

Page 141: ...t address settings You can select the desired values from the list displayed by pressing Browse Or you can press each key to enter the desired value for each item Sample recipient settings NDS Mode Example If you send data to the data under share_vol in the above tree structure the settings of the host name and the file path differ depending on the location of a user account ...

Page 142: ...EE CANON File Path share_vol data User CN jenkins Password Password for the above user Host Name SALES_US SALES TREE CANON File Path share_vol SALES_JP data One dot is required before data User CN john Password Password for the above user Host Name SALES TREE CANON File Path share_vol SALES_JP data User CN smith Password Password for the above user Host Name Tokyo MARKETING TREE CANON File Path sh...

Page 143: ...ame specify the context by which a user logs in For the file path specify the relative path from the user context You may omit the xx portion but the TREE portion with the tree name may not be omitted Enter a user name prefixed with CN Unless the same directory tree contains the user account name by which a user logs in and the volume object to which data is sent dots are required according to the...

Page 144: ...Setting Up a Computer as a File Server 4 22 4 Using a NetWare Network Windows ...

Page 145: ...2 Protocol Settings 5 3 Settings from the Control Panel 5 3 Setting Up a Computer for Printing Sending a Fax 5 10 Connecting to a TCP IP Network 5 10 Connecting to a NetBIOS Network 5 10 Printer Connection Method 5 14 Setting Up a Computer as a File Server 5 16 Connecting to a TCP IP Network 5 16 Connecting to a NetBIOS Network and Configuring a Shared Folder 5 17 ...

Page 146: ...n p 1 2 3 Computer Settings for a File Server See Setting Up a Computer as a File Server on p 5 16 Specify the settings of the computer receiving data sent from the machine To send data the optional equipment must be installed For the equipment needed see Optional Equipment and System Environment Requirements on p 1 2 IMPORTANT If you are using the optional Color Network Printer Unit for steps 1 a...

Page 147: ...t Console For details about items that can be set with NetSpot Device Installer or NetSpot Console see Network Setting Items on p 9 2 NOTE For instructions on how to enter settings using a web browser Remote UI see Chapter 3 Customizing Settings in the Remote UI Guide For more information on NetSpot Device Installer or NetSpot Console see Chapter 7 Using the Network and Device Settings with Utilit...

Page 148: ...e with WINS specify the WINS settings that follow NOTE WINS Windows Internet Name Service is a service for associating a NetBIOS name which is a computer name or printer name on a NetBIOS network with an IP address To use WINS a WINS server is required 1 Press 2 Press System Settings NOTE If the message Enter the System Manager ID and Password using the numeric keys appears on the touch panel disp...

Page 149: ...ss SMB Settings 5 If you want to print or send a fax via a NetBIOS network select On for Use SMB IMPORTANT To print or send a fax from a computer the optional equipment must be installed For the equipment needed see Optional Equipment and System Environment Requirements on p 1 2 ...

Page 150: ...o workgroup on your environment create a workgroup in the Windows environment and then enter the workgroup name IMPORTANT You cannot enter the domain name as the workgroup name Enter the printer name of up to 12 characters in Printer when printing from Windows NT You cannot enter a character string including blanks in Server Printer and Workgroup 7 Press Comment Enter a comment about the printer i...

Page 151: ...d to enable the LAN Manager to refer to the machine If the LAN Manager does not have to refer to the machine you can control the traffic over your network by selecting Off 9 Confirm the settings you specified press OK The display returns to the Network Settings screen 10 To specify the WINS settings press TCP IP Settings Otherwise skip to step 16 11 Press WINS Configuration ...

Page 152: ...le 14 Specify the Scope ID setting Enter the scope ID if necessary The scope ID is an identifier for determining the range available to a printer or computer Regardless of the WINS Configuration setting a scope ID is referred to from the network IMPORTANT If you set a scope ID the machine cannot communicate with any computer whose scope ID is different from the scope ID you set here If any scope I...

Page 153: ...tional Functions screen closes 17 Restart the machine Turn OFF the machine wait at least 10 seconds and then turn it ON again NOTE For instructions on how to turn ON OFF the machine see Chapter 1 Before You Start Using This Machine in the Reference Guide The protocol settings are complete ...

Page 154: ...hat use the machine for printing or sending a fax must have TCP IP client software installed and must be enabled for TCP IP network use For details see the manuals provided with the operating system Connecting to a NetBIOS Network All computers that use the machine for printing or sending a fax must be enabled for NetBIOS network use See the procedures referenced below to set the computers Windows...

Page 155: ...etwork components are installed confirm that both Client for Microsoft Networks and File and printer sharing for Microsoft Networks appear If not click Add to install these components Select TCP IP from The following network components are installed click Properties The TCP IP Properties dialog box appears on the screen Click the Bindings tab to display the Bindings sheet Select Client for Microso...

Page 156: ...ctions window opens In the case of Windows XP the Network Connections window opens Right click the Local Area Connection icon click Properties The Local Area Connection Properties dialog box opens Confirm that Client for Microsoft Networks File and Printer Sharing for Microsoft Networks and Internet Protocol TCP IP are all selected If any of these functions are not selected select them now Double ...

Page 157: ... the NetBIOS settings Right click the Network Neighborhood icon displayed on the screen click Properties Click the Services tab to display the Services sheet Then confirm that NetBIOS Interface and Server appear in Network Services If not click Add to install them Click OK Restart the computer if prompted ...

Page 158: ... the PCL Driver Guide If you want to use the PS printer driver See the procedure for alternative printer driver installation in Chapter 2 Getting Started in the PS Driver Guide If you want to use the UFR printer driver See the procedure for alternative printer driver installation in Chapter 2 Getting Started in the UFR Driver Guide If you want to use the fax driver See the procedure for alternativ...

Page 159: ... procedure for standard installation in Chapter 2 Getting Started in the PS Driver Guide If you want to use the UFR printer driver See the procedure for standard installation in Chapter 2 Getting Started in the UFR Driver Guide If you want to use the fax driver See the procedure for standard installation in Chapter 2 Getting Started in the Fax Driver Guide When the dialog box for selecting the por...

Page 160: ... data sent from the machine To send data from the machine to a server on the network you must enter an address setting from the control panel For instructions on how to specify recipient address settings see Chapter 2 Basic Sending Methods in the Sending and Facsimile Guide The following procedures describe a sample shared folder configuration Depending on your environment the actual configuration...

Page 161: ...In the following procedures items displayed on the screen for Windows 98 are used items might differ depending on your operating system 1 Specify the NetBIOS settings Right click the Network Neighborhood icon displayed on the screen click Properties In The following network components are installed confirm that both Client for Microsoft Networks and File and printer sharing for Microsoft Networks ...

Page 162: ...he Access Control tab select the level of access control If you select User level access control specify a domain in which a list of users and groups is saved In the Network dialog box click the Identification tab to display the Identification sheet Confirm the computer name Click OK to close the Network dialog box ...

Page 163: ...sheet select Shared As enter the share name in Share Name For Access Type select either Full or Depends on Password Enter a password If Depends on Password is selected enter the password for full access Up to 14 alphanumeric characters can be entered for the password Confirm the settings you entered click OK If User level access control is selected Right click the folder you want to share using Ex...

Page 164: ...ws 98 Me manual Confirm the settings you entered click OK Click OK to close the properties dialog box of the shared folder 3 Set a recipient address using the control panel There are two methods for specifying the recipient address settings You can select the desired values from the list displayed by pressing Browse Or you can press each key to enter the desired value for each item Sample recipien...

Page 165: ... able to browse the directories If the language of the touch panel display differs from the computer used as a master browser Host name and File path may not be displayed correctly or you may not be able to browse the directories NOTE You can send data using the following formats A DNS server is required for the latter case 192 168 2 100 share host_name organization company com share You can also ...

Page 166: ...ning Windows 2000 XP Server 2003 1 Log on to Windows as Administrator 2 Specify the NetBIOS settings If you are using Windows 2000 right click the My Network Places icon on the screen click Properties If you are using Windows XP on the Start menu right click My Network Places click Properties If you are using Windows Server 2003 on the Start menu click Control Panel Network Connections In the case...

Page 167: ... the Internet Protocol TCP IP Properties dialog box In the General sheet click Advanced Click the WINS tab and then in the WINS sheet select Enable NetBIOS over TCP IP Click OK until all the dialog boxes are closed Restart the computer if prompted 3 Confirm the computer name If you are using Windows 2000 Right click the My Computer icon click Manage The Computer Management window opens Right click...

Page 168: ...ows XP Server 2003 On the Start menu right click My Computer click Properties Click the Computer Name tab to display the Computer Name sheet Click Change More in the Computer Name Changes dialog box In the DNS Suffix and NetBIOS Computer Name dialog box confirm NetBIOS computer name Click Cancel until all the dialog boxes are closed 4 Set up the users and passwords for access to the shared folder ...

Page 169: ...me in User name enter the password in Password re enter the password in Confirm Password Up to 20 alphanumeric characters can be entered for the user name and up to 14 for the password If User must change password at next logon is selected any new users added must change their passwords in order to send data from the machine You cannot change the password from the control panel Confirm the setting...

Page 170: ... In the Active Directory environment the procedures for setting up users differ from the above For details see the Windows manual 5 Configure the shared folder Right click the folder you want to share using Explorer click Properties On the Sharing sheet select Share this folder enter the share name in Share name ...

Page 171: ... or a higher access authority Click OK close the properties dialog box of the shared folder NOTE To display the Security tab in Windows XP open Folder Options deselect Use simple file sharing However you can share folders and files with Use simple file sharing selected Select or deselect Use simple file sharing to suit your environment For details about the settings see the manual provided with Wi...

Page 172: ...and send data in the Windows Server 2003 Active Directory environment you must first specify this setting 7 Set a recipient address using the control panel There are two methods for specifying the recipient address settings You can select the desired values from the list displayed by pressing Browse Or you can press each button to enter the desired value for each item Sample recipient setting Serv...

Page 173: ... language of the touch panel display Host Name and File Path may not be displayed correctly or you may not be able to browse the directories If the language of the touch panel display differs from the computer used as a master browser Host name and File path may not be displayed correctly or you may not be able to browse the directories If you send data in the Windows 2000 XP Server 2003 Active Di...

Page 174: ...2003 computer that belongs to a domain containing Windows 2000 Server 2003 domain controllers For instructions on how to specify recipient address settings see Chapter 2 Basic Sending Methods in the Sending and Facsimile Guide The settings for sending data to the shared folder are complete Windows NT 4 0 IMPORTANT It is recommended that the network manager configure Windows NT Server 4 0 NOTE Wind...

Page 175: ...nterface and Server appear in Network Services If not click Add to install them Click the Protocols tab to display the Protocols sheet confirm that TCP IP Protocol appears in Network Protocols If not click Add to install it Click the Identification tab to display the Identification sheet confirm the computer name Click OK to close the dialog box ...

Page 176: ...ord in Password re enter the password in Confirm Password enter additional information if necessary Up to 20 alphanumeric characters can be entered for the user name and up to 14 for the password If User Must Change Password at Next Logon is selected any new users added must change their password in order to send data from the machine You cannot change the password from the control panel Confirm t...

Page 177: ... users or groups you want to give access to the shared folder to select either Change or Full Control from Type of Access click OK To create a shared folder on an NTFS format disk click the Security tab In the Security sheet click Permission to open the Directory Permission dialog box Select or add the users or groups you want to give access to the shared folder to For each user or group select Ad...

Page 178: ...server using no more than their allowable number of characters If you change the language of the touch panel display Host Name and File Path may not be displayed correctly or you may not be able to browse the directories If the language of the touch panel display differs from the computer used as a master browser Host name and File path may not be displayed correctly or you may not be able to brow...

Page 179: ...ds Set a user name not longer than 20 alphanumeric characters and a password not longer than 14 alphanumeric characters 3 Set a recipient address using the control panel There are two methods for specifying the recipient address settings You can select the desired values from the list displayed by pressing Browse Or you can press each key to enter the desired value for each item Sample recipient s...

Page 180: ...hanumeric characters can be entered Enter each of these items on the server using no more than their allowable number of characters If you change the language of the touch panel display Host Name and File Path may not be displayed correctly or you may not be able to browse the directories If the language of the touch panel display differs from the computer used as a master browser Host name and Fi...

Page 181: ...ame up to 15 alphanumeric characters for the domain name and up to 20 for the user name user_name organization company com up to 128 characters in total Note that the latter is only applicable when sending to a Windows 2000 XP Server 2003 computer that belongs to a domain containing Windows 2000 Server 2003 domain controllers For instructions on how to specify recipient address settings see Chapte...

Page 182: ...Setting Up a Computer as a File Server 5 38 5 Using a NetBIOS Network ...

Page 183: ... This chapter describes settings and procedures for printing via an AppleTalk network AppleTalk Network Setup Procedures 6 2 Macintosh Network Settings 6 3 Protocol Settings 6 4 Settings from the Control Panel 6 5 Setting Up a Computer for Printing 6 8 ...

Page 184: ... browser NetSpot Console Canon utility 3 Macintosh Print Settings See Setting Up a Computer for Printing on p 6 8 Specify the settings for each computer you use for printing IMPORTANT If you are using the optional Color Network Printer Unit see the manual provided with the optional Color Network Printer Unit To print from a computer the optional equipment must be installed For the equipment needed...

Page 185: ...ck that Active is selected under AppleTalk If Inactive is selected select Active 2 Check that the AppleTalk connection method is Ethernet On the Apple menu point to the control panels click AppleTalk Set the selection to Ethernet Close the AppleTalk dialog to save the setting NOTE In an environment connecting to Ethernet through LocalTalk select Printer Port The Macintosh network settings are comp...

Page 186: ...gure settings with software other than the control panel of the machine TCP IP protocol must be supported by your network environment Some items cannot be set using NetSpot Device Installer or NetSpot Console For details about items that can be set with NetSpot Device Installer or NetSpot Console see Network Setting Items on p 9 2 The following procedure describes sample settings using the control...

Page 187: ...is installed on the machine Settings from the control panel become effective when the machine is restarted after the procedure NOTE For instructions on how to enter characters using the touch panel display see Chapter 2 Basic Operations in the Reference Guide 1 Press 2 Press System Settings NOTE If the message Enter the System Manager ID and Password using the numeric keys appears on the touch pan...

Page 188: ...Protocol Settings 6 6 6 Using an AppleTalk Network Macintosh 3 Press Network Settings 4 Press AppleTalk Settings 5 Select On for AppleTalk Selecting Off disables AppleTalk ...

Page 189: ...ou are using a network that is set up in zones enter the name of the zone You can also enter a zone name by pressing Browse and selecting the appropriate name from the displayed list 8 Confirm the settings you specified press OK 9 Press Done repeatedly until the Additional Functions screen closes 10 Restart the machine Turn OFF the machine wait at least 10 seconds and then turn it ON again NOTE Fo...

Page 190: ...de to install the printer driver and to set the port IMPORTANT To print from a computer the optional equipment must be installed For the equipment needed see Optional Equipment and System Environment Requirements on p 1 2 NOTE Select either one of the following names displayed in the Chooser xxx indicates the name of the printer entered in Service Name xxx_D the print job is printed without spooli...

Page 191: ...7 1 CHAPTER 7 Using the Network and Device Settings with Utilities This chapter describes the utilities used for managing networks and printers NetSpot Device Installer 7 2 NetSpot Console 7 3 ...

Page 192: ...vailable on the CD ROM NetSpot Device Installer can be accessed directly without installation enabling network users to quickly and easily specify the initial settings of network devices For the system requirements for NetSpot Device Installer and instructions on how to install the software see the Readme file for NetSpot Device Installer For instructions on how to display the Readme file see the ...

Page 193: ... information about network devices using a web browser such as list or map display of devices detailed protocol settings display and notification of device status and job manipulations For the system requirements for NetSpot Console and instructions on how to install the software see the NetSpot Console User s Guide or Readme file For instructions on how to display the NetSpot Console User s Guide...

Page 194: ...NetSpot Console 7 4 7 Using the Network and Device Settings with Utilities ...

Page 195: ...TER 8 Troubleshooting This chapter describes how to resolve printing problems Network Connection Problems and Remedies 8 2 Printing Problems and Remedies 8 4 Data Sending File Sharing Problems and Remedies 8 9 ...

Page 196: ... connects to other than the intended destination depending on the settings of the machine or dial up router including the following examples this may result in subscriber line charges and call charges Examples The file or mail server s host name or IP address set on the machine does not exist on the network The DNS server exists on an external network You attempt to access a device connected to an...

Page 197: ...gs do not permit the IP address of a computer on which a web browser Remote UI or utility is used you cannot set the machine setting items or browse information on the machine Check the settings for Setting Browsing Range in IP Address Range Settings See step 21 in TCP IP Settings on p 3 4 Cause 2 Use SNMP or Enable Dedicated Port Settings is set to Off Remedy Set Use SNMP and Enable Dedicated Por...

Page 198: ...NetBIOS Network Cause The IP address of the computer in which a driver is to be installed is not permitted by the settings for both RX Print Range and Setting Browsing Range in IP Address Range Settings Remedy If you are using a NetBIOS network and the IP address of the computer in which a driver is to be installed is not permitted by the settings for both RX Print Range and Setting Browsing Range...

Page 199: ...ination in Printer in Control Panel If you are using LPD with Windows 98 Me follow the procedures below to confirm the spool settings On the Start menu point to Settings click Printers Right click the printer icon you are using on the pop up menu click Properties Click the Details tab to display the Details sheet Click Spool Settings to open the Spool Settings dialog box Confirm that Spool print j...

Page 200: ... recognize the machine even though the IP address settings are appropriate This problem may be resolved by delaying the startup of network communications for the machine See Startup Time Settings on p 3 30 Cause 3 The computer that is printing is not properly set up Remedy Check the following Confirm that the proper printer driver is installed If you are printing from Windows each computer must ha...

Page 201: ... the IP address settings are appropriate This problem may be resolved by delaying the startup of network communications for the machine See Startup Time Settings on p 3 30 Cause 3 NetBIOS network is not properly set up Remedy Confirm that SMB and WINS are properly set up Cause 4 The IP address of the computer from which data print fax I fax job is to be sent to the machine is not permitted by the ...

Page 202: ... the Phase to a valid phase type Set the Zone to the zone to which the printer belongs NOTE Your computer may not be able to recognize the machine even though the IP address settings are appropriate This problem may be resolved by delaying the startup of network communications for the machine See Startup Time Settings on p 3 30 Cause 3 The computer that is printing is not properly set up Remedy Ch...

Page 203: ...r UNIX r System V Release 4 0 ready User 192 168 37 195 none user_name User login 331 Password required for user_name Password Enter password 230 User user_name logged in ftp cd export share Move to data destination directory 250 CWD command successful ftp bin Set data transfer type binary 200 Type set to I ftp put sample tif Set transfer file name for verification ftp by Cut off server connection...

Page 204: ...r the name of the server you want to share check that the server is on the network This server name will be Host Name entered when you set up the recipient settings Open the server open the folder for file sharing The path to this folder will be File Path entered when you set up the recipient settings Check that files can be written to this folder NOTE If data cannot be sent or file sharing will n...

Page 205: ... The machine cannot send data while it is receiving a print job Unable to Send Data Share Files Windows and Samba File Sharing Cause File sharing settings for the shared folder are incorrect Remedy Check the following settings On the computer you are using go into Windows Explorer double click Entire Network check that the computer you want to share is listed there You can also check for the compu...

Page 206: ...Data Sending File Sharing Problems and Remedies 8 12 8 Troubleshooting ...

Page 207: ... specifications and index Network Setting Items 9 2 Available Software for Network Settings 9 11 Confirming Settings 9 12 Viewing the Network Access Log 9 13 Specifications 9 14 Ethernet Interface Adaptor 9 14 Token Ring Network Interface Adaptor 9 15 Index 9 16 ...

Page 208: ... device or a web browser Remote UI to set items which cannot be set using NetSpot Device Installer or NetSpot Console In the following N A stands for Not Applicable TCP IP Settings Item Setting Description Default Setting Can be set in NetSpot Device Installer Can be set in NetSpot Console IP Address Settings IP Address IP address 0 0 0 0 Subnet Mask IP address 0 0 0 0 Gateway Address IP address 0...

Page 209: ...gs Use SNTP On Off Off N A N A NTP Server Address IP address or host name NULL N A N A Polling Interval Interval for performing time synchronization 1 to 48 hours 24 N A N A NTP Server Check N A N A FTP Print Settings Use FTP printing On Off On N A N A User User name for FTP server login 24 Characters maximum NULL N A N A Password Password for FTP server login 24 Characters maximum NULL N A N A Us...

Page 210: ...tion 24 Characters maximum NULL N A N A Use HTTP Use HTTP On Off On N A N A Proxy Settings 2 Use Proxy On Off On N A N A Server Address Server name or IP address 128 Characters maximum NULL N A N A Port Number 1 to 65535 80 N A N A Use Proxy within the Same Domain On Off Off N A N A IP Address Range Settings 3 RX Print Range Reject IP Address es Apply Settings On Off Up to 8 IP addresses can be st...

Page 211: ...ttings 1 Print Server 47 Characters maximum NULL File Server 47 Characters maximum NULL Print Server Password 20 Characters maximum NULL Service Mode Service only currently mounted form Change forms as needed Minimize form changes across print queues Minimize form changes within print queues Minimize form changes within print queues N A Printer Number 0 to 15 0 Polling Interval 1 to 15 seconds 5 P...

Page 212: ...ed Minimize form changes across print queues Minimize form changes within print queues Minimize form changes within print queues N A Printer Number 0 to 254 0 Polling Interval 1 to 255 seconds 5 Printer Form 0 to 255 0 N A Buffer Size 3 to 20 KB units 20 N A NPrinter Settings 1 Print Server 64 Characters maximum NULL Tree 32 Characters maximum NULL Context 256 Characters maximum NULL Printer Numbe...

Page 213: ...taller Can be set in NetSpot COnsole AppleTalk On Off Off N A N A Phase Phase 2 fixed Service Name 32 Characters maximum Model name N A Zone 32 Characters maximum Item Setting Description Default Setting Can be set in NetSpot Device Installer Can be set in NetSpot Console Use SMB On Off On N A Server 15 Characters maximum NULL N A Printer 13 Characters maximum NULL N A Workgroup 15 Characters maxi...

Page 214: ...le Dedicated Port On Off On N A N A Item Setting Description Default Setting Can be set in NetSpot Device Installer Can be set in NetSpot Console Use Spooler On Off Off N A N A Item Setting Description Default Setting Can be set in NetSpot Device Installer Can be set in NetSpot Console Startup Time Settings 0 to 300 seconds 60 N A Item Setting Description Default Setting Can be set in NetSpot Devi...

Page 215: ...n Off Off N A N A LAA 40 00 00 00 00 00 to 7F FF FF FF FF FF 00 00 00 00 00 00 N A N A MAC Address Display only Item Setting Description Default Setting Can be set in NetSpot Device Installer Can be set in NetSpot Console SMTP Receipt On Off On N A N A POP On Off On N A N A SMTP Server Server name or IP address 48 Characters maximum NULL N A N A E mail Address 64 Characters maximum NULL N A N A PO...

Page 216: ...mote UI to set items which cannot be set using NetSpot Device Installer or NetSpot Console SMTP Authentication SMTP AUTH On Off Off N A N A User User name for SMTP authentication 64 Characters maximum NULL N A N A Password Password for SMTP authentication 32 Characters maximum NULL N A N A Allow SSL POP On Off Off N A N A Allow SSL SMTP On Off Off N A N A Item Setting Description Default Setting C...

Page 217: ...ilable Only some of the items can be set See Network Setting Items on p 9 2 Type of Settings The Machine s Control Panel Web Browser Remote UI NetSpot Device Installer NetSpot Console NWADMIN PCONSOLE TCP IP Protocol Settings See p 3 3 NetWare Print Server Settings See p 4 3 NetWare Protocol Settings See p 4 9 NetBIOS Protocol Settings See p 5 3 AppleTalk Protocol Settings See p 6 4 ...

Page 218: ...o confirm the network settings made from the machine s touch panel display To print a user s data list follow the procedure below 1 Press 2 Press Report Settings Network User s Data List 3 When a confirmation screen appears on the touch panel display press Yes The user s data list is printed ...

Page 219: ... follows NOTE For instruction on how to set the machine to permit or reject specific IP addresses see step 21 in TCP IP Settings on p 3 4 1 Press System Monitor 2 Press Print Log 3 Select Network from the drop down list The log pertaining to the rejected IP addresses is displayed NOTE Up to 100 logs can be displayed You can export the log to a CSV format file using the Remote UI For instructions s...

Page 220: ...ase T 100Base TX RJ 45 Protocol Supported TCP IP Frame type Print applications Ethernet II LPD Raw IPP IPX SPX Frame type Print applications Ethernet II Ethernet 802 2 Ethernet 802 3 Ethernet SNAP Auto Detect Bindery PServer NDS PServer RPrinter NPrinter LPD IPP NetBIOS Frame type Print application Ethernet II SMB AppleTalk Frame type Print application Ethernet SNAP PAP Printer Access Protocol ...

Page 221: ...rk Interface 4 16 Mbps Token Ring RJ 45 DB 9 Protocol Supported TCP IP Frame type Print applications Token Ring SNAP LPD Raw IPP IPX SPX Frame type Print applications Token Ring SNAP Token Ring 802 2 Auto Detect Bindery PServer NDS PServer RPrinter NPrinter LPD IPP NetBIOS Frame type Print application Token Ring SNAP SMB ...

Page 222: ...rint Server Password 9 5 Printer Form 9 5 Printer Number 9 5 Service Mode 9 5 Bindery remote printer mode RPrinter 4 4 4 12 BOOTP 3 7 9 2 Buffer Size 9 5 C Checking your network 1 8 Macintosh network 1 10 UNIX network 1 11 Using network with various types of computers 1 12 Windows network 1 8 Comment 5 6 9 7 Communication Mode 2 12 9 8 Full Duplex 2 12 Half Duplex 2 12 Community Name 9 7 Connectin...

Page 223: ...alf Duplex 2 12 Host Name 3 8 9 2 HTTP 3 33 I Interface settings 2 9 IP Address 3 6 3 8 5 8 9 2 IP Address Range Settings 9 4 Permit IP Address es 9 4 Reject IP Address es 9 4 RX Print Range 9 4 Setting Browsing Range 9 4 IP Address Settings 3 6 9 2 BOOTP 9 2 DHCP 9 2 Gateway Address 9 2 IP Address 9 2 RARP 9 2 Subnet Mask 9 2 IPP 3 14 3 33 3 46 IPP Client software 3 46 IPP Settings 9 3 IPP Settin...

Page 224: ...9 Node Number 4 11 9 5 Node Type 9 3 Novell Client 4 3 NPrinter NDS remote printer mode 4 4 4 12 NPrinter Settings 9 6 Context 9 6 Print Server 9 6 Printer Number 9 6 Tree 9 6 NTFS format 5 33 NTP Server Address 9 3 NTP Server Check 9 3 NWADMIN 4 3 P Packet Signature 9 5 Password 9 10 PCONSOLE 4 3 4 5 4 6 Permit IP Address es 9 4 Phase 9 7 PING Command 9 3 Polling Interval 9 5 POP 9 9 POP Address ...

Page 225: ... network 5 10 NetWare network 4 17 TCP IP network 3 33 5 10 Setting Browsing Range 9 4 Setup procedures AppleTalk network 6 2 NetBIOS network 5 2 NetWare network 4 2 Network environment 2 2 TCP IP network 3 2 Setup using NetWare Administrator or PCONSOLE 4 5 NDS queue server mode or remote printer mode 4 5 Queue server mode or remote printer mode in bindery mode 4 6 SMB 3 33 SMB Settings 5 4 5 5 9...

Page 226: ...S Resolution 9 3 WINS Server 9 3 Token Ring 2 9 2 13 6 5 9 15 Token Ring board 2 9 2 16 6 5 Token Ring Settings 2 14 9 9 All Broadcast Request 2 15 9 9 All Broadcast Response Notice 2 15 9 9 LAA Locally Administered Address 2 15 9 9 LAA Mode 2 15 9 9 MAC Address 9 8 Maximum Frame Size 2 15 9 9 Ring Speed and Communication Method 2 14 9 9 Use Source Routing 2 15 9 9 Tree 9 6 Tree name 4 15 Types of...

Page 227: ......
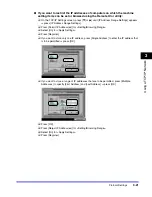
Page 228: ...eurs de l imprimante laser uniquement 102 avenue du General de Gaulle 92257 La Garenne Colombes Cedex France CANON U K LTD Woodhatch Reigate Surrey RH2 8BF United Kingdom CANON DEUTSCHLAND GmbH Europark Fichtenhain A10 47807 Krefeld Germany CANON ITALIA S p A Via Milano 8 20097 San Donato Milanese MI Italy CANON LATIN AMERICA INC 703 Waterford Way Suite 400 Miami Florida 33126 U S A CANON AUSTRALI...

Reviews: