48
To adjust the high-fire setting (DR 2000 – 5000)
One or more manometers should be connected to the
Dynaforce® before proceeding to the next step to monitor the
air and gas signal. Refer to Section 3.7 of this manual for
details on connecting manometers.
After the low fire settings are stable, ramp the boiler firing rate
to 100% using the boiler control and bring the system
temperatures up to 130F or to highest system design
temperatures to minimize or eliminate condensate.
Use the Dynaforce® Control Panel:
1) Press [DIAGNOSTICS] button
2) Press [Diagnostic Tests] button
3) Move the firing rate slider to 100.0%
4) Press [Start Test] to operate the boiler at max fire for
5 minutes.
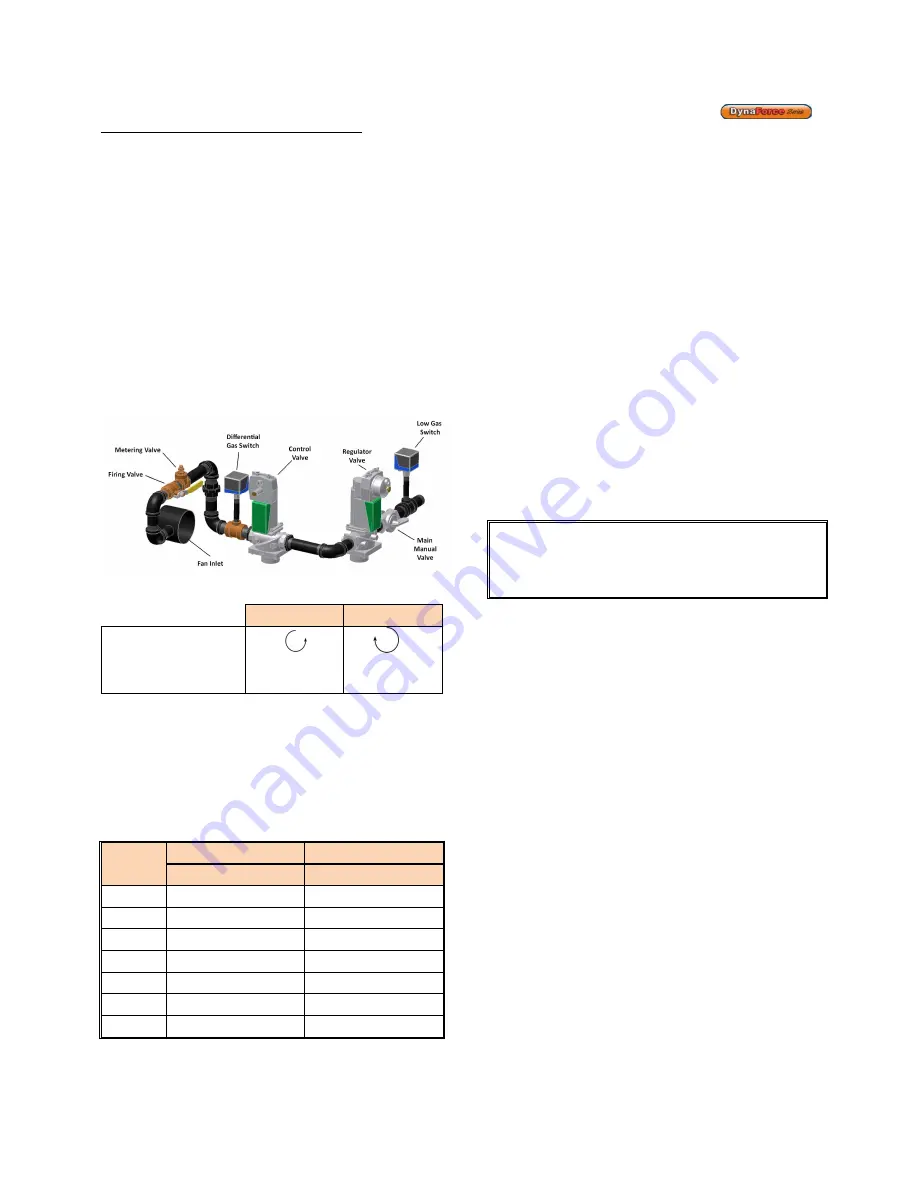
Figure 35: DR3500 – 5000 Gas Train Layout
Locate the metering valve on the gas train.
Increase CO2
Decrease CO2
High Fire
Adjustment
Counter-
Clock Wise
Clockwise
Turn the screw 1/8 turn in either way for each adjustment to
keep track of the adjustments. After adjusting the screw wait a
moment for the combustion levels to stabilize before
attempting to make any further adjustments. Continue this
procedure until combustion levels are satisfied.
To reset the metering valve to factory settings refer to the chart
below and the step-by-step instructions that follow.
Table 15: Inline metering valve setting
Model
LP Gas (Propane)
Natural Gas
# of Turns Clockwise
# of Turns Clockwise
DR 2000
3 3/4
2 1/2
DR 2500
3 5/8
2 7/8
DR 3000
4
3
DR 3500
5 3/4
4
DR 4000
5 7/8
5
DR 4500
7 ¾
5
DR 5000
7 3/4
5
Step 1: Fully open inline metering valve (counter-
clockwise)
Step 2: Close inline metering valve to preset level
Step 3: Above table shows initial settings only, fine-tuning
will be required with the use of an analyzer.
•
This boiler is designed for low fire soft start. At the
start of trial for ignition the fan will decelerate to
minimum fire and will light off at low fire before
ramping up towards full input through the 4-20mA
from the controller.
•
Shut power off to the heater and open the firing valve.
Switch power back on and allow the burner to fire.
Ignition should be smooth. Normally the differential
gas pressure will be identical to the differential air
pressure. Actual differential pressure may vary from
the numbers on the test label due to the field
conditions and sample variations. Always make
adjustments to meet the recommended CO
2
levels.
Adjust high fire first followed by low fire adjustment.
•
Allow the water temperature to rise so that the heater
cycles on the operator.
•
Check the temperature rise across the heat
exchanger. This will be indicated by taking a
difference between the inlet and outlet temperatures
on the Dynaforce® control. For hydronic applications
and for domestic hot water, a rise exceeding 30ºF is
not normally recommended.
•
Allow the unit to cycle on the limit. This can be done
by gradually restricting outlet water flow. The auto
reset limits are set at 200ºF for domestic hot water
and hydronic heating. The manual reset limits are set
to 210
o
F.
•
Remove fan inlet filter. At full input, block 50% of the
fan inlet opening. The display should show ‘LCI not
closed’. If it does not, slowly turn the adjustment on
the normally closed blocked flue switch clockwise until
the blocked flue switch indicator de-energizes.
•
Check the air proving switch. Remove the restriction
from the fan inlet and reset the power on the control
panel. A properly set air switch will cause the
interrupted air switch indicator to turn green at a fan
speed between 15Hz and 20Hz on the VFD.
•
Check the ignition retries circuit.
•
Shut the main gas off to the unit and allow it to try for
ignition. Trial for ignition should commence within 30
seconds.
8.4
COMISSIONING APPLIANCE
•
Remove manometers and replace inlet gas pressure
test plug.
•
Fill out start up report for each heater. Be sure to
record all settings and readings. Retain a copy of
report for future reference.
•
Start up is now complete and heater may be placed
into service.
Summary of Contents for DRH300
Page 2: ......
Page 6: ......
Page 38: ...32 13 Place toggle switch setting to REMOTE for remote operation if required...
Page 69: ...63 PART 12 EXPLODED VIEW 19 1 2 3 4 5 6 7 8 9 10 11 12 13 14 15 16 17 18 20...
Page 70: ...64 21 22 23 24 26 35 34 33 32 31 30 29 28 27 25 36 37 38 39 40 42 43 56...
Page 77: ...71 PART 13 ELECTRICAL DIAGRAMS...
Page 78: ...72...
Page 79: ...73...
Page 81: ...75...
Page 82: ...76...
Page 83: ...77...
Page 86: ......


