as 10W-30.
Additives in motor oil can
cause valve deposits and reduce pump
life. For maximum pump life, drain and
replace oil after the first hour of run
time. Proper oil fill level is illustrated in
Figure 5.
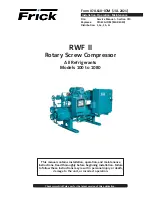
Vertical Models
5
Drain Petcock
Discharge Tube
Belt Guard
Check
Valve
Safety
Valve
Pressure
Switch
Tank
Outlet
Figure 6
Pressure switch
- Auto/Off Switch - In
the "auto" position, the compressor
shuts off automatically when tank
pressure reaches the maximum preset
pressure. In the "off" position, the
compressor will not operate. This
switch should be in the "off" position
when connecting or disconnecting the
power cord from the electrical outlet.
Unloader
- Device on pressure switch
which allows pressurized air to vent
alleviating motor restarts under load.
Regulator
- The regulator controls the
amount of air pressure released at the
hose outlet (Sold separately).
ASME Safety Valve
- This valve
automatically releases air if the tank
pressure exceeds the preset maximum.
Discharge tube
- This tube carries
compressed air from the pump to the
check valve. This tube becomes very hot
during use. To avoid the risk of severe
burns, never touch the discharge tube.
Check valve
- One-way valve that
allows air to enter the tank, but
prevents air in the tank from flowing
back into the compressor pump.
Belt Guard
- Covers the belt, motor
pulley and flywheel.
Drain Petcock
- This valve is located on
the bottom of the tank. Use this valve
to drain moisture from the tank daily
to reduce the risk of corrosion.
Reduce tank pressure below 10 psi,
then drain moisture from tank daily to
avoid tank corrosion. Drain moisture
from tank(s) by opening the drain
petcock located underneath the tank.
START-UP
Do not attach air
tools to open end
of the hose until start-up is completed
and the unit checks OK.
Never disconnect
threaded joints
with pressure in tank!
1. Remove the breather and fill pump
to the proper oil level. See
lubrication section.
2. Turn outlet valve to open air flow.
3. Move pressure switch lever to the
OFF position and plug in power
cord. Move pressure switch to the
AUTO position to run the unit.
MOISTURE IN COMPRESSED AIR
Moisture in compressed air will form
into droplets as it comes from an air
compressor pump. When humidity is
high or when a compressor is in
continuous use for an extended period
of time, this moisture will collect in the
tank. When using a paint spray or
sandblast gun, this water will be carried
from the tank through the hose, and out
of the gun as droplets mixed with the
spray material.
IMPORTANT:
This condensation will
cause water spots in a paint job,
especially when spraying other than
water based paints. If sandblasting, it
will cause the sand to cake and clog the
gun, rendering it ineffective.
A filter in the air line, located as near to
the gun as possible, will help eliminate
this moisture.
4. Run the unit for 30 minutes, under
no load, to break in pump parts.
5. Turn outlet valve to shut off air flow
and move the pressure switch lever
to OFF. The compressor is now ready
for use.
NOTE:
Electric models are equipped
with a pressure switch that
automatically turns the motor OFF
when the tank pressure reaches a
preset level. After air is used from the
tank and drops to a preset low level,
the pressure switch automatically turns
the motor back on.
Disconnect, tag and lock
out power source, then
release all pressure from
the system before attempting to install,
service, relocate or perform any
maintenance.
All repairs should be performed by an
authorized service representative.
FOR EFFICIENT OPERATION:
Perform the following test to verify free
operation of the safety valve weekly
and follow maintenance schedule.
1. Pull ring on safety valve and allow
the ring to snap back to normal
position (See Figure 8). This valve
automatically releases air if the tank
pressure exceeds the preset
maximum.
Operation
Assembly
(Con’t)
Figure 8
Figure 7
OFF
AUTO
Maintenance
sin antes determinar que lo puede
hacer según los códigos locales de
eléctricidad. Estas instalaciones las
debe hacer un electricista calificado.
Si necesita reconectar el producto
para utilizarlo en circuitos diferentes,
los trabajos de reconexión los debe
hacer un técnico calificado.
MOTORES CON VOLTAJE DOBLE
(ALGUNOS MODELOS)
El
enchufe
con conexión a tierra se debe cambiar
para transformar la unidad a voltaje
doble.
Estos motores se pueden utilizar con
120 ó 240 voltios. Compare el enchufe
del cordón con los tomacorrientes
mostrados abajo para determinar el
voltaje para el cual el compresor viene
de fábrica. Igualmente, chequée la
placa del motor para cambiarlo de
voltaje bajo a voltaje alto.
Todos los
trabajos
de alambrado las debe hacer un
electricista calificado.
Para cambiar las conexiones para usarlo
con otro voltaje:
1. Desconecte el cordón del
tomacorrientes
2. Destape el terminal del motor.
3. Vea el diagrame de conexiones en
la parte posterior de la tapa o en la
placa del motor y siga estas
instrucciones para conectarlo al
voltaje deseado.
4. Cámbiele el enchufe por uno
adecuado para el voltaje y corriente
requeridos.
Cuando
cambie el
voltaje del compresor, cerciórese de
conectar el cable verde, de conexión a
tierra, al terminal de conexión de tierra
del enchufe y a la parte metálica del
presostato.
!
ADVERTENCIA
!
ADVERTENCIA
!
AVISO
NOTA:
Las unidades de 120 voltios, 15
amperios se pueden utilizar en circuitos
de 120 voltios y 15 amperios bajo las
siguientes condiciones:
1. Que no haya ningún otro artefacto
eléctrico o lámpara conectado al
mismo circuito.
2. El suministro de voltaje sea normal.
3. Los cordones de extensión sean al
menos del calibre mínimo
especificado en este manual de
instrucciones.
4. El circuito esté equipado con un
cortacircuito de 15 amperios o con
un fusible de acción retardada tipo T
de 15 amperios T (En Canada use
Tipo D).
Si no puede satisfacer las condiciones
arriba enumeradas, o si el sistema de
protección apaga la unidad
constantemente, tal vez tenga que
conectar el compresor a un circuito de
120 voltios y 20 amperios. Algunos
modelos también se pueden utilizar
con 240 voltios, vea la sección MOTOR
DE VOLTAJE DOBLE.
PARA CONECTAR A TIERRA
1. Este producto está diseñado para
conectarse a circuitos nominales de
120 ó 240 voltios y tiene un enchufe
similar al de la Fig. 4. Cerciórese de
conectarlo a un tomacorrientes
diseñado para el enchufe. Este
producto debe conectarse a tierra. En
caso de que ocurriese un
cortocircuito, la conexión a tierra
reduciría el riesgo de choque
eléctrico al ofrecerle un cable de
20 Sp
Compresores de Aire Estacionarios
desvío a la corriente eléctrica. Este
producto viene equipado con un
cordón eléctrico que tiene un
alambre para conexión a tierra y un
enchufe adecuado para ésto. El
enchufe se debe conectar a un
tomacorrientes que esté instalado
correctamente y conectado a tierra
según los códigos y ordenanzas locales.
El uso incorrecto del enchufe
con conexión a tierra podría
ocasionar peligro de
electrocutamiento. No use un
adaptador para conectarlo.
2. Si necesita reparar o reemplazar el
cordón o el enchufe, no conecte el
alambre de conexión a tierra a
ninguno de los terminales planos del
enchufe. El alambre de conexión a
tierra es el que tiene el forro verde
con o sin rayas amarillas.
3. Consúltele a un electricista calificado o
técnico de reparación si no comprende
bien las instrucciones para conectar a
tierra, o si tiene dudas si la unidad está
conectada a tierra correctamente. No
modifique el enchufe suministrado; si no
lo puede conectar al tomacorrientes, un
electricista calificado debe instalar el
tomacorrientes adecuado.
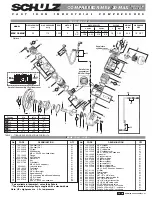
ENCHUFES Y TOMACORRIENTES
1. Si no está familiarizado con el
enchufe del cordón eléctrico o si éste
no entra en el tomacorrientes, la
Figura 4 le muestra los diferentes
enchufes necesarios según el voltaje
de la unidad.
2. Cerciórese de conectar el producto a
un tomacorrientes diseñado para el
enchufe que va a utilizar.
3. El tomacorrientes debe estar
conectado a un circuito que tenga el
voltaje y amperaje indicados.
4. NUNCA reemplace el tomacorrientes
con uno para amperajes superiores
!
PELIGRO
Amperios
Cordón
Enchufe Nema
No más de 15
3 alambres, calibre 14
125V, 15 Amp
Entre 15 - 18
3 alambres, calibre 14
125V, 20 Amp
Entre 18 - 20
3 alambres, calibre 12
125V, 20 Amp
Entre 20 - 25
3 alambres, calibre 12
125V, 30 Amp
ENCHUFES Y CALIBRES DE LOS CORDONES PARA 120 VOLTIOS
Instalación
(Continuación)
Ground Pin
Grounded
Outlet
Grounded
Outlet
Ground Pin
120V
20A
120V
15A
240V
20A
240V
15A
Figura 4
Conexiones Eléctricas
SOLO LAS UNIDADES CON CORDONES
Terminal para
conexión a tierra
Terminal para
conexión a tierra
Tomacorrientes
conectado a
tierra
Tomacorrientes
conectado a
tierra