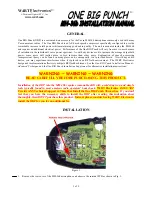
L1
L2
Pressure
Switch
Thermal
Units(3)
L3
T2
Fused Breaker
Or Disconnect
X2
Motor
OVER-
LOAD
COIL
T3
T1
Three Phase
With Magnetic
Starter
L1
L2
240V
Ground
Pressure
Switch
Line
M
Motor
Single Phase
Figure 3 - Wiring Diagrams
NOTE:
120 volt, 15 amp units can be
operated on a 120 volt 15 amp circuit
under the following conditions:
1. No other electrical appliances or
lights are connected to the same
branch circuit.
2. Voltage supply is normal.
3. Extension cords are of at least the
minimum gauge specified in this
instruction manual.
4. Circuit is equipped with a 15 amp
circuit breaker or a 15 amp slow
blow fuse type T (For Canada use
Type D).
If the above conditions cannot be met
or if nuisance tripping of the current
protection device occurs, it may be
necessary to operate the compressor
from a 120 volt 20 amp circuit. Some
models convert to 240 volt operation,
see DUAL VOLTAGE MOTOR.
GROUNDING INSTRUCTIONS
1. This product is for use on a nominal
120 or 240 volt circuit and has a
grounding plug that looks like the
plug illustrated in Fig. 4. Make sure
the product is connected to an outlet
having the same configuration as the
plug.This product must be grounded.
All wiring and
electrical
connections must be performed by a
qualified electrician. Installations must
be in accordance with local and
national codes.
GROUNDING
This product should be connected to a
grounded metallic, permanent wiring
system,or a grounding rod installed in
accordance with local codes. This
product must be grounded. Grounding
reduces the risk of electrical shock by
providing an escape wire for the
electric current, if short circuit occurs.
This product must be equipped with a
power cord or cable that provides a
grounding wire.
Improperly grounded
motors are shock hazards.
Make sure all the
equipment is properly grounded.
WIRING
Local electrical wiring codes differ from
area to area. Source wiring, plug and
protector must be rated for at least the
amperage and voltage indicated on the
motor nameplate, and meet all electrical
codes for this minimum. Use a slow blow
fuse type T or a circuit breaker.
Overheating, short
circuiting and fire
damage will result from inadequate
wiring.
Motor protection should be used when
a motor built-in thermal overload
protection is not provided. Some 3
phase units require a magnetic starter
for thermal protection ( See Figure 3).
Vertical Models
3
4. Secure the screws to a stud within a
framed wall. Use anchors if the wall
is concrete.
Do not secure the
compressor with
toggle bolts into drywall. Drywall
sheeting or plaster will not support
the weight of the compressor.
INSTALLING A SHUT-OFF VALVE
A shut-off valve should be installed on
the discharge port of the tank to
control the air flow out of the tank.
The valve should be located between
the tank and the piping system.
Never install a
shut-off valve
between the compressor pump and the
tank. Personal injury and/or equipment
damage may occur.
PIPING
Never use plastic
(PVC) pipe for
compressed air. Serious injury or death
could result.
Bury underground lines below the
frost line and avoid pockets where
condensation can gather and freeze.
Apply air pressure to the piping
installation and make sure all joints are
free from leaks BEFORE underground
lines are covered.
Before putting the compressor into
service, find and repair all leaks in the
piping, fittings and connections.
Ground Pin
Grounded
Outlet
Grounded
Outlet
Ground Pin
120V
20A
120V
15A
240V
20A
240V
15A
Figure 4
Installation
(Con’t)
Figure 2 - Wall Cable Installation
Electrical Installation
HARD WIRED UNITS ONLY
Electrical Connection
UNITS WITH LINE CORDS ONLY
6. Si es necesario, use un sacaengranaje
para mover la polea en el eje del
motor. Apriete el tornillo después de
terminar de mover la polea.
7. Colóquele la tapa de la banda.
ALMACENAMIENTO
1. Cuendo no los esté usando,
almacene la manguera y el
compresor en un sitio frío y seco.
2. Debe drenar la humedad del
tanque y desconectar la manguera y
colgarla con los extremos hacia
abajo para drenarla.
3. Para proteger el cordón eléctrico,
enróllelo en el mango de la unidad
o enróllelo y amárrelo.
INFORMACION TECNICA
Para recibir información sobre el
funcionamiento o reparación de la
unidad, sírvase llamar al 1-800-543-
6400 (en EUA). En el exterior,
comuníquese con el distribuidor
autorizado más cercano a su domicilio.
22 Sp
Compresores de Aire Estacionarios
de preparación para el uso y se haya
cerciorado de que la unidad está lista
para funcionar.
¡Nunca
desco-
necte las conexiones con roscas antes
de liberar la presión del tanque!
1. Sáquele el respiradero y llene el
cabezal de aceite hasta alcanzar el
nivel adecuado. Vea la sección de
lubricación.
2. Abra la llave de salida para permitir
el flujo de aire.
3. Coloque la palanca del presostato en
OFF (apagado) y conecte el cordón
eléctrico al tomacorrientes. Coloque
la palanca del presostato en AUTO
para encender la unidad.
4. Deje que la unidad funcione por 30
minutos, sin carga, para que las
piezas del cabezal se fijen.
5. Cierre la válvula de salida para cortar
el flujo de aire y coloque la palanca
del presostato en OFF. El compresor
estará listo para funcionar.
NOTA:
Los modelos eléctricos tienen un
presostato que apaga el motor
automáticamente cuando la presión del
tanque alcanza un nivel fijado. Una vez
que se consuma el aire en el tanque y la
presión baje a un nivel fijado, el
presostato enciende automáticamente
el motor.
Desconecte el cordón
eléctrico y amárrelo y
después libere toda la
presión del sistema antes de tratar de
instalarlo, darle servicio o darle
cualquier tipo de mantenimiento.
Todos los trabajos de reparación los
debe hacer un técnico autorizado.
!
ADVERTENCIA
!
ADVERTENCIA
PARA EL FUNCIONAMIENTO
EFICIENTE:
Semanalmente haga la siguiente prueba
para verificar el funcionamiento
adecuado de la válvula de seguridad y
déle el mantenimiento necesario
indicado en la tabla de mantenimiento.
1. Hále el anillo de
la válvula de
seguridad y
déjelo que
regrese a su
posición normal (Vea la Figura 8). Esta
válvula libera el aire automáticamente
si la presión del tanque excede el nivel
máximo fijado.
Nunca
trate de
modificar esta válvula. Esta válvula se
debe chequear ocasionalmente. Si hay
fugas de aire después de soltar el
anillo, o si la válvula está atascada y no
la puede activar con el anillo, deberá
reemplazarla.
2. Con el motor APAGADO y
desconectado, limpie el motor, el
volante, el tanque, las líneas de aire y
las aletas de enfriamiento del cabezal.
BANDAS
Las bandas se estiran con el uso normal.
Cuano están bien ajustadas la deflexión
debe ser sólo una 12,7 mmm (1/2”) al
aplicarle una fuerza de 2,27 kg entre la
polea del motor y el cabezal (Vea la
Figura 9).
PARA AJUSTAR LA BANDA:
1. Quítele la tapa.
2. Aloje los cuatro tornillos que
sostienen el motor a la base.
!
PELIGRO
3. Mueva el motor en la dirección
adecuada. La banda debe estar bien
alineada al hacer este ajuste.
4. Para alinear la banda, coloque un
objeto recto en el volante de modo
que toque dos puntos del borde (Vea
la Figura 10).
5. Ajuste el volante o la polea del motor
de modo que la banda esté paralela a
la línea recta (Vea la Figura 10).
Mida el Nivel de Aceite
●
Drene el Tanque
●
Chequée el Filtro de Aire
●
Chequée la Válvula de Seguridad
●
Limpie el Interior del Motor (con aire)
●
Chequée la Tensión de las Bandas
●
Cámbiele el Aceite
●
MANTENIMIENTO
Deflexión de 1,27 cm (1/2”)
Figura 9
Apago
Automático
Figura 7
Mantenimiento
Servicio Necesario
Diaria-
Semanal- Mensual-
Trimestral-
mente
mente
mente
mente
Funcionamiento
(Con’t)
Figura 8
Toquel Borde
en 2 Sitios
Borde recto
paralelo a la
banda
Figura 10