Chapter 5: Troubleshooting
65
7.
Check the voltage of the new lithium battery in ScanWin. Select the System tab at the top of the
screen; then select the Node Information tab at the right side of the screen. Look for “NVRAM
backup battery voltage.” The value displayed should be close to 3.6 volts.
Returning the Scanner to the Manufacturer
If the Scanner 1141 RTU must be returned to Cameron’s Measurement Systems Division, ship it as a
complete unit
,
but remove the sealed lead acid battery from the Scanner enclosure. There is usually no
need to return the battery.
If it is not possible to return the complete unit, return the main circuit board. The main circuit board is
removed by undoing the six screws or standoffs that connect it to the base plate. NOTE: Circuit boards
should be shipped in antistatic bags, and a well-protected package.
Replacing the Sealed Lead Acid Battery
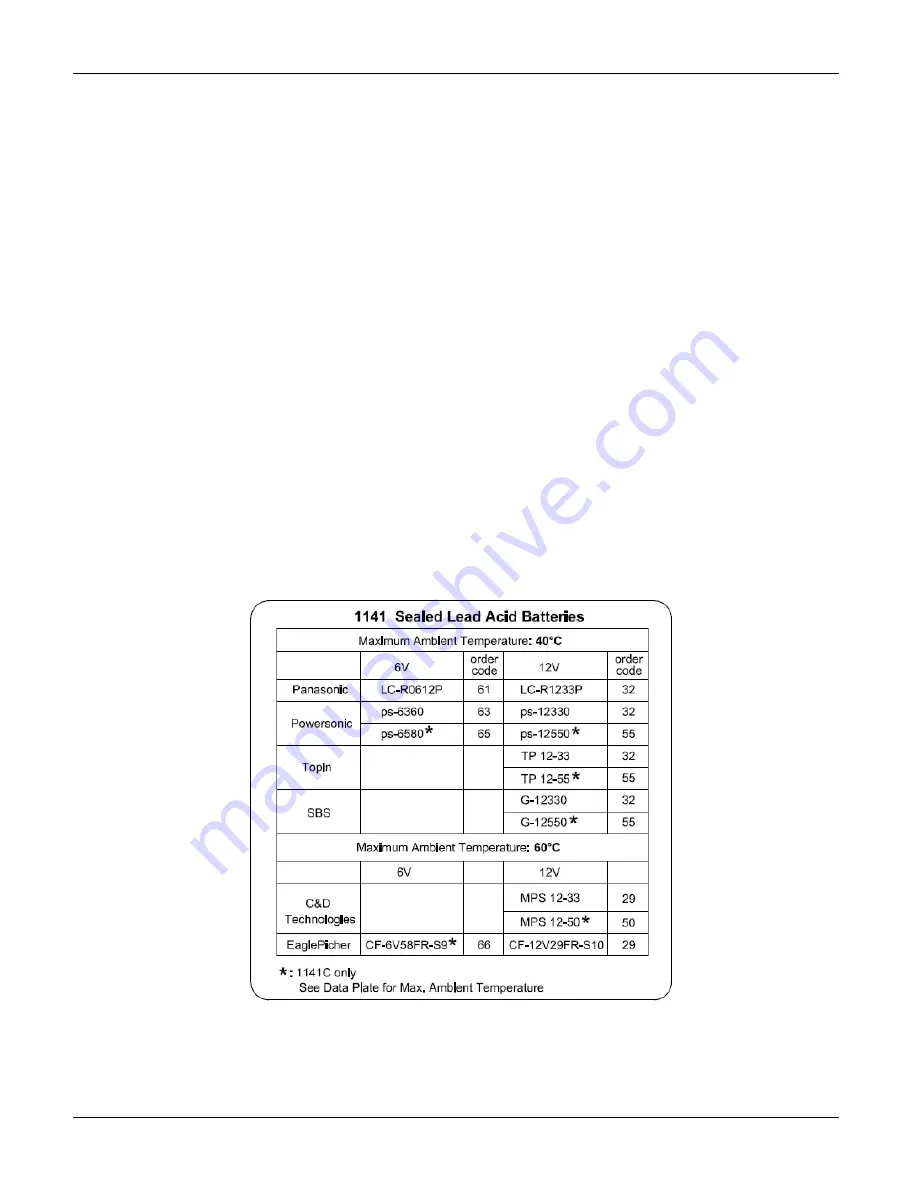
A label mounted inside the enclosure lists batteries certified for use with the Scanner 1141 (Figure 5.3).
An operator can determine which batteries are suitable for his Scanner 1141 by identifying batteries with
the proper voltage and temperature range, or by examining the order code in the Code field of the data
plate attached to the Scanner 1141. The order code for the battery is the first two-digit number following
the Scanner 1141 model. For example: if the code listed on the data plate is 1141L-XX-YY-YY… ,
“XX” is the battery order code required for replacement.
Figure 5.3—Battery label
Summary of Contents for NUFLO 1141C
Page 1: ...Manual No 30165009 Rev 01 NUFLOTM Scanner 1141 RTU Hardware User Manual ...
Page 28: ...Scanner 1141 Hardware User Manual 28 Figure 3 1 Scanner 1141 main circuit board ...
Page 66: ...Scanner 1141 Hardware User Manual 66 ...
Page 67: ...Chapter 6 Parts List and Order Code 67 Chapter 6 Parts List and Order Code Scanner 1141C ...
Page 68: ...Scanner 1141 Hardware User Manual 68 Scanner 1141L ...
Page 69: ...Chapter 6 Parts List and Order Code 69 Scanner 1141G ...
Page 91: ...Appendix A Specifications 91 Outline Dimensions Scanner 1141C ...
Page 92: ...Scanner 1141 Hardware User Manual 92 Scanner 1141L Front and Side Views ...
Page 94: ...Scanner 1141 Hardware User Manual 94 Scanner 1141G ...
Page 96: ...Scanner 1141 Hardware User Manual 96 Drawing 1 Installation ...
Page 97: ...Appendix B Control Drawings 97 Drawing 2 Power Supply ...
Page 98: ...Scanner 1141 Hardware User Manual 98 Drawing 3 Communications Serial Ports ...
Page 99: ...Appendix B Control Drawings 99 Drawing 4 Status Pulse Inputs Outputs ...
Page 100: ...Scanner 1141 Hardware User Manual 100 Drawing 5 RTD Inputs Analog Inputs Outputs ...
Page 101: ...Appendix B Control Drawings 101 Drawing 6 Analog Outputs ...
Page 102: ...Scanner 1141 Hardware User Manual 102 ...
Page 117: ...117 ...
Page 118: ...118 ...
Page 119: ......
Page 120: ......


