20
OPERATION / BEDIENUNG / UTILISATION / OPERACIÓN / OBSŁUGA / UTILIZZO
EN
A few seconds after connecting to the power supply, the effects projector is ready for operation and the operating mode that was previously
selected is activated. During startup, the software version is briefly displayed (Vx.xx).
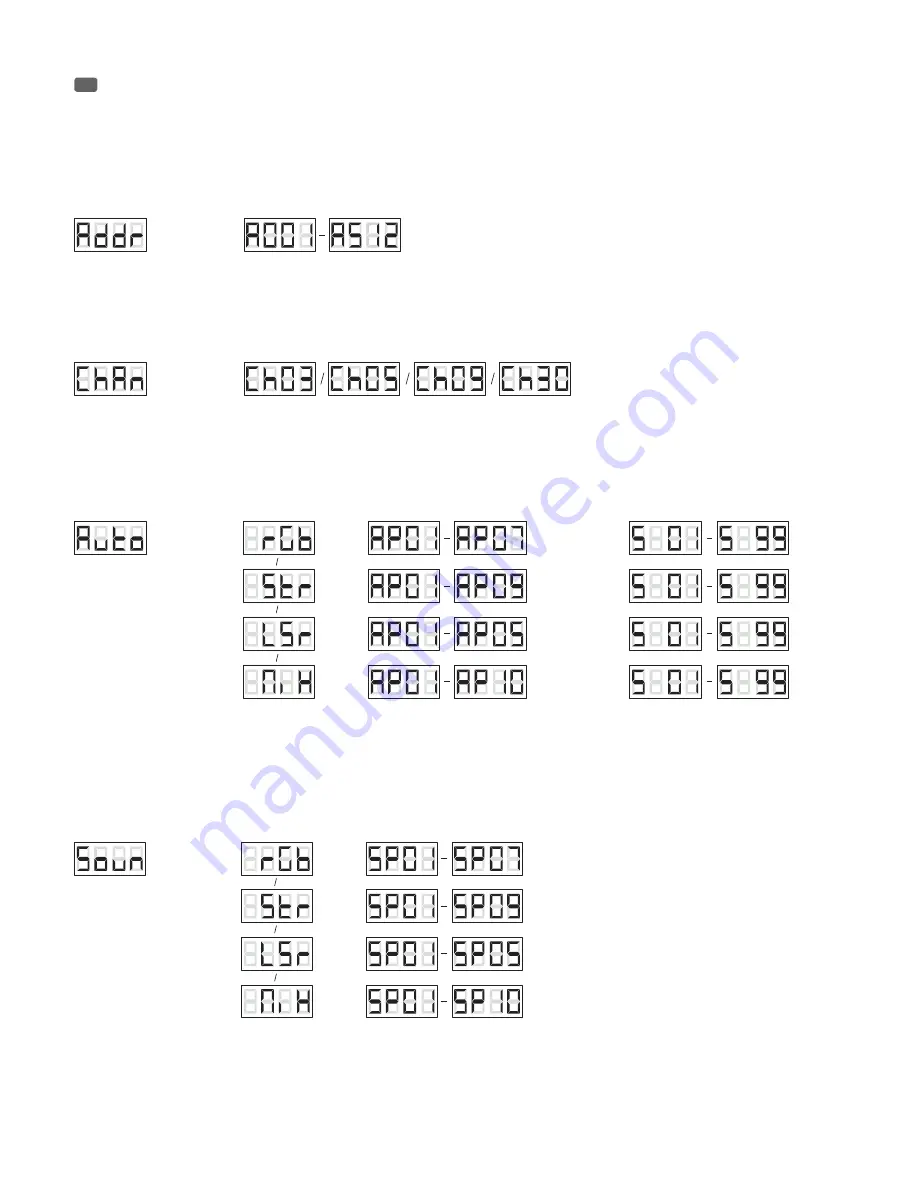
ACTIVATING THE DMX CONTROL AND ADJUSTING THE DMX START ADDRESS
Press the MODE button repeatedly until “Addr” appears on the display. Now press ENTER to activate the DMX control and display the currently set
DMX start address. If no DMX signal is present, all four characters flash on the display; if a DMX signal is present, the display stops flashing. Using
the UP and DOWN buttons, select the desired DMX start address and confirm with ENTER. The display switches off for approximately one second to
acknowledge the correct entry and then shows the currently set DMX start address.
UP/DOWN
-> ENTER
-> ENTER->
SETTING THE DMX MODE
Press the MODE button repeatedly until “ChAn” appears on the display, press ENTER and select one of the 4 available DMX modes using the UP and
DOWN buttons (Ch03, Ch05, Ch09, Ch30). Confirm the input with ENTER. To acknowledge a successful entry, the display switches off for approxi-
mately one second. Afterwards, the display will show the currently enabled DMX start address. You will find tables with the channels of the different
DMX modes in this manual under DMX CONTROL.
UP/DOWN
-> ENTER
-> ENTER->
AUTOMATIC CONTROL MODE (Auto)
Press the MODE button repeatedly until “Auto” appears on the display. Now press ENTER to select from four different program categories and
confirm with ENTER (rGb = RGB LEDs, Str = Stroboscope, LSr = Laser, MiX = combination of RGB LEDs, strobe and laser effect). One of the auto
programs can now be selected by using the UP and DOWN buttons. After confirming by pressing the ENTER button, you can now select the speed
at which the selected program runs by using the UP and DOWN buttons (S 01 = minimum speed, S 99 = maximum speed). Confirm with ENTER. To
acknowledge a successful entry, the display switches off for approximately one second and then shows “Auto”.
-> ENTER
UP/DOWN
-> ENTER ->
<- MODE
-> ENTER ->
<- MODE
UP/DOWN
-> ENTER
<- MODE
-> ENTER ->
<- MODE
-> ENTER ->
<- MODE
UP/DOWN
-> ENTER
<- MODE
-> ENTER ->
<- MODE
-> ENTER ->
<- MODE
UP/DOWN
-> ENTER
<- MODE
-> ENTER ->
<- MODE
-> ENTER ->
<- MODE
UP/DOWN
-> ENTER
<- MODE
MUSIC CONTROL MODE (Soun)
Press the MODE button repeatedly until “Soun” appears on the display. Now press ENTER to select from four different program categories and
confirm with ENTER (rGb = RGB LEDs, Str = Stroboscope, LSr = Laser, MiX = combination of RGB LEDs, strobe and laser effect). One of the sound
programs within the respective program category can now be selected using the UP and DOWN buttons. Confirm with ENTER. To acknowledge a
successful entry, the display switches off for approximately one second and then shows “Soun”. To adjust the sensitivity with which the programs
react to sounds (bass pulses), use the MIC SENSITIVITY controller as desired. When turned to the left, the sensitivity is lowered, when turned to the
right, it is increased.
-> ENTER
UP/DOWN
-> ENTER ->
<- MODE
-> ENTER
<- MODE
-> ENTER ->
<- MODE
-> ENTER
<- MODE
-> ENTER ->
<- MODE
-> ENTER
<- MODE
-> ENTER ->
<- MODE
-> ENTER
<- MODE
COLOUR MIXING (CoLo)
This mode offers the ability to separately adjust the brightness of the 3 RGB LEDs and to thus generate an unlimited number of different colours
(colour mixing). Press the MODE button repeatedly until “CoLo” appears on the display. Press the ENTER button and adjust the brightness of the red
LEDs using the UP and DOWN buttons (r000 - r100) and confirm with ENTER. Now you can adjust the brightness of the green and blue LEDs in the
same way (G000 - G100, b000 - b100). Confirm the input with ENTER. To acknowledge a successful entry, the display switches off for approximately
one second and then shows “CoLo”.
Summary of Contents for FLAT STORM
Page 51: ...51...


