Caliber RCD 272DBTI Quick Start Manual Download Page 4

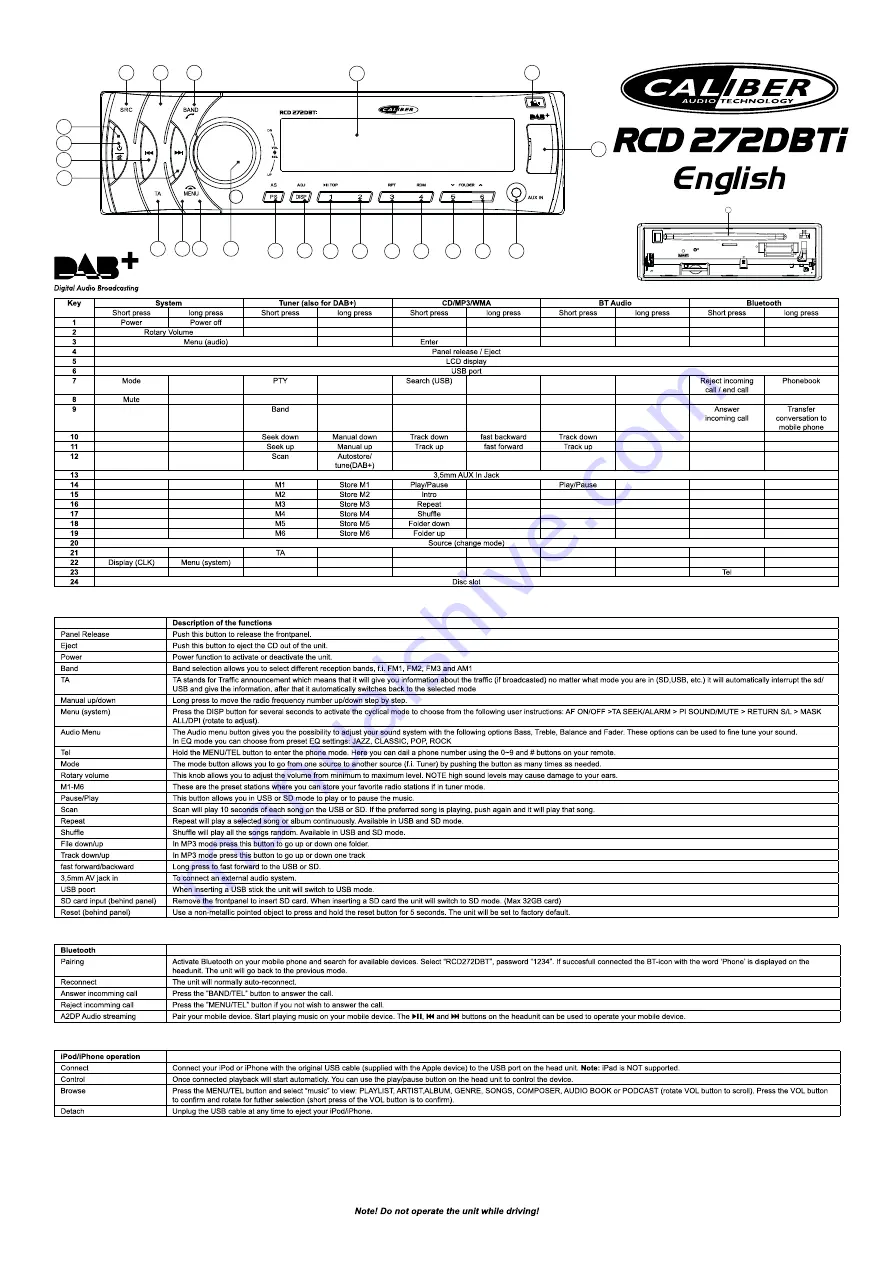
Description of the functions

Panel Release

Push this button to release the frontpanel.

Eject

Push this button to eject the CD out of the unit.

Power

Power function to activate or deactivate the unit.

Band

Band selection allows you to select different reception bands, f.i. FM1, FM2, FM3 and AM1

TA

TA stands for Traffic announcement which means that it will give you information about the traffic (if broadcasted) no matter what mode you are in (SD,USB, etc.) it will automatically interrupt the sd/

USB and give the information, after that it automatically switches back to the selected mode

Manual up/down

Long press to move the radio frequency number up/down step by step.

Menu (system)

Press the DISP button for several seconds to activate the cyclical mode to choose from the following user instructions: AF ON/OFF >TA SEEK/ALARM > PI SOUND/MUTE > RETURN S/L > MASK 

ALL/DPI (rotate to adjust).

Audio Menu

The Audio menu button gives you the possibility to adjust your sound system with the following options Bass, Treble, Balance and Fader. These options can be used to fine tune your sound.

In EQ mode you can choose from preset EQ settings: JAZZ, CLASSIC, POP, ROCK

Tel

Hold the MENU/TEL button to enter the phone mode. Here you can dail a phone number using the 0~9 and # buttons on your remote.

Mode

The mode button allows you to go from one source to another source (f.i. Tuner) by pushing the button as many times as needed.

Rotary volume

This knob allows you to adjust the volume from minimum to maximum level. NOTE high sound levels may cause damage to your ears.

M1-M6

These are the preset stations where you can store your favorite radio stations if in tuner mode.

Pause/Play

This button allows you in USB or SD mode to play or to pause the music.

Scan

Scan will play 10 seconds of each song on the USB or SD. If the preferred song is playing, push again and it will play that song.

Repeat

Repeat will play a selected song or album continuously. Available in USB and SD mode.

Shuffle

Shuffle will play all the songs random. Available in USB and SD mode.

File down/up

In MP3 mode press this button to go up or down one folder.

Track down/up

In MP3 mode press this button to go up or down one track

fast forward/backward

Long press to fast forward to the USB or SD.

3,5mm AV jack in

To connect an external audio system.

USB poort

When inserting a USB stick the unit will switch to USB mode. 

SD card input (behind panel)

Remove the frontpanel to insert SD card. When inserting a SD card the unit will switch to SD mode. (Max 32GB card)

Reset (behind panel)

Use a non-metallic pointed object to press and hold the reset button for 5 seconds. The unit will be set to factory default.

Bluetooth

Pairing

Activate Bluetooth on your mobile phone and search for available devices. Select “RCD272DBT”, password “1234”. If succesfull connected the BT-icon with the word ‘Phone’ is displayed on the 

headunit. The unit will go back to the previous mode.

Reconnect 

The unit will normally auto-reconnect.

Answer incomming call

Press the ”BAND/TEL” button to answer the call.

Reject incomming call

Press the ”MENU/TEL” button if you not wish to answer the call.

A2DP Audio streaming

Pair your mobile device. Start playing music on your mobile device. The 

12

7

 and 

buttons on the headunit can be used to operate your mobile device.

Key

System

Tuner (also for DAB+)

CD/MP3/WMA

BT Audio

Bluetooth

Short press

long press

Short press

long press

Short press

long press

Short press

long press

Short press

long press

1

Power

Power off

2

Rotary Volume

3

Menu (audio)

Enter

4

Panel release / Eject

5

LCD display

6

USB port

7

Mode

PTY

Search (USB)

Reject incoming 

call / end call

Phonebook

8

Mute

9

Band

Answer 

incoming call

Transfer 

conversation to 

mobile phone

10

Seek down

Manual down

Track down

fast backward

Track down

11

Seek up

Manual up

Track up

fast forward

Track up

12

Scan

Autostore/

tune(DAB+)

13

3,5mm AUX In Jack

14

M1

Store M1

Play/Pause

Play/Pause

15

M2

Store M2

Intro

16

M3

Store M3

Repeat

17

M4

Store M4

Shuffle

18

M5

Store M5

Folder down 

19

M6

Store M6

Folder up

20

Source (change mode)

21

TA

22

Display (CLK)

Menu (system)

23

Tel

24

Disc slot

6

8

14

15

16

17

18

19

12

7 23

21

22

13

2   

9

4

3

20

5

24

EQ

INT

1

11

10

CD/USB/SD/RDS EON/BLUETOOTH  

4X 75W

6

8

14

15

16

17

18

19

12

7 23

21

22

13

2   

9

4

3

20

5

24

EQ

INT

1

11

10

CD/USB/SD/RDS EON/BLUETOOTH  

4X 75W

iPod/iPhone operation

Connect

Connect your iPod or iPhone with the original USB cable (supplied with the Apple device) to the USB port on the head unit. 

Note:

 iPad is NOT supported.

Control

Once connected playback will start automaticly. You can use the play/pause button on the head unit to control the device.

Browse

Press the MENU/TEL button and select “music” to view: PLAYLIST, ARTIST,ALBUM, GENRE, SONGS, COMPOSER, AUDIO BOOK or PODCAST (rotate VOL button to scroll). Press the VOL button 

to confirm and rotate for futher selection (short press of the VOL button is to confirm).

Detach

Unplug the USB cable at any time to eject your iPod/iPhone.

Summary of Contents for RCD 272DBTI

Page 1: ......

Page 2: ......

Page 3: ......

Page 4: ...ode SD card input behind panel Remove the frontpanel to insert SD card When inserting a SD card the unit will switch to SD mode Max 32GB card Reset behind panel Use a non metallic pointed object to pr...

Page 5: ...ove the bumps rub the inside edge of the hole and outside edge of the disc with a ballpoint pen or other such instrument then insert the disc again Installation location Make sure that the system will...

Page 6: ...le bo tier principal est destin aux fichiers musicaux JPEG etc Lors de l insertion de la carte SD l appareil se mettra en mode SD Max 32GB card R initialisation derri re le panneau Utilisez un objet...

Page 7: ...liminer ces bosses frottez le bord int rieur de l orifice et le bord ext rieur du disque l aide d un stylo bille ou tout autre instrument similaire puis ins rez nouveau le disque Emplacement de l inst...

Page 8: ...en USB Modus SD card slot hinter dem Bedienfeld Entfernen Sie das Bedienteil um eine SD Karte einzulegen Der SD Kartenslot am Ger t ist f r Musikdateien JPEG Dateien usw Wenn Sie eine SD Karte einstec...

Page 9: ...dass die Disc nicht richtig geladen werden kann Zur Beseitigung derartiger Unebenheiten k nnen Sie den Rand des Innenlochs und den Au enrand der Disc mit einem Kugelschreiber oder einem anderen geeig...

Page 10: ...egare un sisterna audio esterno Entrata USB Quando inserite una chiave di memoria USB l unit passer alla modalit USB Entrata scheda SD pannello posteriore Rimuovere il pannello frontale per inserire u...

Page 11: ...er rimuovere le irregolarit passare una penna a sfera o un altro oggetto simile sul lato interno del foro e sul bordo esterno del disco quindi inserire nuovamente il disco Posizione di installazione A...

Page 12: ...anura SD en la carcasa principal es para archivos de m sica archivos JPEG etc Al insertar una tarjeta SD aqu la unidad entrar en modo SD M x tarjeta de 32GB Reset detr s del panel Utilice un objeto pu...

Page 13: ...ilo interior del agujero y el borde exterior del disco con un bol grafo o un instrumento similar y vuelva a insertar el disco Lugar de instalaci n Aseg rese de que el sistema no ser instalado en un lu...

Page 14: ...para inserir um cart o SD A ranhura do cart o SD no corpo principal para ficheiros de musica JPEG etc Qo inserir aqui um cart o SD o aparelho muda para modo SD Max cart o de 32GB Nota O cart o SD com...

Page 15: ...adequado do disco Para remover os solavancos esfregue a borda interna do orif cio e borda externa do disco com uma caneta esferogr fica ou outro instrumento em seguida insira o disco novamente Local d...

Page 16: ...m panelen Ta bort frampanelen f r att s tta in ett SD kort SD kort l saren p huvud kroppen r f r musik filar JPEG filar etc N r s tt er in ett SD kort h r kommer enheten byta till SD l ge Max 32GB kor...

Page 17: ...s tt F r att avl gsna dessa oj mnheter kan du slipa till kanterna i mitth let och den yttre kanten av skivan med en kulspetspenna eller ett liknande instrument och sedan s tta i skivan igen Installati...

Page 18: ...SD w czy si tryb SD Max 32GB karta Reset za panel U yj niemetalicznych ostrym przedmiotem nacisn i przytrzyma przycisk reset przez 5 sekund Urz dzenie b dzie zestaw do ustawie fabrycznych Numer System...

Page 19: ...er wno ci mo na usun wycieraj c kraw d rodkowego otworu oraz zewn trzn kraw d p yty d ugopisem lub podobnym przedmiotem a nast pnie w o y p yt ponownie Miejsce monta u Nale y upewni si e system nie zo...

Page 20: ...eli pre vlo enie karty SD Pri vkladan karty SD jednotka sa prepne do re imu SD Max 32GB kartu Vynulovanie za panelom Pou itie non kovov hroty objektu stla te a podr te tla idlo Reset po dobu 5 sek nd...

Page 21: ...te odstr ni hrbol eky prejdite po vn tornom okraji a vonkaj om okraji disku s guli kov m perom alebo in m podobn m n strojom a potom znovu vlo te disk Miesto in tal cie D vajte pozor aby ste syst m ne...

Page 22: ...1 2 3 Audio 4 5 LCD 6 USB 7 PTY USB 8 9 incomming 10 11 12 Scan DAB 13 3 5mm AUX In Jack 14 M1 1 15 M2 2 Intro 16 M3 3 17 M4 4 18 M5 5 19 M6 6 20 21 TA 22 CLK 23 Tel 24 Bluetooth Bluetooth RCD272DBT 1...

Page 23: ...Disc error Disc error RESET Disc error DVD Music CD Audio 12 cm Opening in het midden Opening in het midden Nieuwe Disc Oneffenheden Buitenkant oneffenheden Niet correct Correct Correct...

Page 24: ...de unit automatisch naar USB modus SD card input achter paneel Verwijder het frontpanel om de SD kaart te plaatsen Zodra een SD kaart geplaatst word schakelt de unit automatisch naar SD modus max 32GB...

Page 25: ...nt van de opening en de buitenste rand van de disc Plaats daarna de disc opnieuw Plaats van installatie Zorg ervoor dat het systeem niet ge nstalleerd wordt op een plaats waar deze wordt blootgesteld...

Page 26: ......

Page 27: ......

Page 28: ......

Reviews: