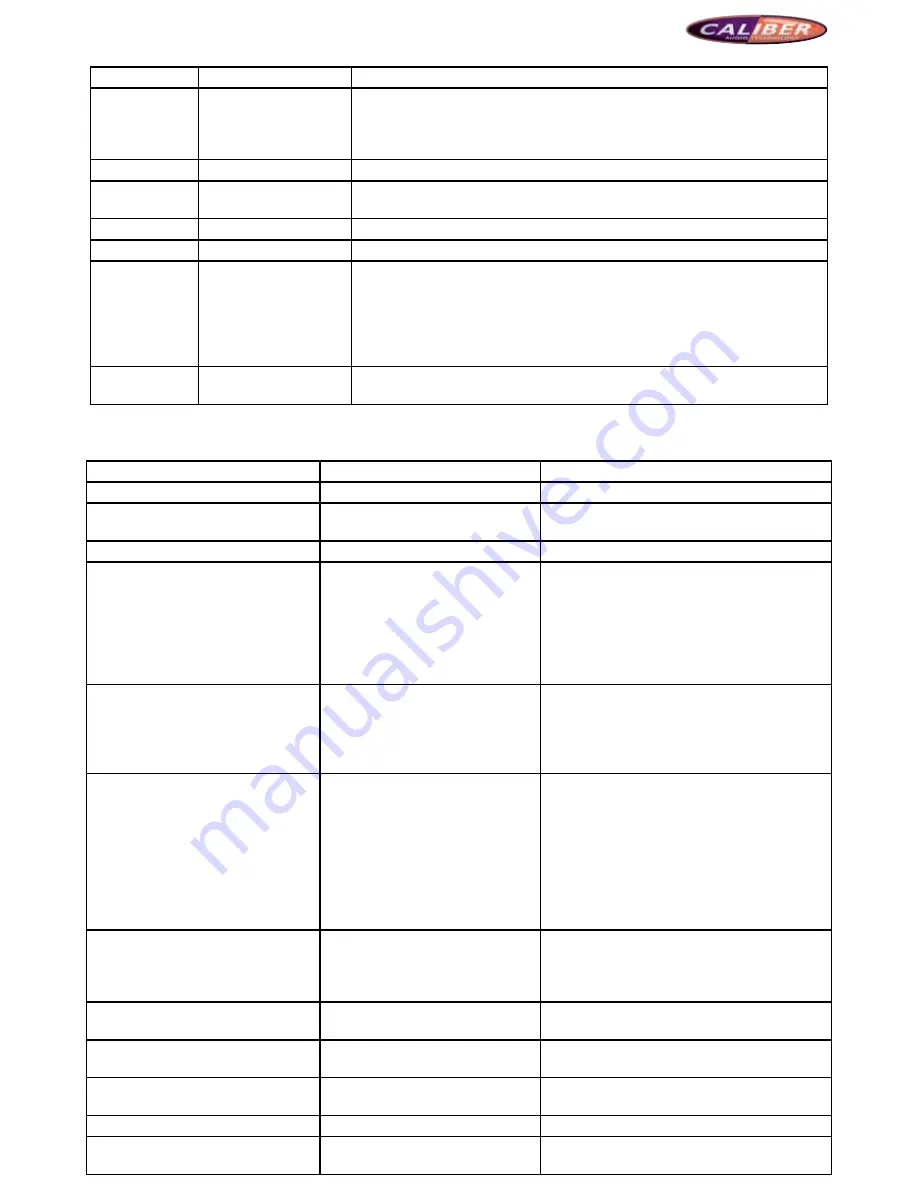
Caliber MCD901 Operating Instructions Manual Download Page 12

MCD901 

Picture 24

Setup

options

function descriptions

System Time

00:00

Operated by touching the touch screen: Click the cursor place of hour or 
minute, and input the corresponding time with the number keyboard. You can 
also set the time with the selection keys on the remote control and the number 

keys. 

Time format

12h/24h

Set the time display to be 12h or 24h

OSD Language

English/Francais/Espanol/

Deutsch/Italino

Choose your required subtitle in the default language list

Beep

On/Off

On: With “Beep” key sound, Off: Silent

TFT Auto Open YES/NO/Manual

Set the TFT screen to be Open/Closed/Manual

Ts Calibrate

YES/NO

Choose “NO” to exitChoose “YES” to calibrate the touch screen. Click the 
white point on the left top of the screen following the prompt on the screen 
“Please click Point A on the left top”, then, the system prompts “Please click 
Point B on the left bottom”, follow the prompt to calibrate the touch screen. 

The system will be switched to the current play automatically if the calibration is 
done successfully.

Use Default 
Settings

YES/NO

Choose “YES” to restore the settings to default value.

11. trouBleShooting

problems

reasons

Solutions

General
Touch screen does not work well

The  touch  screen  has  not  been 

calibrated

Calibrate the screen

The log-on volume is too loud

Bad settings

Adjust the volume knob to the appointed value

The device cannot be started.

The fuse of power supply or the car 

batteries is melted

The  supply  voltage  is  beyond  the 

rated  standards,  therefore,  the 

system 

automatically 

protects 

against  the  malfunctions  caused  by 

illegal operations

Change for a new fuse of proper type

Adjust the voltage

Press  the  Rest  key  on  the  right  bottom  of  the 
panel to reset the system

The  remote  control  does  not  work 

well or does not work

The remote control does not aim at 

the device

The batteries of remote control are 
used up.

The batteries are installed wrongly

Make sure to keep the remote control in line with 

the device.

Change for new batteries
Re-install the batteries properly

No audio output or the audio output is 

of low volume

Wrong wire connection

The volume is set to be too low

The  mute  line  is  not  connected 
properly

The speaker fails
Over large error of volume balance 

setup
The speaker has wire connected to 

the ground

Check and correct the connection

Increase the volume

Re-connect the mute line according to the wiring 

installation drawing
Change the speaker

Adjust  the  volume  balance  setup  to  the  middle 
place

Keep insulated of the speaker connection

Poor  sound  quality  and  with  serious 
distortion

Do not use poor disc
The  speaker  do  not  match  the 

impedance of device power 
The speaker is of open circuit

Use the official compact disc
Change for a proper speaker
Check the connection of speaker

With  sound,  but  without  picture  with 

warning prompt

The display screen is turned off

Touch the touch screen

The  parking  control  line  is  not 

connected

Check  whether  the  braking  detection  line  is 

wrongly connected

The  device  reset  the  settings 
automatically once it is turned off

ACC and B+ lines are not connected 
properly

Check  and  correct  the  ACC  and  B+  lines 
connection

The keys on the panel do not work

Some keys are blocked.

Check the keys on the panel

The  audio  track  cannot  be  changed 

when playing the disc.

Bad settings

Summary of Contents for MCD901

Page 1: ...ng check Please make sure to have all the following accessories when the box is unpacked 1 Remote control 3 Cleaning cloth 2 Power line 4 User manual Cleaning the device Please use the polishing cloth or dry cloth to wipe the dust In case of dirt on the surface please wipe it with soft cloth with neutral cleaner attenuated by 5 6 times of water Dry the cloth before cleaning the surface wipe the su...

Page 2: ...reen brightness among Bright Dim and Dark press any key or touch the screen when the screen is dark to return to normal 13 Setup Press to enter the setup menu 14 AS PS When RDS function is enabled AS PS key can be used to perform function as well as searching the channels 15 NAVI Press to switch between navigation mode and the previous play mode 16 Audio switching key Press this key to enable disa...

Page 3: ...e 12 Exit Exit the current menu 13 Menu Enter the system menu 14 Picture display parameter setup 15 Repeat section A and B 16 Ok Play 17 Up Down Left Right direction keys 18 TITEL Enter the title menu 19 Setup 20 Repeat the chapter play 21 Select the next chapter in disc playing mode Search the radio channel Upwards in radio mode Zoom in the map in navigation mode 22 Select the previous chapter in...

Page 4: ...touch screen or remote control Please refer to the Radio section in system setup 1 Radio interface with RDS Picture 2 Interface introduction 1 Name of current mode Click to return to the main interface 2 The current radio frequency 3 AF indication 4 LOC DX LOC Short distance DX Long distance when LOC function is enabled only those radio channels with strong signal and excellent receiving state are...

Page 5: ...nly 6 sections work In DVD and VCD playing mode the touch sections are distributed as follows SectionA Touch to enter the main interface SectionB Touch to enter the corresponding setup menu SectionC Touch to select the previous chapter music SectionD Touch to enter the function status control SectionE Touch to select the next chapter music SectionF Touch to enter the search menu press the correspo...

Page 6: ... then the TFT screen is drawn up to the proper position for the normal play The disc is read thereafter and CD MP3 play interface appears You select the music directly from the interface or input the number by clicking the number keyboard on the right side of the screen to play 1 Mode switching key Click to return to main interface 2 Bluetooth icon 3 Playing time 4 Exit Click to return to the curr...

Page 7: ...d x16 10 SCAN Click to scan automatically the first 10 seconds of each program to play 11 Repeat Click to switch among Single ALL and Off 12 Page Up Down of program list 13 Random play Click to enable disable the random play 14 EQ key Click to enter the EQ setup interface as shown in Picture 10 and you can set the corresponding parameter as required by touching the screen 15 Volume bar 16 Volume i...

Page 8: ...the SD card is not read 6 Bluetooth hands free This system offers Bluetooth hands free communication If your mobile phone has Bluetooth and A2DP functions you can connect with the system point to point dial receive the phone call from the screen and play the phone music Detailed operations are as follows Picture 15 Picture 16 1 Enable the Bluetooth Enter Bluetooth setup menu as Picture 15 set the ...

Page 9: ...IN function allows external media source to connect to the system such as camera game player walkman external GPS box remote control If there is no AUX IN the screen is shown as follows In AUX IN mode click section A of the touch screen to return to the system main interface 8 Rear view camera Enter the system main interface and choose Camera or press Camera key on the panel to switch to the rear ...

Page 10: ...ted TA Option Seek Alarm The device searches the radio channel automatically when TP information is lost if Seek is selected If Alarm is selected the device does not search the channel but giving out a sound of BEEP BEEP TA Retune Long Short When Long is selected the device will search the channel 3 minutes after TP information is lost while Short is selected the time will be 45 seconds 3 ASP setu...

Page 11: ...acteristic and the type of playing source Power onVol Fixed LastVol Volume selection after Power on Fixed FixedVol LastVol Volume of device before last shutdown FixedVol 10 30 Choose a fixed volume value according to the requirement Radio Level 0 6 Adjustment of relative level of radio volume output Media Level 0 6 Adjustment of relative level of media volume output 4 Video setup In system setup i...

Page 12: ...unctions caused by illegal operations Change for a new fuse of proper type Adjust the voltage Press the Rest key on the right bottom of the panel to reset the system The remote control does not work well or does not work The remote control does not aim at the device The batteries of remote control are used up The batteries are installed wrongly Make sure to keep the remote control in line with the...

Page 13: ...eration Press EJECT key for 5 seconds to reset the disc reading device The disc cannot enter There is a disc inside the device already Take the disc out and try another new one The disc cannot play normally The grade of disc is out of the grade settings of lock The area code of disc is not compatible The disc is up side down Adjust the grade of lock function Use a compatible disc Keep the label si...

Page 14: ... 24bit Type TFT Electronic anti shock ESP Display screen pixel 280x800 Pixels DVD 2 3 seconds 1200 W x234 H CD DA 10 seconds Viewing angle Up 65 Down 40 MP3 100 seconds Left 65 Right 65 WMA 200 seconds Ambient temperature Mechanical anti shock 10 200Hz X Y Z 1 0G Operating temperature 20º 70º Power output 75Wx4 Impedance 4ohm Storage temperature 30º 80º SNR 70dBA Operating humidity 45 80 Frequency...

Reviews: