Page 40
2008 Gazebo Owner’s Manual
LTR20081011, Rev. A
Timberline Gazebo Assembly
Step 2: Roof Frame Assembly
When assembling the roof frame, it is recommended that you
lay everything out and assemble it on a flat surface. It is also
recommended that there be another person available when
installing the roof frame on to the gazebo walls.
Check the parts list that came with your gazebo and make sure
that all the parts are present. Also, follow the written steps in
conjunction with the figures that are shown.
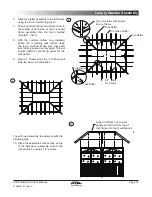
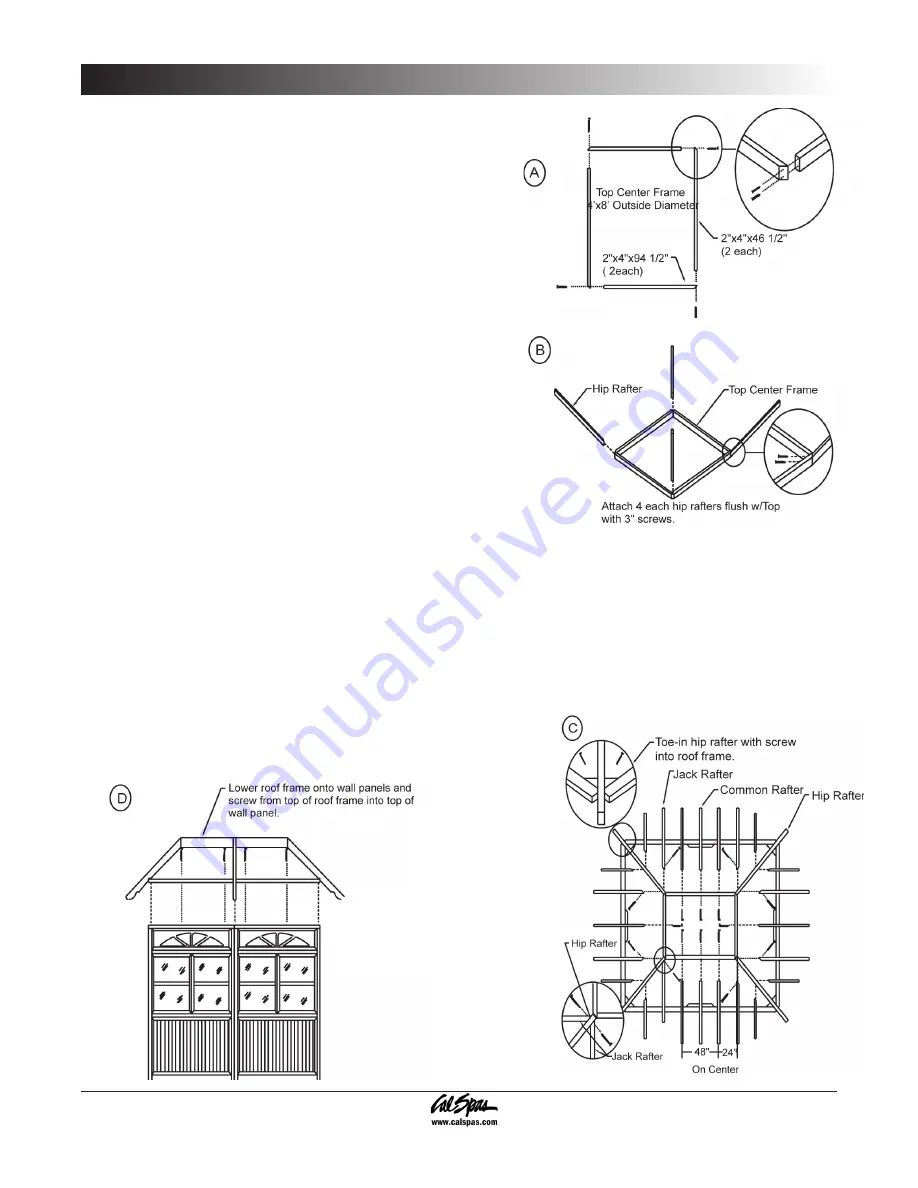
Take two 3”x4”x46 1/2” pieces of wood and two 3”x4”x94 1/2”
pieces of wood and lay them out on the ground (Figure A), in
effect making a rectangle.
Use the provided drywall screws to attach all the pieces
together.
Place corner stabilizer (4 each) and attach in each corner
(Figure C) using drywall screws.
Attach each corner together with the provided screws, making
sure to keep the 45 degree corners pointing outward (Figure
B). This is the top center frame.
Take the hip rafters (4 each) and attach them to each corner
of the top center frame. Make sure that the 45 degree corner
matches the 45 degree end on the hip rafters (Figure B).
Take 4 common rafters and attach them to the middle of each side of the top center frame assembly (Figure C).
Use the toe-in method.
With the common rafters now installed, attach the remaining jack rafters using the toe-in method. Make sure
that each jack rafter is spaced evenly apart. This will ensure sufficient anchoring points for the roof panels
(Figure C).
It is recommended that you have an assistant for the following step.
Place the assembled roof section on top of the wall panel assembly.
Anchor the roof section by using drywall screws (Figure D).
1.
2.
3.
4.
5.
6.
7.
8.


