background image

2008 Gazebo Owner’s Manual 

Page 33

LTR20081011, Rev. A

Luxury Gazebo Assembly

Step 4: Dome Installation

The final steps of the gazebo assembly will require the 

use of a ladder.

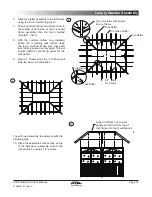
Attach the four dome brackets to the center of each 

side of the dome frame (Figure A).
Lower  the  dome  assembly  onto  the  top  center 

frame.
From  the  inside  the  gazebo  secure  the  dome 

assembly  to  the  roof  assembly  using  the  dome 

brackets and 2 1/2” screws. There will be four dome 

brackets that will connect to each side of the dome 

frame.

1.

2.

3.

Steel roof panels interlock together

as shown in magnified view

Install dome 

last

Dome for roof

bottom review

Install brackets as shown

on center of each side of

dome frame

A

B

Summary of Contents for Gazebos

Page 1: ...LTR20081011 Rev A 4 9 08 ...

Page 2: ... Step 4 Rafter Assembly 7 Step 5 Roof Frame to Walls 8 Step 6 Installing the Roof Panels 8 Step 7 Installing the Dome 10 Spa Cabana Gazebo Assembly Exploded View of Assembly 11 Step 1 Corner Post Assembly 12 Step 2 Anchoring the Main Support Post 13 Step 3 Roof Assembly 15 Roof Final Assembly 16 901 Spa Cabana Gazebo Assembly Step 1 Assembling the Gazebo 17 Step 2 Anchoring the Main Support Post 1...

Page 3: ...assembly of the your new gazebo may begin Important This gazebo is a free standing unit As with any structure it is critical that all the main support posts be plumb vertically level If the first main support post is not plumb then the entire gazebo will be misaligned The best way to keep the structure level is to use a level 1 2 3 Delivery and Set up General Safety Precautions Carefully read and ...

Page 4: ...evated wood deck or other structure we strongly recommend that you consult a structural engineer or contractor to ensure the structure will support the weight of 150 Lbs sq ft It is strongly recommended that a qualified licensed contractor prepare the foundation for your spa For all gazebos regardless of model it is recommended that the foundation extend beyond the dimension of the gazebo For exam...

Page 5: ...o Assembly Order of Assembly Whether you assemble your gazebo yourself or hire someone to do it your new Bayside gazebo needs to be assembled in a specific order Our Cal Enclosures professionals have determined through their experience that this is the easiest way to assemble your gazebo ...

Page 6: ...corner up side by side Attach the panels together using 4 drywall screws Repeat this step until all the panels are attached The figure below shows the proper arrangement of panels The owner must use care when securing the wall panels and rounded corners together as any damage incurred during assembly is not covered by the warranty Be sure that the screws do not come in contact with the windows 1 2...

Page 7: ...ts list that came with your gazebo and make sure that all the parts are present Also please follow the written steps in conjunction with the figures that are shown Take four 2 x3 x96 pieces of wood and lay them out on the ground in effect making a square Place corner stabilizers 4 each and attach in each corner using drywall screws Use the provided drywall screws to attach all the pieces together ...

Page 8: ...ttach each corner together with the provided screws making sure to keep the 45 degree corners pointing outward This is the top center frame 2 Take the hip rafters 4 each and attach them to each corner of the top center frame Make sure that the 45 degree corner matches the 45 degree end on the hip rafters ...

Page 9: ...on rafters to the middle of each side of the top center frame assembly Use the toe in method see inset With the common rafters now installed attach the the remaining rafters Make sure that each rafter is spaced evenly apart This will ensure sufficient anchoring points for the roof panels Figure B NOTE It is recommended that you have an assistant for the following step 1 2 3 ...

Page 10: ...f and rafter assembly on top of the wall panel assembly Anchor the roof section by using drywall screws Step 6 Installing the Roof Panels It is strongly recommended that you use a ladder for the final steps of the gazebo assembly Prior to installing the roof panels a center line must be drawn on the top side of each rafter 1 ...

Page 11: ...el in place Be sure the bottom corners are aligned on the center line Faster using the provided screws Figure 9 When roof panels meet at corners sometimes a gap will be present Be sure that the bottom corners meet at the center line 2 Use the provided screws to mount all ridge caps Figure 10 3 ...

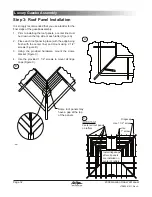
Page 12: ...the use of a ladder Install the provided metal brackets on the center of each dome side Figure A Lower the dome assembly on to the top roof frame Figure B From the inside the gazebo secure the dome assembly to the roof assembly using the dome brackets and drywall screws There will be four dome brackets that will connect to each side of the dome frame 1 2 3 ...

Page 13: ...ded View of Assembly Whether you assemble your gazebo yourself or hire someone to do it your new gazebo needs to be assembled in a specific order Our Cal Enclosures professionals have determined through their experience that this is the easiest way to assemble your gazebo 5 5 4 4 3 3 6 12 2 2 2 2 2 1 1 1 1 9 8 10 ...

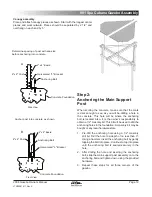
Page 14: ... the bottom Once this is complete repeat these steps for all four sides of the gazebo Using the provided hardware attach the galvanized L bracket to the 4 x4 either side With the use of a level and after ensuring that the 2 x6 is between the spa and the 4 x4 check that the support is level top to bottom and mark the location of the anchoring hole by scoring the concrete 1 2 3 4 5 4 x 4 2 x 6 shoul...

Page 15: ...he bolt into place Continue to tap into place until the anchoring bolt is seated securely in the hole After drilling the hole and inserting the anchoring bolt slide the main support post assembly on to the anchoring bolt and tighten down using the provided hardware Repeat these steps for all four corners of the gazebo 1 2 3 Anchor post into concrete as shown Concrete Foundation Anchoring Bolt Galv...

Page 16: ...tance between each main support post will be determined by the size of the spa and gazebo that was purchased The Cabana Gazebo has 3 sizes 7 x7 7 5 x7 5 and 8 x8 The desired distance between each main support post will be determined by the aforementioned sizes The list below will tell you what each distance should be for each gazebo model If the spa is Then the distance between each gazebo main su...

Page 17: ...screws Make sure that the 2 x6 x144 is centered between the two 4 x4 main support posts Place another 2 x6 x144 roof support on the opposite side of the 4 x4 main support post Screw this piece to the 4 x4 as well Repeat this process on the other main support posts that are directly across from the main support posts that were just completed Referring to Figure A place another 2 x6 x144 roof suppor...

Page 18: ...ach roof slat securely in place with 2 1 2 screws Lay out the 2 x2 x144 roof slats on the one upper level of the gazebo Make sure that each roof slat is spaced exactly 2 1 2 apart These roof slats need to be running the opposite direction as the lower level roof slats 1 2 3 2 x 2 x 144 spaced 2 1 2 apart 2 x 2 x 140 spaced 2 1 2 apart 2 x 2 x 144 Roof Slats 2 x 2 x 140 NOTE Please observe the two ...

Page 19: ...d or parts contact your local retailer Step 1 Assembling the Gazebo Corner and side panel assembly Stand up corner posts and attach a side panel as shown Repeat this step for the other side panel until all of the corner posts are standing Front cross beams Place and attach the front cross beams as shown Rear cross beams Place and attach the rear cross beams as shown Rear diagonal beams Place and a...

Page 20: ...the front diagonal beams 11 in from the out edge of the front beam as shown Front section attachment Attach the front section to the structure as shown Top cross beam assembly Place top cross beams with an equal overhang on each end as shown Decorative posts and fastening Place and attach decorative posts as shown Fasten top cross beams as shown ...

Page 21: ... may be bought at any local hardware store Pre drill the anchoring hole using a 1 2 masonry drill bit Drill the hole to a depth of no less than 3 Using a hammer insert the anchoring bolt by gently tapping the bolt into place Continue to tap into place until the anchoring bolt is seated securely in the hole After drilling the hole and inserting the anchoring bolt slide the main support post assembl...

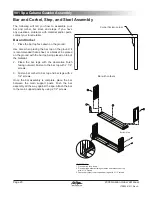
Page 22: ... ground with the bar top being placed on top of the material Place the bar legs with the decorative finish facing outward Fasten to the bar top with 2 1 2 screws Fasten bar corbel to bar top and bar legs with 2 1 2 screws Once the bar assembly is complete place the bar between the main support posts Push the bar assembly all the way against the spa Attach the bar to the main support posts by using...

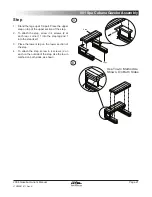
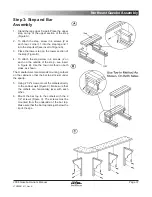
Page 23: ...section of the step To attach the step screw in 4 screws 2 at each rear corner 1 into the step leg and 1 into the step itself Place the lower step on the lower section of the step To attach the step screw in 4 screws 2 on each on the outside of the step Use the toe in method on both sides as shown 1 2 3 4 Use Toe In Method As Shown On Both Sides Step Legs A B ...

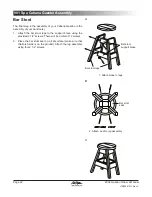
Page 24: ...stools Attach the bar stool legs to the support brace using the provided 2 1 2 screws There will be a total of 12 screws Place the bar stool seat on a flat surface make sure that the finish side is on the ground Attach the leg assembly using four 2 1 2 screws 1 2 1 Attach sides to legs 2 Attach seat to leg assembly Bar stool legs Bar stool support brace Bar stool seat A B C ...

Page 25: ... Whether you assemble your gazebo yourself or hire someone to do it your new gazebo needs to be assembled in a specific order Our Cal Enclosures professionals have determined through their experience that this is the easiest way to assemble your gazebo 2 1 5 1 5 5 5 5 6 3 4 4 4 4 4 4 4 7 3 4 11 11 7 7 16 5 5 5 5 1 1 2 ...

Page 26: ...ing the sample in Figure B inset Repeat this step until all the panels are attached Figure B will show you the wall panel layout The rounded corners attach to the wall panels the same way with five 2 1 2 screws The owner must use care when securing the wall panel and rounded corner together as any damage incurred during assembly is not covered by the warranty Use care when attaching the sides and ...

Page 27: ...e four 2 x2 x24 pieces of wood and attach to each center point on the side of the roof frame Attach each corner together with the provided screws making sure to keep the 45 degree corner pointing outward Figure C inset This is the top center frame Take four single slider rafters and two double slider rafters attach them to the middle of each side of the top center frame assembly Figure C Use the t...

Page 28: ...ack rafter is spaced evenly apart This will ensure sufficient anchoring points for the roof panels Figure E shows what the roof frame will look like when it is completed It is recommended that you have an assistant for the following step Place the assembled roof section on top of the wall panel assembly Anchor the roof section by using 2 1 2 screws Figure F 6 7 8 9 10 Lower roof frame onto wall pa...

Page 29: ...sembly Place each roof panel in place with the edge resting on the panel supports and mount using 2 1 2 screws Figure A If your model gazebo has a dome roof refer to Step 3 Using the provided hardware mount the dome bracket Figure B Use 2 1 2 screws to mount all ridge caps Set the roof assembly onto the wall panel assembly and attach using 2 1 2 screws 1 2 3 4 A B Panel Support Panel Support ...

Page 30: ...Gazebo Assembly Order of Assembly Whether you assemble your gazebo yourself or hire someone to do it your new gazebo needs to be assembled in a specific order Our Cal Enclosures professionals have determined through their experience that this is the easiest way to assemble your gazebo ...

Page 31: ... five 2 1 2 screws Figure A Repeat this step until all the panels are attached Figure B The rounded corners attach to the wall panels the same way with five 2 1 2 screws The owner must use care when securing the wall panel and rounded corner together as any damage incurred during assembly is not covered by the warranty Caution Use care when attaching the sides and corners Be sure that the screws d...

Page 32: ...p the 45 degree corners pointing outward Figure C inset This is the top center frame 1 2 3 4 Take the hip rafters 4 each and attach them to each corner of the top center frame Make sure that the 45 degree corner matches the 45 degree end on the hip rafters Figure D 5 10 Inside Diameter Completed Roof Frame 2 x3 x98 1 2 4 each 2 x2 x24 4 each 2 x3 x60 4 each Lay out roof frame as shown above Use sc...

Page 33: ... 7 8 9 Lower roof frame on to wall panels and screw from top of roof frame into top of wall panel Jack Rafter 48 24 On Center Jack Rafter Hip Rafter Hip Rafter Common Rafter Toe in hip rafter with screws into roof frame E G F Lower roof frame on to wall panels and screw from top of roof frame into top of wall panel Jack Rafter 48 24 On Center Jack Rafter Hip Rafter Hip Rafter Common Rafter Toe in ...

Page 34: ...ome bracket Figure C Use the provided 1 1 2 screws to mount all ridge caps Figure C 1 2 3 4 Some roof panels ma have a gap at the top of the panels Use 1 1 2 screw Use 1 screw IMPORTANT Center all roof panels on rafters A B C Ridgecap Some roof panels may have a gap at the top of the panels Use 1 1 2 screw Use 1 screw IMPORTANT Center all roof panels on rafters Install ridgecaps after all panels a...

Page 35: ...frame Figure A Lower the dome assembly onto the top center frame From the inside the gazebo secure the dome assembly to the roof assembly using the dome brackets and 2 1 2 screws There will be four dome brackets that will connect to each side of the dome frame 1 2 3 Steel roof panels interlock together as shown in magnified view Install dome last Dome for roof bottom review Install brackets as sho...

Page 36: ...zebo Assembly Order of Assembly Whether you assemble your gazebo yourself or hire someone to do it your new Northeast gazebo needs to be assembled in a specific order Our Cal Enclosures professionals have determined through their experience that this is the easiest way to assemble your gazebo ...

Page 37: ...e written steps in conjunction with the figures that are shown Place the wall panel on a flat surface Be sure not to set it on any surface that can possibly scratch the surface of the windows Fit the rounded luxury corner onto the wall panel and attach using the provided 2 1 2 screws Figure A Repeat this step for the remaining wall panels Referring to Figure B make sure that each wall panel 2 each...

Page 38: ... center frame Take three hip rafters and attach them to the 45DE angle at each corner of the top center frame Secure using 2 1 2 screws Figure A Place the assembled roof frame onto the assembled wall panels Figure A and attach using the provided 2 1 2 screws Attach two roof panels 47 x109 and secure using 2 1 2 screws Center each panel on the hip rafters Figure C Place moon roof 48 x48 x65 1 2 on ...

Page 39: ...re B To attach the step screw in 4 screws 2 on each on the outside of the step see insert in Figure B Use the toe in method on both sides as shown The manufacturer recommends mounting corbels on the cabinet so that the bar top sits just under the spa lip Using 2 1 2 screws mount the corbels directly to the cabinet wall Figure C Make sure that the corbels are horizontally level with each other Moun...

Page 40: ...ine Gazebo Assembly Order of Assembly Whether you assemble your gazebo yourself or hire someone to do it your new gazebo needs to be assembled in a specific order Our Cal Enclosures professionals have determined through their experience that this is the easiest way to assemble your gazebo ...

Page 41: ... screws Repeat this step until all the panels are attached The figure shows you which order to go in The rounded corners attach to the wall panels the same way with 5 drywall screws The owner must use care when securing the wall panel and rounded corner together as any damage incurred during assembly is not covered by the warranty Use care when attaching the sides and corners Be sure that the wind...

Page 42: ...h and attach in each corner Figure C using drywall screws Attach each corner together with the provided screws making sure to keep the 45 degree corners pointing outward Figure B This is the top center frame Take the hip rafters 4 each and attach them to each corner of the top center frame Make sure that the 45 degree corner matches the 45 degree end on the hip rafters Figure B Take 4 common rafte...

Page 43: ...azebo assembly Prior to installing the roof panels a center line must be drawn on the top side of each rafter Figure A Place each roof panel in place with the edge being flush with the center line and mount using drywall screws Figure B Use 2 1 2 drywall screws to mount all ridge caps Figure C Set the roof assembly onto the wall panel assembly and attach using drywall screws 1 2 3 4 ...

Page 44: ... The final steps of the gazebo assembly will require the use of a ladder Fasten the dome brackets to the center of each side of the dome Set the dome assembly onto the top center roof From the inside the gazebo secure the dome assembly to the roof assembly using the dome brackets and drywall screws 1 2 3 ...

Page 45: ...r local Cal Enclosures dealer On models that have Plexiglas windows use cheese cloth and warm water These windows are made of Plexiglas and do not hold up well under abrasive commercial cleaners Troubleshooting Q Why won t the windows on the gazebo stay open or closed A This is most likely due to the fact that your foundation is not level Foundations will most likely have a 1 4 pitch for drainage ...

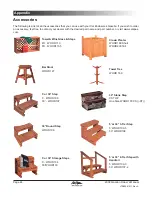
Page 46: ...th the desired part name and part number or visit www calspas com Towel Wine Glass Steps 4ft WOOD 113 5ft WOOD113 5 Crown Planter WOOD189 Short WOOD200 Tall Bar Stool WOOD 127 Towel Tree WOOD 169 30 Stone Step CS TOP One Size WOOD107 CS ST 5 or 30 Step 5 WOOD109 30 WOOD107 30 Round Step WOOD106 5 or 30 3 Tier Step 5 WOOD109 5 30 WOOD108 5 or 30 Storage Steps 5 WOOD134 30 WOOD133 5 or 30 2 Tier Ste...

Page 47: ...WOOD139 11 ft WOOD136 Deluxe Stone Top 7 ft WOOD138DS 8 ft WOOD139DS 11 ft WOOD136DS Crescent Bench Wood Top One Size WOOD140 Deluxe Stone Top One Size WOOD140DS Bench Wood Top 7 ft WOOD141 8 ft WOOD142 11 ft WOOD105 Deluxe Stone Top 7 ft WOOD141DS 8 ft WOOD142DS 11 ft WOOD105DS Storage Bench Wood Top 7 ft WOOD901 8 ft WOOD902 11 ft WOOD905 Deluxe Stone Top 7 ft WOOD901DS 8 ft WOOD902DS 11 ft WOOD...

Page 48: ...Wine Rack WOOD183 Bar Corbal WOOD27405060 Bar Bench Top only 7 ft WOOD289 8 ft WOOD288 11 ft WOOD287 Round Corner Crescent Bench Top only WOOD199 Door and Window Tracking 5 ft Door Tracking OPT 804 Window Tracking OPTW 816 Bar Assembly Complete 7 ft WOOD291 8 ft WOOD292 11 ft WOOD293 Bay Window 4 ft and 5 ft Bi Fold Window with Bar ...

Page 49: ...2008 Gazebo Owner s Manual Page 47 LTR20081011 Rev A ...

Page 50: ...Page 48 2008 Gazebo Owner s Manual LTR20081011 Rev A ...

Page 51: ...rimary responsibility of the customer Warranty Limitations This warranty does not apply if the gazebo has been subject to negligence alteration misuse abuse repairs by non L M S authorized representatives incorrect installation acts of God and any other cases beyond the control of L M S Examples of common acts invalidating this warranty include but are not limited to Failure to use a wood protecta...

Page 52: ...ts Cal Select against defects and workmanship warping and discoloration for a period of three years All natural gazebo materials are warranted for a period of 90 days DON T FORGET TO REGISTER YOUR NEW PRODUCT AT WWW CALSPAS COM Locating the product serial number The serial number of your gazebo is on a metal plate located inside up in the rafters You will need this number to properly register your...

Reviews: