


Assembly instructions
1
B
C
4 or 5
K
G
I
6
H
2 or 3
8
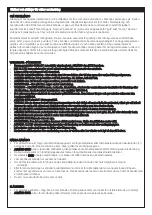
STEP 2 -
(Joining the two halves assembled in step l) Stand the section 1 upright and place the upper cross
braces (4&5) close to section 1. Inserting truss head screw C through the hole of section1
and section 4&5 and install K Keps nut and tighten securely.
(Installing the lower cross braces and casters) Place the assembled lower cross braces (2&3) under section 1,
Stand the section 6 upright to make it close to section 1 and section 4&5. Inserting screw B through
STEP 3 -
section 4&5 and section 6, install G Keps nut and tighten securely. Next insert the threaded caster stem
through the hole in the end of the lower cross brace then through the riser and finally the riser brace.
Install (H) flat washer and (l) Keps nut, repeat this at the remaining (3) aster locations and securely tighten.
8
7
STEP 4 -
STEP 5 -
STEP 6 -
STEP 7 -
As picture, put wheels 7 in front, and wheels with brake at the back.
To place the Oven on the cart first remove all items that are inside of the grill to make lifting easier.
Use a minimum of two people when lifting the Oven onto the cart. Place one of your hands in the bottom
vent of the Oven and the other under the grill. Lifting by the hinge or the side tables could result in injury
and damage to the product.
Position the nest upright on a flat level surface with the help of an assistant you can now place the oven
into the nest. Position the oven so the vent door is accessible between two of the risers and gently push
downward on the oven to seat it in the nest.
STEG 2
–
(Sätt ihop de två halvorna som monterades i steg l)
Ställ sektion 1 upprätt och placera de övre tvärstagen (4 och 5) nära sektion 1.
Sätt in skruven med lågvälvt huvud C genom hålet på sektion 1 och sektion 4 och 5 och montera
K låsmuttern och dra åt ordentligt.
STEG 3
–
(Montering av nedre tvärstag och hjul)
Placera de monterade nedre tvärstagen (2 och 3) under sektion 1, ställ sektion 6 upprätt så att den
är nära sektion 1 och sektion 4 och 5. Sätt in skruven B genom sektion 4 och 5 och sektion 6,
montera G låsmuttern och dra åt ordentligt. Sätt sedan in det gängade hjulskaftet genom hålet i det
nedre tvärstagets ände, sedan genom stången och slutligen stångens stöd.
Montera (H) planbricka och (I) låsmutter, upprepa detta på de återstående (3) hjulplatserna och dra
åt ordentligt.
STEG 7
–
Placera ställningen upprätt på en plan yta med hjälp av en annan person. Du kan nu placera
ugnen på ställningen. Placera ugnen så att ventilationsluckan är tillgänglig mellan två av stängerna
och tryck försiktigt nedåt på ugnen för att placera den på ställningen.
STEG 6
– Ni behöver vara minst två personer när ugnen ska lyftas upp på vagnen. Placera en av dina
händer i bottenöppningen på ugnen och den andra under grillen. Att lyfta i gångjärnen eller
STEG 4
–
Sätt hjul 7 fram och hjul med broms bak 8, enligt bilden.
STEG 5
–
För att placera ugnen på vagnen, ta först bort alla objekt som är inne i grillen så att den blir lättare
att lyfta.
Monteringsanvisningar