


Assembly instructions
1
2
9
10
1
1
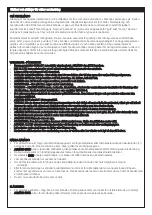
STEP 8 -
When the grill is securely placed on the cart add the firebox (10), charcoal plate (9), and cooking
grill(12) inside of the Kamado Grill as displayed in the assembly diagram.
STEP 9 -
Press down on the castor levers (8) to lock the castor wheels to ensure the Kamado cannot move when
in use.
Asennusohjeet
VAIHE 8
–
Kun grilli on vakaasti vaunun päällä, lisää arina (11), puuhiililevy (10), ylärengas (9) ja grilliritilä (13)
Kamado-grillin sisään kokoamiskaavion mukaisesti.
VAIHE 9
–
Paina kääntyviä pyöriä (8) niiden lukitsemiseksi, jolloin Kamado ei pääse liikkumaan käytön aikana.