background image

49-2000082

7

Features

USING 

YOUR OVEN: 

Features

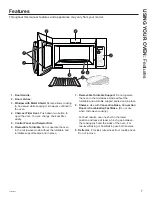
1.   Door Handle. 
2.   Door Latches.
3.   Window with Metal Shield. 

Screen allows cooking 

to be viewed while keeping microwaves confined in 
the oven.

4.   Charcoal Filter Door. 

Push down two button to 

open the door. You can change charcoal filter 
easily. 

5.   Control Panel and Selector Dial.
6.   Removable Turntable. 

Do not operate the oven 

in the microwave mode without the turntable and 
turntable support seated and in place.

7.   Removable Turntable Support. 

Do not operate 

the oven in the microwave mode without the 
turntable and turntable support seated and in place.

8.   Shelves. 

Use with 

Convection Bake, Convection 

Roast 

or

 Combination Fast Bake. 

(Do not use 

when microwave cooking.) 
 
For best results, use one shelf in the lower 
position and leave at least a 1-inch gap between 
the cooking dish and the sides of the oven. For 
two-level Baking or Fast Baking use both shelves.

9  Deflector.  

Provides robustness from cooktop heat. 

Do not remove.

Throughout this manual, features and appearance may vary from your model.

Summary of Contents for CVM517P

Page 1: ... Cooking Options 9 Microwave Time and Auto Features 11 Power Level 13 Microwave terms 14 Microwave Sensor Features 14 Baking and Roasting Features 18 Fast Cook Feature 19 Cookware Tips 20 Best Method of Cooking Chart 21 Other Features 22 Care and Cleaning Inside 25 Outside 25 Replacing the LED Lamp 26 Exhaust Feature 27 Troubleshooting 28 Optional Kits 30 Limited Warranty 31 Consumer Support 32 Es...

Page 2: ...ill too Among other things registration of your appliance ensures that we can deliver important product information and warranty details when you need them Register your Café appliance now online Helpful websites are available in the Consumer Support section of this Owner s Manual You may also mail in the pre printed registration card included in the packing material ...

Page 3: ...ped Ŷ HHS FRUG DZD IURP KHDWHG VXUIDFHV Ŷ Do not let cord hang over the edge of the table or counter Ŷ R QRW LPPHUVH FRUG RU SOXJ LQ ZDWHU Ŷ R QRW FRYHU RU EORFN DQ RSHQLQJV RQ WKH appliance Ŷ R QRW VWRUH WKLV DSSOLDQFH RXWGRRUV R QRW XVH WKLV product near water for example in a wet basement near a swimming pool near a sink or in similar locations Ŷ R QRW PRXQW WKLV DSSOLDQFH RYHU D VLQN TO REDUCE...

Page 4: ... casseroles cooking dishes measuring cups custard cups pottery or china dinnerware which does not have metallic trim or glaze with a metallic sheen can be used in compliance with cookware manufacturers recommendations Ŷ W LV LPSRUWDQW WR NHHS WKH DUHD FOHDQ ZKHUH WKH door seals against the microwave Use only mild nonabrasive detergents applied with a clean sponge or soft cloth Rinse well SUPER HEA...

Page 5: ... allow grease to build up on the microwave or the fan filters Ŷ Q WKH HYHQW RI D JUHDVH ILUH RQ WKH VXUIDFH XQLWV below the microwave oven smother a flaming pan on the surface unit by covering the pan completely with a lid a cookie sheet or a flat tray Ŷ 8VH FDUH ZKHQ FOHDQLQJ WKH YHQW IDQ ILOWHUV Corrosive cleaning agents such as lye based oven cleaners may damage the filters Ŷ KHQ SUHSDULQJ IODP...

Page 6: ...ent birth defects or other reproductive harm GROUNDING INSTRUCTIONS To prevent risk of electric shock follow these instructions Ŷ Plug microwave into a grounded 3 prong outlet Ŷ Do not remove the ground prong or use an adapter Ŷ Do not use an extension cord WARNING Improper use of the grounding plug can result in a risk of electric shock This appliance must be grounded In the event of an electrica...

Page 7: ...turntable support seated and in place 7 Removable Turntable Support Do not operate the oven in the microwave mode without the turntable and turntable support seated and in place 8 Shelves Use with Convection Bake Convection Roast or Combination Fast Bake Do not use when microwave cooking For best results use one shelf in the lower position and leave at least a 1 inch gap between the cooking dish a...

Page 8: ...wice Timer Defrost Amount of defrosting time Power Level Power level 1 10 Sensor Features Press Turn and push dial to enter Option Steam Cook Food type Popcorn Starts immediately Beverage Starts immediately Reheat Food type Cook Food type Convection Baking or Convection Roasting Press Turn and push dial to enter Convection Bake or Oven temperature and cook time Convection Roast Combination Fast Co...

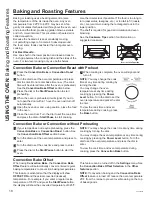
Page 9: ... Microwave energy Heat Conduction Heat produced within food by instant energy penetration Benefits Fast high efficiency cooking Oven and surroundings do not get hot Easy clean up Always use the shelf with Fast Bake For best results use one shelf in the lower position or Do not use the shelves when microwave cooking Convection Baking and Convection Roasting During baking or roasting a heating eleme...

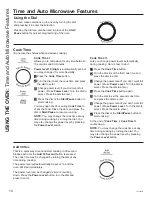
Page 10: ...r level by pressing the Power Level button Cook Time II Lets you change power levels automatically during cooking Here s how to do it 1 Press the Cook Time button 2 Turn the dial to set the first cook time and press the dial to enter 3 Change the power level if you don t want full power Press Power Level Turn the dial to select Press the dial to enter 4 Press the Cook Time button again 5 Turn the ...

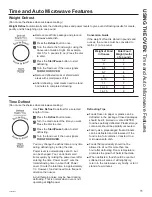
Page 11: ...DIWHU entering the time Power Level 7 cuts the total defrosting time in about half Power Level 10 cuts the total time to approximately RZHYHU IRRG ZLOO QHHG PRUH IUHTXHQW attention than usual A dull thumping noise may be heard during defrosting This is normal when oven is not operating at High power Defrosting Tips Ŷ RRGV IUR HQ LQ SDSHU RU SODVWLF FDQ EH defrosted in the package Closed packages s...

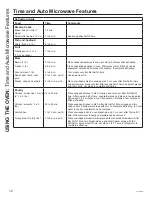
Page 12: ...s with table knife Let stand to complete defrosting Poultry Chicken broiler fryer cut up 2 1 2 to 3 lbs 14 to 20 min Place wrapped chicken in dish Unwrap and turn over after first half of time After second half of time separate pieces and place in cooking dish Microwave 2 to 4 minutes more if necessary Let stand a few minutes to finish defrosting Chicken whole 2 1 2 to 3 lbs 20 to 25 min Place wra...

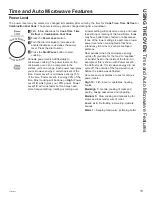
Page 13: ...d need less stirring or rotating of the food Some foods may have better flavor texture or appearance if one of the lower settings is used Use a lower power level when cooking foods that have a tendency to boil over such as scalloped potatoes Rest periods when the microwave energy F FOHV RII JLYH WLPH IRU WKH IRRG WR HTXDOL H or transfer heat to the inside of the food An example of this is shown wi...

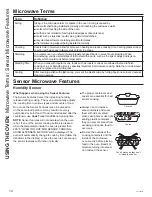
Page 14: ...ap you vent the plastic wrap by turning back one corner so excess steam can escape Sensor Microwave Features Humidity Sensor What happens when using the Sensor Features The Sensor Features detect the increasing humidity released during cooking The oven automatically adjusts the cooking time to various types and amounts of food Do not use the Sensor Features twice in succession on the same food por...

Page 15: ...d Foods A wide variety of foods including meats fish and vegetables can be cooked using this feature Foods not recommended Foods that must be cooked XQFRYHUHG IRRGV WKDW UHTXLUH constant attention foods that UHTXLUH DGGLWLRQ RI LQJUHGLHQWV during cooking and foods calling for a dry look or crisp surface after cooking should not be cooked using this feature It is best to Cook Time them Sensor Micro...

Page 16: ...o not use the shelves when microwave cooking The Reheat feature reheats servings of previously cooked foods or a plate of leftovers 1 3ODFH WKH FXS RI OLTXLG RU FRYHUHG IRRG LQ WKH RYHQ Press Reheat and choose food type 2 The oven signals when steam is sensed and the time remaining begins counting down Do not open the oven door until time is counting down If the door is opened close it and press S...

Page 17: ... rotating food To resume cooking close the door and press Start Pause Ŷ 0DWFK WKH DPRXQW RI IRRG WR WKH VL H RI FRQWDLQHU LOO containers at least 1 2 full Ŷ H VXUH RXWVLGH RI FRQWDLQHU DQG LQVLGH RI RYHQ DUH GU Ŷ IWHU FRPSOHWLRQ RI RRN F FOH LI IRRG QHHGV DGGLWLRQDO cooking return food to oven and use Cook Time to finish cooking NOTE Do not use this feature twice in succession on the same food por...

Page 18: ... 7 When cooking is complete the oven will signal and turn off NOTE You may change the cook time at any time during cooking by turning the dial You may change the oven temperature at any time during cooking by pressing the Power Level button Turn the dial to set the oven temperature and press the dial to enter To view the cook time and oven temperature during cooking press the Bake button Convectio...

Page 19: ...LU FLUFXODWLRQ DQG HYHQ browning See the Cookware Tips section for information on suggested cookware See the Best Method of Cooking section to determine the which foods are appropriate to cook using Fast Cook Fast Cook with Preheat 1 Press the Combination Fast Cook button 2 Turn the dial to set the oven temperature and press dial to enter Do not enter Fast Cook cook time now The cook time will be ...

Page 20: ...ake Glass or Glass Ceramic baking containers are recommended Be sure not to use items with metal trim as it may cause arcing sparking with oven wall or oven shelf This can damage the cookware the shelf or the oven Heat Resistant Plastic microwave cookware safe to 450 F may be used but it is not recommended for foods UHTXLULQJ DOO DURXQG EURZQLQJ EHFDXVH WKH SODVWLF LV D poor conductor of heat Cook...

Page 21: ...efrosting Cooking 9 9 9 9 Casseroles 9 9 9 Eggs and Cheese Scrambled Omelets Quiche Souffle 9 9 9 9 Vegetables fresh 9 Breads Muffins Coffee Cake Quick Yeast 9 9 9 9 Desserts Cakes Layer and Bundt Angel Food and Chiffon Custard and Pudding Bar Cookies Fruit Pies and Pastry Candy 9 9 9 9 9 9 9 9 Blanching Vegetables 9 Frozen Convenience Foods 9 9 9 Use the following guide to select the best method ...

Page 22: ...f button to stop and cancel cooking at any time Timer On Off The Timer operates as a minute timer and can be used at any time even when the oven is operating 1 Press the Timer button 2 Turn the dial to select the minutes Press the dial to enter 3 Turn the dial to select the seconds Press the dial to enter 4 Press the dial or Timer to start To cancel press the Timer button When time is up the oven ...

Page 23: ...t Display Speed Slow Normal Fast Press enter to activate My Cycle The Add 30 Sec button can be adjusted to the My Cycle features 1 Press the Settings button and turn the dial to select My Cycle Press the dial to enter 2 Turn the dial to select time from 5 Sec to 60 Sec and press the dial to complete the setting Sound Level Sound Level can be adjusted for Mute Low Normal or Loud 1 Press the Setting...

Page 24: ... as follows Display clock sync ON Auto surface light ON HIGH setting Auto vent fan OFF Auto off 15 minutes 3 Turn the dial to select Surface Light Sync On Off Press the dial to confirm If on it allows the microwave surface lights to turn on at HIGH level automatically when the paired range s cooktop burner turns ON If OFF the microwave surface lights will not automatically turn on when a cooktop b...

Page 25: ...ch the control panel Door Panel Before cleaning the front door panel make sure you know what type of panel you have Refer to the 11th digit of the model number S is stainless steel L is CleanSteel D is for black slate or dark matte finish and B W or C are plastic colors Stainless Steel on some models The stainless steel panel can be cleaned with Stainless Steel Magic or a similar product using a c...

Page 26: ... the power at the main fuse or circuit breaker panel or pull the plug 2 Remove the screw from the side of the light compartment cover and lower the cover until it stops 3 Be sure the LED lamp is cool before removing Remove a screw and connector from LED lamp 4 Connect LED lamp and secure using the screw Raise the light cover and replace the screw Connect electrical power to the oven Remove screw ...

Page 27: ...ower Level Auto Cook Combination Fast Bake Convection Roast Turntable Convection Bake Reusable vent filters on all models Charcoal filter Turn to Select Press to Ente r Reheat Timer On Off Defrost Weight Time Start Pause Cancel Off Lock Controls Hold 3 Sec Cook Time Set Clock Options Help Surface Light Vent Fan Popcorn Beverage Microwave Express Warm Power Level Auto Cook Combination Fast Bake Con...

Page 28: ...te On Off for about 3 seconds to unlock the control OVEN TOO HOT FOR SENSOR COOKING USING ALTERNATE METHOD appears on display One of the sensor cooking buttons was pressed when the temperature inside the oven was greater than 200 F These features will not operate when the oven is hot The oven will automatically change to cook by time follow the directions in the display or once the oven is cool en...

Page 29: ... and 59 minutes When the maximum cooking time is reached the oven will automatically indicate that cooking is complete and turn off the cooking element Ŷ When using convection bake convection roast or combination fast cook with a preheat the oven door must be opened and the cooking time set after preheat or the oven will turn off the cooking element after 1 hour FEDERAL COMMUNICATIONS COMMISSION U...

Page 30: ...BUMP Bump Out Kit When installing a microwave in a kitchen with 15 deep FDELQHWV WKH EXPS RXW NLW LV UHTXLUHG 7KH NLW DOORZV the microwave to be installed 3 inches further out which prevents the cabinets from blocking the ventilation holes at the top of the microwave grill Filter Kits Ŷ WB02X29749 Recirculating Charcoal Filter Kit Filter kits are used when the oven cannot be vented to the outside ...

Page 31: ... Warranty Any implied warranties including the implied warranties of merchantability or fitness for a particular purpose are limited to one year or the shortest period allowed by law This limited warranty is extended to the original purchaser and any succeeding owner for products purchased for home use within the USA If the product is located in an area where service by a Café Appliances Authorize...

Page 32: ...arranties Purchase a Café extended warranty and learn about special discounts that are available while your warranty is still in effect You can purchase it on line anytime Café Appliances Services will still be there after your warranty expires cafeappliances com extended warranty Remote Connectivity For assistance with wireless network connectivity for models with remote enable visit our website ...

Page 33: ... su horno 7 Controles 8 Opciones de cocción 9 Funciones de tiempo y automático 11 Nivel de potencia 13 Terminología de microondas 13 Características de microondas por sensor 14 Funciones de Horneado y Asado 18 Función de Cocción Rápida 19 Consejos de utensilios de cocina 20 Tabla con el mejor método para cocinar 21 Otras funciones 22 Cuidado y Limpieza Interior 25 Exterior 25 Reemplazo de la luz L...

Page 34: ...ro de su electrodoméstico asegura que podamos entregarle información importante del producto y detalles de la garantía cuando los necesite Registre su electrodoméstico Café ahora a través de Internet Sitios Web útiles están disponibles en la sección de Soporte para el Consumidor de este Manual del Propietario También puede enviar una carta en la tarjeta de inscripción preimpresa que se incluye con...

Page 35: ... HO FDEOH DOHMDGR GH VXSHUILFLHV FDOLHQWHV Ŷ 1R SHUPLWD TXH HO FDEOH HOpFWULFR FXHOJXH VREUH HO ERUGH de la mesa o del mostrador de encimera Ŷ 1R VXPHUMD HO FDEOH HOpFWULFR R HO HQFKXIH HQ DJXD Ŷ 1R FXEUD QL EORTXHH QLQJXQD DSHUWXUD GH HVWH DSDUDWR Ŷ 1R DOPDFHQH HVWH DSDUDWR DO DLUH OLEUH 1R XWLOLFH HVWH producto cerca del agua por ejemplo en un sótano húmedo cerca de una piscina cerca de un lavab...

Page 36: ...ismo Se pueden usar la mayoría de las cazuelas de vidrio platos de cocción tazas graduadas tazas para postre vajillas de cerámica o cubiertos de porcelana que no poseen bordes metálicos o vidriados con un brillo metálico siguiendo las recomendaciones del fabricante Ŷ V LPSRUWDQWH PDQWHQHU HO iUHD OLPSLD GRQGH OD SXHUWD VH selle contra el horno microondas Use sólo detergentes suaves y no abrasivos ...

Page 37: ...andeja plana Ŷ Limpie con cuidado los filtros del ventilador Agentes de limpieza corrosivos tales como los limpiadores de horno a base de soda cáustica podrán dañar los filtros Ŷ Al preparar comidas llameantes debajo del horno microondas encienda el ventilador Ŷ Nunca deje de prestar atención a las unidades de la superficie debajo de su horno microondas en las configuraciones altas de calor Las eb...

Page 38: ...se entiendan completamente o si tiene dudas sobre si la herramienta está conectada a tierra de forma apropiada Se brinda un cable de corriente corto a fin de reducir los riesgos asociados con enredos o tropiezos con un cable más largo No use prolongadores con este electrodoméstico Si el cable de corriente es demasiado corto solicite a un electricista o a personal del servicio técnico calificado qu...

Page 39: ...oporte del plato giratorio extraíble El soporte del plato giratorio debe estar en su lugar cuando se use el horno 8 Estantes Utilícelos con Convection Bake horneado por convección Convection Roast asado por convección o Combinaton Fast Bake horneado rápido combinado QR ORV XWLOLFH PLHQWUDV HO PLFURRQGDV HVWi FRFLQDQGR Para obtener mejores resultados utilice un estante en la posición inferior y dej...

Page 40: ...tencia 1 10 Funciones de sensor Presione Gire y apriete el dial para aceptar Opción Cocción al Vapor Tipo de alimentos Popcorn rosetas o palomitas de maíz Empieza inmediatamente Beverage bebida Empieza inmediatamente Reheat recalentar Tipo de alimentos Cook cocinar Tipo de alimentos Convection Baking o Convection Roasting Horneado por convección o Asado por convección Presione Gire y apriete el di...

Page 41: ... alrededor de la comida algunas comidas se cocinan más rápido que en cocciones con hornos normales Método de Cocción Alrededor de la comida circula aire caliente para producir exteriores dorados y conservar los jugos Fuente de Calor LUFXODFLyQ GH LUH DOLHQWH RQYHFFLyQ Conducción de Calor Calor conducido desde la parte externa de la comida a la parte interna Beneficios Ayuda en el dorado y a conser...

Page 42: ...Time II cocción por tiempo II Le permite cambiar los niveles de potencia de forma automática mientras cocina Se hace de la siguiente forma 3UHVLRQH HO ERWyQ RRN 7LPH FRFFLyQ SRU WLHPSR 2 Gire el dial para ajustar el primer tiempo de cocción y presione el dial para seleccionar 3 Cambie el nivel de potencia si no quiere que FRFLQH D WRGD SRWHQFLD 3UHVLRQH 3RZHU HYHO Gire el dial para seleccionar Pre...

Page 43: ...DO DSUR LPDGDPHQWH D OD PLWDG SRZHU OHYHO QLYHO GH SRWHQFLD UHGXFH HO WLHPSR WRWDO a aproximadamente 1 3 Sin embargo será necesario prestar mayor atención a la comida que lo usual Es posible que se escuchen ruidos de golpes secos durante la descongelación Esto es normal cuando el horno no está funcionando en el nivel de SRWHQFLD LJK OWR Consejos para la Descongelación Ŷ DV FRPLGDV FRQJHODGDV HQ SD...

Page 44: ... 3ROOR SDULOOD IUHLGRUD FRUWH ó D OLEUDV 14 a 20 min Coloque el pollo envuelto en el plato Desenvuelva y dé vuelta luego de la primera mitad de tiempo Luego de la segunda mitad de tiempo separe los trozos y coloque los mismos en un plato de cocción Cocine en el horno microondas entre 2 y 4 minutos más si es necesario Deje reposar por unos pocos minutos para finalizar la descongelación 3ROOR HQWHUR...

Page 45: ...y no necesitará que la agite gire o dé la vuelta tanto Algunas comidas pueden tener mejor sabor textura o aspecto si se usa un nivel inferior Use un nivel de potencia inferior cuando esté cocinando comidas que tengan tendencia a hervir como las papas gratinadas RV SHUtRGRV GH GHVFDQVR FXDQGR VH DFDED HO FLFOR GH OD HQHUJtD PLFURRQGDV OH GDQ WLHPSR a la comida a igualarse o transferir el calor a su...

Page 46: ...a cubierto un plato con film plástico deberá abrir un orificio desplegando una esquina para que pueda escapar el vapor Características de microondas por sensor Sensor de humedad Qué sucede cuando usa las funciones de sensores Las funciones de Sensor detectan la mayor humedad liberada durante la cocción El horno ajusta automáticamente el tiempo de cocción a los diferentes tipos y cantidades de comi...

Page 47: ...ial para ingresar 3 Presione el dial para seleccionar la cantidad tamaño R ILQDOL DFLyQ VL HV QHFHVDULR HO KRUQR GDUi XQ DYLVR Presione el dial luego de cada selección 4 Inserte comida y cierre la puerta 7LPHG 6WHDP 9DSRU SRU 7LHPSR HV XQD FRFFLyQ preconfigurada por tiempo 6HQVRU 6WHDP 9DSRU FRQ 6HQVRU HV XQ WLHPSR YDULDEOH basado en un sensor Selección del Menú para la Cocción al Vapor con Sensor...

Page 48: ...ntar QR XWLOL DU ORV HVWDQWHV FXDQGR FRFLQD SRU PLFURRQGDV La función de recalentar Reheat vuelve a calentar raciones de comidas previamente cocinadas o un plato de sobras 1 Coloque la taza de líquido o comida cubierta en el horno 3UHVLRQH 5HKHDW 5HFDOHQWDU HOLMD HO WLSR GH FRPLGD 2 El horno da una señal cuando advierte que hay vapor y empieza a mostrarse hacia atrás el tiempo que queda No abra la...

Page 49: ...art Pause para seguir cocinando Ŷ MXVWH OD FDQWLGDG GH FRPLGD DO WDPDxR GHO UHFLSLHQWH OHQH los recipientes por lo menos hasta la mitad Ŷ VHJ UHVH GH TXH OD SDUWH H WHULRU GHO UHFLSLHQWH HO LQWHULRU del horno estén secos Ŷ 8QD YH FRPSOHWDGR HO FLFOR GH RFFLyQ VL OD FRPLGD necesita cocerse más vuélvala a poner en el horno y use Cook Time para acabar de cocinarla NOTA No utilice esta función dos vec...

Page 50: ...a cocinar 7 Cuando se acabe de cocinar el horno dará una señal y se apagará NOTA Podrá cambiar el tiempo de cocción en cualquier momento durante la cocción girando el dial Podrá cambiar la temperatura del horno en cualquier momento durante la cocción presionando el botón Power Level Gire el dial para fijar la temperatura del horno y presione el dial para seleccionar Para ver el tiempo de cocción y...

Page 51: ...e ambos estantes El estante se necesita para la buena circulación del aire y para dorar Vea la sección de Consejos de Utensilios de Cocina para información sobre utensilios recomendados Ver la Sección Mejor Método de Cocción para determinar cuáles alimentos son apropiados para cocinar usando Fast Cook Cook Horneo rápido con precalentamiento 1 Presione el botón Combination Fast Cook 2 Gire el dial ...

Page 52: ...Horneado rápido combinado Se recomienda usar recipientes de cristal o cerámica acristalada Asegúrese de que no usa artículos con decoraciones metálicas ya que podrían causar arcos eléctricos FKLVSDV FRQ ODV SDUHGHV R HO HVWDQWH GHO PLFURRQGDV VWR puede dañar los utensilios el estante o el horno Pueden usarse utensilios de microondas de plástico resistente al calor VHJXURV SDUD XVR HQ SHUR QR VH re...

Page 53: ... Guisos 9 9 9 Huevos y queso Revueltos tortillas 4XLFKH VRXIOp 9 9 9 9 Vegetales IUHVFRV 9 Panes Magdalenas pastel de té Masa de levadura Levadura 9 9 9 9 Postres Pasteles pasteles con capas y bundt Cabello de angel y pasta fina Flan y pudín Galletas alargadas Fruta Pasteles rellenos y pastelería Dulces 9 9 9 9 9 9 9 9 Vegetales blanqueados 9 Alimentos preparados congelados 9 9 9 Use la tabla sigu...

Page 54: ...tras el temporizador esté funcionando Dispositivo giratorio Para obtener mejores resultados de cocción deje el dispositivo giratorio activado Puede desactivarse si va a cocinar platos grandes 3UHVLRQH HO ERWyQ 7XUQWDEOH 2Q 2II 3ODWR LUDWRULR QFHQGLGR SDJDGR SDUD GHWHQHU R LQLFLDU OD URWDFLyQ GHO SODWR JLUDWRULR En determinadas ocasiones el dispositivo giratorio puede calentarse demasiado como para...

Page 55: ...HFFLRQDU Mi Ciclo El botón Add 30 Sec Agregar 30 Segundos puede ser ajustado a las funciones de My Cycle Mi Ciclo 3UHVLRQH HO ERWyQ 6HWWLQJV RQILJXUDFLRQHV JLUH HO GLDO SDUD VHOHFFLRQDU 0 FOH 0L LFOR 3UHVLRQH HO GLDO SDUD ingresar LUH HO GLDO SDUD VHOHFFLRQDU HO WLHPSR GH VHJXQGRV D VHJXQGRV SUHVLRQH HO GLDO SDUD FRPSOHWDU OD FRQILJXUDFLyQ Nivel de Sonido El nivel de sonido puede ser ajustado en M...

Page 56: ... OX GH OD VXSHUILFLH 3UHVLRQH HO dial para confirmar Si está activada esto permite que las luces de la superficie del microondas se enciendan en el QLYHO OWR GH IRUPD DXWRPiWLFD FXDQGR HO TXHPDGRU de la superficie de cocción de la cocina emparejada se enciende Si está desactivada las luces de la superficie del microondas no se encenderán automáticamente cuando un quemador de la superficie de cocci...

Page 57: ...rían también dañar el panel de control Panel de puerta Antes de limpiar el panel de puerta frontal asegúrese de que sabe qué tipo de panel tiene Consulte el octavo dígito del número de modelo S es acero inoxidable L es CleanSteel y D es para negro pizarra y acabado mate oscuro y B W o C son colores plásticos Acero inoxidable en algunos modelos El panel de acero inoxidable puede limpiarse con Stain...

Page 58: ...sible principal o del panel de diferencial o estire del enchufe 4XLWH HO WRUQLOOR GHO ODWHUDO GH OD FXELHUWD GHO FRPSDUWLPLHQWR de la bombilla y baje la cubierta hasta que pare 3 Asegúrese que la LED está fría antes de retirarla Retire un tornillo y el conector de la lámpara LED 4 Conecte la lámpara LED y asegure la misma usando el tornillo Levante la tapa de la luz y reemplace el tornillo Conecte...

Page 59: ...Power Level Auto Cook Combination Fast Bake Convection Roast Turntable Convection Bake Filtros de extractor reutilizables HQ WRGRV ORV PRGHORV Filtro de carbón vegetal Turn to Select Press to Ente r Reheat Timer On Off Defrost Weight Time Start Pause Cancel Off Lock Controls Hold 3 Sec Cook Time Set Clock Options Help Surface Light Vent Fan Popcorn Beverage Microwave Express Warm Power Level Auto ...

Page 60: ...ol Aparece en pantalla OVEN TOO HOT FOR SENSOR COOKING USING ALTERNATE METHOD Horno demasiado caliente para cocinar por sensor Se está utilizando otro método Se pulsó uno de los botones de cocción por sensor cuando la temperatura interior del horno era superior a los 200ºF Estas funciones no podrán ejecutarse cuando el horno El horno cambiará automáticamente a cocinar por tiempo VLJD ODV LQGLFDFLR...

Page 61: ... el horno de microondas se apague Ŷ Calentar horneado por convección asado por convección y cocción rápida combinado tienen un WLHPSR GH FRFFLyQ Pi LPR GH PLQXWRV KRUDV PLQXWRV XDQGR HO WLHPSR GH FRFFLyQ Pi LPR se alcanza el horno automáticamente indicará que la cocción finalizó y apagará el elemento de cocción Ŷ O XVDU KRUQHDGR SRU FRQYHFFLyQ DVDGR SRU convección u cocción rápida combinado con un...

Page 62: ...oondas en una cocina con gabinetes de una profundidad de 15 se requerirá el kit de montaje Este kit permite que el horno microondas sea instalado 3 pulgadas más lejos lo cual evita que los gabinetes bloqueen los orificios de ventilación en la parte superior de la rejilla del microondas Kits de filtros Ŷ WB02X29749 Kit de filtro de carbón vegetal de recirculación Los kits de filtros se usan cuando ...

Page 63: ... única y exclusiva alternativa es la reparación del producto como se indica en la Garantía Limitada Las garantías implícitas incluyendo garantías implícitas de comerciabilidad o conveniencia sobre un propósito particular se limitan a un año o al período más corto permitido por la ley Esta garantía limitada se extiende al comprador original y a cualquier dueño subsiguiente de productos comprados pa...

Page 64: ...a extendida de Café y conozca los descuentos especiales que están disponibles mientras su garantía aún está vigente La puede adquirir en cualquier momento a través de Internet Los servicios de Café aún estarán allí cuando su garantía caduque En EE UU cafeappliances com extended warranty o comuníquese al 800 626 2224 durante el horario de atención comercial Conectividad Remota 3DUD VROLFLWDU DVLVWH...

Reviews: