background image

10

49-2000202   Rev. 4

USING THE COOKTOP: 

Griddle

Using Your Cast Iron Griddle

The ribbed side of the reversible griddle can be used for 

food normally grilled.
Your griddle provides an extra-large cooking surface 

for


meats, pancakes and other foods usually prepared 

in a skillet. Before first use, rinse with hot water and dry 

thoroughly. Prepare the surface with cooking spray or 

vegetable oil.

Griddle Precautions:

■   Do not place the griddle in a microwave oven.
■   Do not clean your griddle in the dishwasher.
■   If something has spilled under the griddle, it should be 

cleaned up as soon as possible to prevent “baked on” 

food soil.

■   Do not allow grease to accumulate under the griddle 

as it can be a fire hazard. Clean under the griddle with 

hot, soapy water as soon as it is cool.

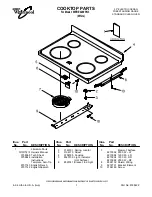
Positioning Your Griddle

The cast-iron griddle can only be used over the center burner(s) of the rangetop. To position the griddle, remove the 

center grate (if present), and replace it with the griddle. Do not turn on the center burner(s) until you are certain the 

griddle has been positioned correctly.

Preheating Your Griddle

For models with a non-reversible griddle, preheat your griddle by setting both center burners to 4 for 5-10 minutes 

before placing food on the griddle. For models with a reversible griddle, preheat your griddle by setting your center 

burner to Hi for 5-10 minutes before placing food on the griddle. Once the griddle is preheated, turn the knob on the 

burner(s) to the cook setting outlined in the table.

WARNING

 Fire Hazard

■   Use care when cooking greasy foods. Spilled grease may result in fire.

■   Never place any items on the griddle when it is not in use. Heat from surrounding burners can heat 

the griddle and may result in fire.

■   Place and remove the griddle only when griddle is cool and all surface burners are turned OFF.

Griddle (on some models)

Cook settings may need to be reduced if the griddle is used for an 

extended time.

Type of Food

Cook Setting

Bacon

3

Breakfast Sausage Links

3

Eggs

1

Grilled Cheese

2

Hamburgers

3

Pancakes

2

Warming Tortillas

1

Preseasoned Cast-Iron Griddle

Type of Food

Cook Setting

Bacon

Med

Breakfast Sausage Links

Med

Eggs

Lo

Grilled Cheese

Med

Hamburgers

Med

Pancakes

Med

Warming Tortillas

Lo

Preseasoned Reversible Cast-Iron Griddle

Cook settings may need to be reduced if the griddle is used for an 

extended time.

Replace the center grate with the non-reversible cast iron griddle

Replace the center grate with the reversible cast iron griddle

Summary of Contents for CGB550P

Page 1: ...3 Using the Range In Case of a Power Failure 8 Surface Burners 8 Griddle 10 Oven Controls 11 Options 12 Settings 12 Sabbath Mode 14 Oven Racks 15 Aluminum Foil and Oven Liners 16 Cookware 16 Cooking M...

Page 2: ...ill too Among other things registration of your appliance ensures that we can deliver important product information and warranty details when you need them Register your Caf appliance now online Helpf...

Page 3: ...cured to the anti tip device properly WARNING If the information in this manual is not followed exactly a fire or explosion may result causing property damage personal injury or death Do not store or...

Page 4: ...Avoid scratching or impacting glass doors cooktops or control panels Doing so may lead to glass breakage Do not cook on a product with broken glass Shock fire or cuts may occur Do not leave children a...

Page 5: ...STRUCTIONS WARNING NEVER Operate the Top Surface Cooking Section of this Appliance Unattended Failure to follow this warning statement could result in fire explosion or burn hazard that could cause pr...

Page 6: ...cover an entire rack with materials such as aluminum foil or oven liners Doing so blocks air flow through the oven and may cause carbon monoxide poisoning Never place foil or oven liners on the oven...

Page 7: ...locate the receiving antenna Increase the separation between the equipment and receiver Connect the equipment into an outlet on a circuit different from that to which the receiver is connected Consult...

Page 8: ...ing will continue as long as the knob remains at LITE Once gas is ignited turn the knob to adjust the flame size Automatic Reignition on some models The burners on this range will automatically religh...

Page 9: ...bottomed wok Do not use stove top grills Top of Range Cookware Aluminum Medium weight cookware is recommended because it heats quickly and evenly Most foods brown evenly in an aluminum skillet Use sau...

Page 10: ...eat your griddle by setting both center burners to 4 for 5 10 minutes before placing food on the griddle For models with a reversible griddle preheat your griddle by setting your center burner to Hi f...

Page 11: ...ven door or pressing any key will wake and illuminate the control 6 Cancel Off Cancels ALL oven operations except the clock and timer 7 Timer Works as a countdown timer Press the Timer pad and number...

Page 12: ...t Compatible Apple or Android devices and home WiFi network required Settings The Options and Settings pads open up more detailed menus in the display that allow access to additional functions For eac...

Page 13: ...d follow the corresponding instructions included with the mating Chef Connect enabled product The range will cancel pairing mode after two minutes if no mating device is detected Select Remove to conf...

Page 14: ...ture and press Start Enter 2 Since no feedback is given during temperature change an oven thermometer can be used to confirm temperature changes Starting a Timed Bake 1 Press the Bake pad 2 If the des...

Page 15: ...ck supports NOTE Remove unused racks when using the oven for faster preheat improved efficiency and optimal cooking performance Extension Racks on some models Extension racks have a frame that locks i...

Page 16: ...sults These modes are described below Refer to the Cooking Guide section for rack position and other recommendations for specific modes and foods Bake The bake mode is for baking and roasting When pre...

Page 17: ...Goods mode is designed for cooking cakes breads cookies and similar foods on a single rack This mode is designed to provide lighter top browning and better volume Some foods may require slightly long...

Page 18: ...ing 1 Select the desired cook mode Bake Convection Bake or Convection Roast pad and enter the desired cooking temperature with the number pads 2 Insert the probe into the food see Proper Probe Placeme...

Page 19: ...es Broil skin side down first Watch food closely when broiling For best performance when broiling center food below the broil heater or burner Boneless chicken breasts Broil Low Bake Lower 2 Move food...

Page 20: ...re and not in direct sunlight If stain on the door vent trim is persistent use a mild abrasive cleaner and a sponge scrubber for best results Spillage of marinades fruit juices tomato sauces and basti...

Page 21: ...of this manual before using the Self Clean Mode Self Clean uses very high temperatures to clean the oven interior For a moderately soiled oven run a 3 hour self clean cycle For a heavily soiled oven...

Page 22: ...enings Lift burners off when cool Wash with hot soapy water Rinse with clean water For more stubborn stains use a brush with plastic bristles NOTE Do not use steel wool or scouring pads to clean the b...

Page 23: ...grates in the oven if your grates have rubber bumpers Doing so will destroy the rubber bumpers and may affect the function of your surface burners Porcelain coated grates may gradually dull if contin...

Page 24: ...teel Surfaces on some models Do not use a steel wool pad it will scratch the surface To clean the stainless steel surface use warm sudsy water or a stainless steel cleaner or polish Always wipe the su...

Page 25: ...r circuit breaker panel Let the bulb cool completely before removing it For your safety do not touch a hot bulb with a damp cloth If you do the bulb may break To remove Turn the glass cover counterclo...

Page 26: ...vity and down to the locked position 5 Close the oven door Removal position Pull hinge locks up to unlock Push hinge locks down to lock Rest notch on bottom edge of hinge slot Notch Bottom edge of slo...

Page 27: ...using aluminum foil on broil pan wrap tightly and add slits conforming to those in the pan to allow grease to drain Oven temperature too hot or too cold Oven temperature needs adjustment See the Cooki...

Page 28: ...lashes in the display The self clean cycle has been selected but the door is not closed Close the oven door F and a number or letter flash in the display You have a function error code Press the Cance...

Page 29: ...The oven gas shut off is located on the gas regulator near the gas line attachment to your range Locate it and flip the lever My oven door glass appears to be tinted or have a rainbow color The inner...

Page 30: ...ps Caf Gas Range Limited Warranty EXCLUSION OF IMPLIED WARRANTIES Your sole and exclusive remedy is product repair as provided in this Limited Warranty Any implied warranties including the implied war...

Page 31: ...Accessories Accessories Freestanding Gas Knobs and Handles Front Control Gas Knobs and Handles Nickel Flat Rack Reinforced Nickel Flat Rack Self Clean Flat Rack Nickel Extension Rack Self Clean Extens...

Page 32: ...arn about special discounts that are available while your warranty is still in effect You can purchase it on line anytime Caf Service will still be there after your warranty expires In the US cafeappl...

Reviews: