Cadis AQUAVISION 2DETECT Installation Instructions Manual Download Page 8

www.cadis.be | [email protected]

Water at the heart of our technology

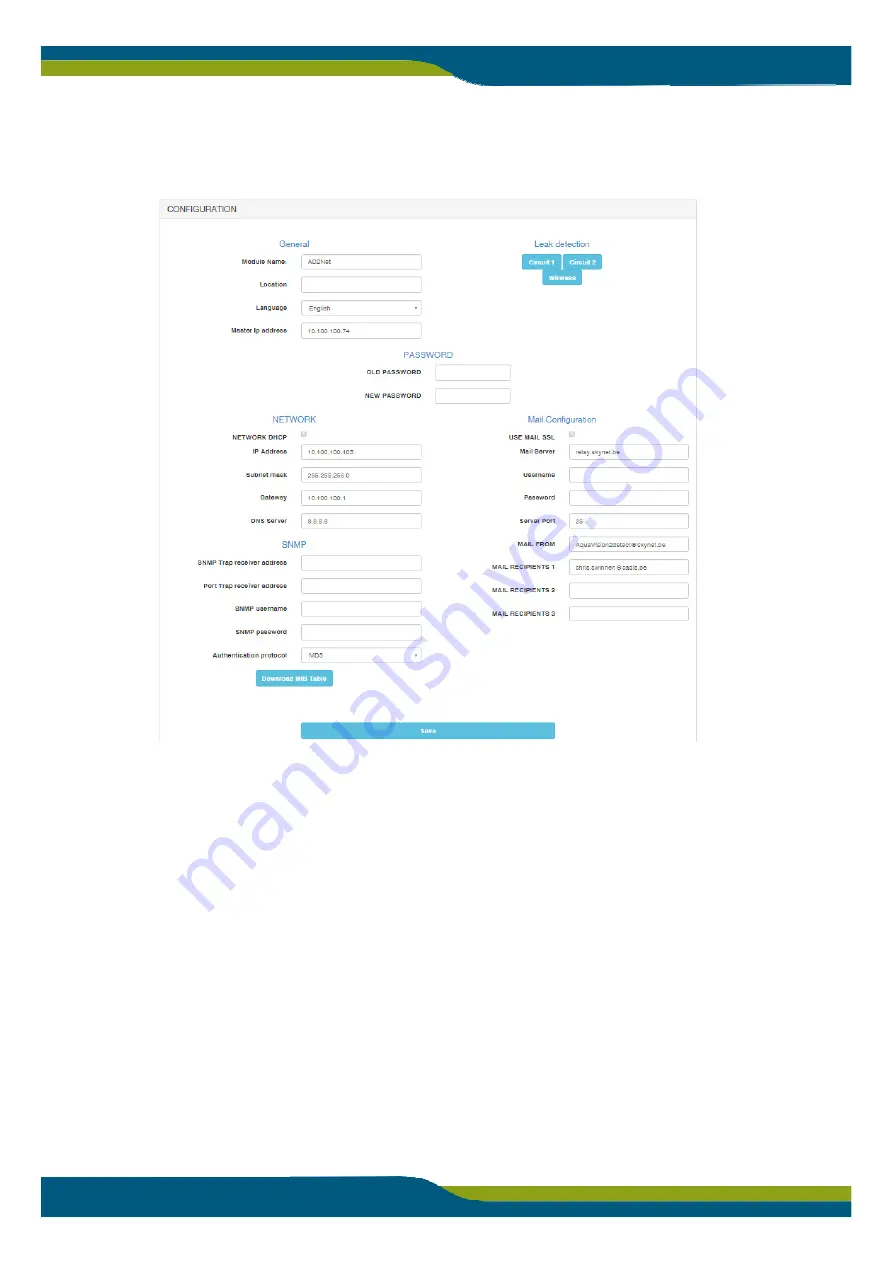
The configuration page

The complete configuration of the AQUAVISION 2DETECT takes place on the configuration page:

General

: enter a name and location for the AQUAVISION 2DETECT and also select the language, if required.

Password

: the login password can be modified here. First enter the old password, then the new password and click 

Save.

Network Configuration

: select whether to use a fixed IP address or a DHCP address. Enter the settings, if a fixed IP 

address is used. To retrieve the configured IP address, press the button marked “S_IP” on the circuit board inside 
the housing. The specified IP address is then displayed on the bottom line of the LCD screen.

SNMP

: if, in the event of an alarm, an SNMP trap needs to be sent, enter the settings for the SNMP trap receiver. 

The MIB table can also be downloaded using the “Download MIB Table” button.

Mail Configuration: 

if, in the event of an alarm, an alert email needs to be sent, then enter the settings for the mail 

server and the recipients of the alert mail. Click Save to save the settings.

Leak detection settings: 

click Channel 1 or Channel 2 to configure the settings of the leak detection cables. Click 

Wireless to configure the wireless sensors.

Summary of Contents for AQUAVISION 2DETECT

Page 1: ...ate wired leak circuits can be connected to this module The maximum connection per circuit is 150 metres of leak detection cable or 10 leak detection probes Optionally an additional 8 wireless water l...

Page 2: ...ng on This module has an integrated web server When correctly connected the module is accessible to each computer on the network ATTENTION Note the colour of the cables to the terminals G Green R Red...

Page 3: ...t are to be disconnected Press and hold the orange button to disconnect the wireless sensor The sensor is then removed from the AQUAVISION 2DETECT s memory Next the following screen appears Press and...

Page 4: ...l reset automatically CABLE BREAKAGE When a problem or breakage in the detection cable occurs the following message is displayed on the LCD This alarm will automatically reset as soon as the detection...

Page 5: ...enter the following address in the command bar http 10 0 0 1 The login screen appears 2 Via wired connection with a network cable Connect a network cable between the AQUAVISION 2DETECT and the comput...

Page 6: ...ce value in ohms of the Red Green detection loop Alarm timestamp this is the time that an alarm is activated The status of each wireless sensor is displayed The following statuses are possible No Leak...

Page 7: ...e Alarm on a wireless sensor The Alarm History page All alarms that are activated in the AQUAVISION 2DETECT are stored in the memory together with a timestamp These alarms can be viewed at all times T...

Page 8: ...used To retrieve the configured IP address press the button marked S_IP on the circuit board inside the housing The specified IP address is then displayed on the bottom line of the LCD screen SNMP if...

Page 9: ...DF plan of the channel This plan is then loaded into the module and can be retrieved via the Home page Service level select the sensitivity for the detection cable Unit select the unit Metres or Feet...

Page 10: ...Circuit 2 Leak location in meter Register 30011 Circuit 2 Leak Zone Register 30012 Circuit 2 Leakvalue in Register 30013 Wireless Sensor 1 Leak Status 0 No Leak 1 Leak Register 30014 Wireless Sensor...

Page 11: ...uter of laptop with the AQUAVISION 2DETECT Adjust the IP address of the computer via Network Centre which you can access through the screen Configuration Click on Proporties Select Internet Protocol i...

Page 12: ...type of device is no longer made it will be replaced by the newer release The warranty only applies to the equipment manufactured and supplied by the manufacturer All additional components that were i...

Reviews: