CADEXAIR STADIUM Series Operation And Maintenance Manual Download Page 16

MAINTENANCE

IMPORTANT 

It is strongly recommended to have replacement filters in stock at all times on the 
premises  where  the  hood  is  located.  Despite  the  implementation  of  a  normal 
maintenance  cycle,  it  is  possible  that  particular  events  increase  the  volume  of 
cooking (festivals, high season, etc.)

STADIUM HOOD FILTER REPLACEMENT FREQUENCY 

The pre-filters, bag filters and box filters must be changed regularly to maintain the high grease 
removal efficiency required by ULC-S647 standard. When a clogged filter alarm is activated, it 
means  that  a  set  of  filters  has  reached  its  grease  holding  capacity.  Further  use  will  restrict  the 
exhaust airflow, causing smoke particle capture problems in the hood. Therefore, all three filters 
must be changed before a clogged filter alarm is activated.  

We recommend changing the filters after the pre-alarm is activated for the corresponding set of 
filters. 

IMPORTANT

Once the contractor has completed the installation of the STADIUM unit, change 
the  pre-filters  immediately.  The  pre-filters  will  likely  be  filled  with  construction 
debris, which will affect the initial operation of the unit. 

1. Enter the start date on the attached FILTER CHANGING SCHEDULE (Appendix 4). This is 

also the date the pre-filters were changed. 

2.  Operate  the  unit  until  the  pre-alarm  for  clogged  filters  comes  on.  Change  the  filters 

corresponding to the alarm at the end of the shift, or the next day before cooking. Write the date 
and type of filter you changed on the FILTER CHANGING SCHEDULE under filter change 
number #1/current. 

3. Determine the number of days between the start date and the date the filters were changed. Add 

this number of days to the last current pre-filter change and enter this new pre-filter schedule 
date into the calendar under filter change number #2/schedule. Change the corresponding filters 
on this new date. 

14 

Summary of Contents for STADIUM Series

Page 1: ......

Page 2: ...ALIDATION 9 LIFTING SUSPENSION AND LEVELING 9 CONNECTING THE EXHAUST COLLAR TO THE HOOD 10 PLUMBING CONNECTION FOR SELF CLEANING HOODS 11 ELECTRICAL FITTINGS 11 TOP ACCESS TO HOODS 11 SILICONE 11 FIRE...

Page 3: ...al standards IMPORTANT CAUTION DANGER INTRODUCTION This user manual is intended to provide basic information for the installation maintenance and use of Cadexair s Stadium hood The hood is an essentia...

Page 4: ...stalling standard HVAC ductwork BRIEF DESCRIPTION OF THE COMPONENTS The Stadium hood is made of 430 or 304 grade stainless steel 18 MSG thickness with a polished finish on exposed surfaces and is desi...

Page 5: ...atic detection technology to monitor hood filter saturation It is designed to help maintain proper ventilation and extend the life of the filters thereby reducing maintenance and operating costs Cadex...

Page 6: ...allowed When maximum clogging is reached the system shuts down completely and displays another message If a filter s is removed the system will detect it and shut down immediately If a variable speed...

Page 7: ...ngs page press the settings button in the upper right corner on the cleaner s main page Or on the settings page USER REQUIRED TECHNICAL TECH For more details please refer to the CC200 user manual avai...

Page 8: ...e filters reach maximum clogging the system fan will shut down To allow the air cleaner or Stadium hood to operate knowing that the filters are dirty the FILTER OVERLOAD button must be pushed This but...

Page 9: ...haser must inspect the hood to ensure that all material is in good condition before signing the delivery acceptance documents In case of damage the buyer must clearly indicate it on the carrier s acce...

Page 10: ...ed a minimum of 42 inches 1067 mm from a cooking surface such as a grill stove fryer or griddle Refer to the hood manufacturing drawings and dimensions to install the hoods in the right places hood di...

Page 11: ...proper size and load capacity and adapted to the supporting structure such as walls or ceilings Fastening methods must comply with building and safety regulations If there is any doubt as to the abili...

Page 12: ...PA 96 standard IMPORTANT According to NFPA 96 the duct must be at least 16 gauge steel or 18 gauge stainless steel The duct must be continuously welded and watertight Hoods sometimes have factory made...

Page 13: ...complete SILICONE Once the hood is in place it is recommended to seal the various hood sections or between the hood and the walls with silicone Recommended silicone Kason RubbaSeal aluminum color PARA...

Page 14: ...alancing the system Make sure that all the filters are in place and have on hand the flow rates required to operate the hood correctly Cadexair recommends the following method based on measurements ta...

Page 15: ...he label see Appendix 3 It is also recommended to start the exhaust fan and check its rotational direction before starting airflow balancing Finally it is essential to know the required flow rates to...

Page 16: ...ter the pre alarm is activated for the corresponding set of filters IMPORTANT Once the contractor has completed the installation of the STADIUM unit change the pre filters immediately The pre filters...

Page 17: ...ners can be applied directly to the surface or with a soft cloth or sponge Rinse thoroughly with clean water and wipe with a soft dry cloth or allow to air dry Always rub in the direction of the grain...

Page 18: ...the components specified in the applicable standard REPLACEMENT FILTERS HOOD MODEL PREFILTERS BAG FILTERS BOX FILTERS 12 X 24 24 X 24 12 X 24 24 X 24 12 X 24 24 X 24 ST 10 1 1 1 ST 20 1 1 1 1 ST 20 2...

Page 19: ...5 3 pockets MERV15 304952415033 Mann Hummel Syn Pac 95E 24 x 24 x 15 6 pockets MERV15 304954415063 Cadexair recommends 21 deep filters in the majority of Stadium hoods Some Stadium hoods are built wit...

Page 20: ...REPLACEMENT PARTS CC20 CONTROLE BOX WITH PRESSURE CARD MBC 176 HIGH LIMIT TEMPERATURE PHY 282 RECESSED DEL LIGH XHT 236 18...

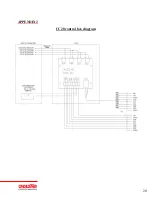
Page 21: ...APPENDIX 1 CC200 CC50 controller diagram 19...

Page 22: ...APPENDIX 2 CC20 control box diagram 20...

Page 23: ...ecessary remove the Geo Vary module from the hood s filtration casing carefully noting the side adjustment number of the sash as well as the location of each module Remove the sash from the module by...

Page 24: ...le FILTER FREQUENCY CHART Startup date First prefilter change Change No Prefilter Bag Filter Box Filter Date Date Date Schedule Actual Schedule Actual Schedule Actual 1 2 3 4 5 6 7 8 9 10 11 12 13 14...

Reviews: