C*Pix SDC2000 User Manual Download Page 4

• 

Do not scratch hard objects against the Lens, Status LCD Panel, or Viewfinder.

• 

If the Status LCD Panel is damaged, do not touch it.

• 

Condensation is a problem when bringing cold equipment into a warm room. Try to put the camera 
in a plastic bag so condensation forms on the outside of the bag.

Important: Do not connect camera to PC before drivers are installed.


Go to page 7 for more    

                         information

.

Getting Started

Contents of package

• 


C

*

Pix SDC2000 Digital Camera 

• 


Installation CD (containing PhotoPrinter,


Funhouse, PhotoStudio, User's Manual and Camera Drivers)

• 

USB cable 

• 

Quick Start Guide 

• 

Warranty Card 

System Requirements

• 

Personal computer with a Pentium 300MHz microprocessor (minimum) and a CD-ROM drive 

• 

Operating Systems: Windows 98SE / Me / 2000 / XP, Macintosh OS 8.6 / 9.0

• 

32MB RAM for Windows 98SE, 64MB RAM for Windows Me/2000 and Macintosh, 128MB RAM 
for Windows XP

• 

500MB of available hard disk space for Windows 98SE/Me/2000 and Macintosh, 1GB for Windows 
XP

• 

Color display monitor with 16 bit color or above

• 

Available USB port

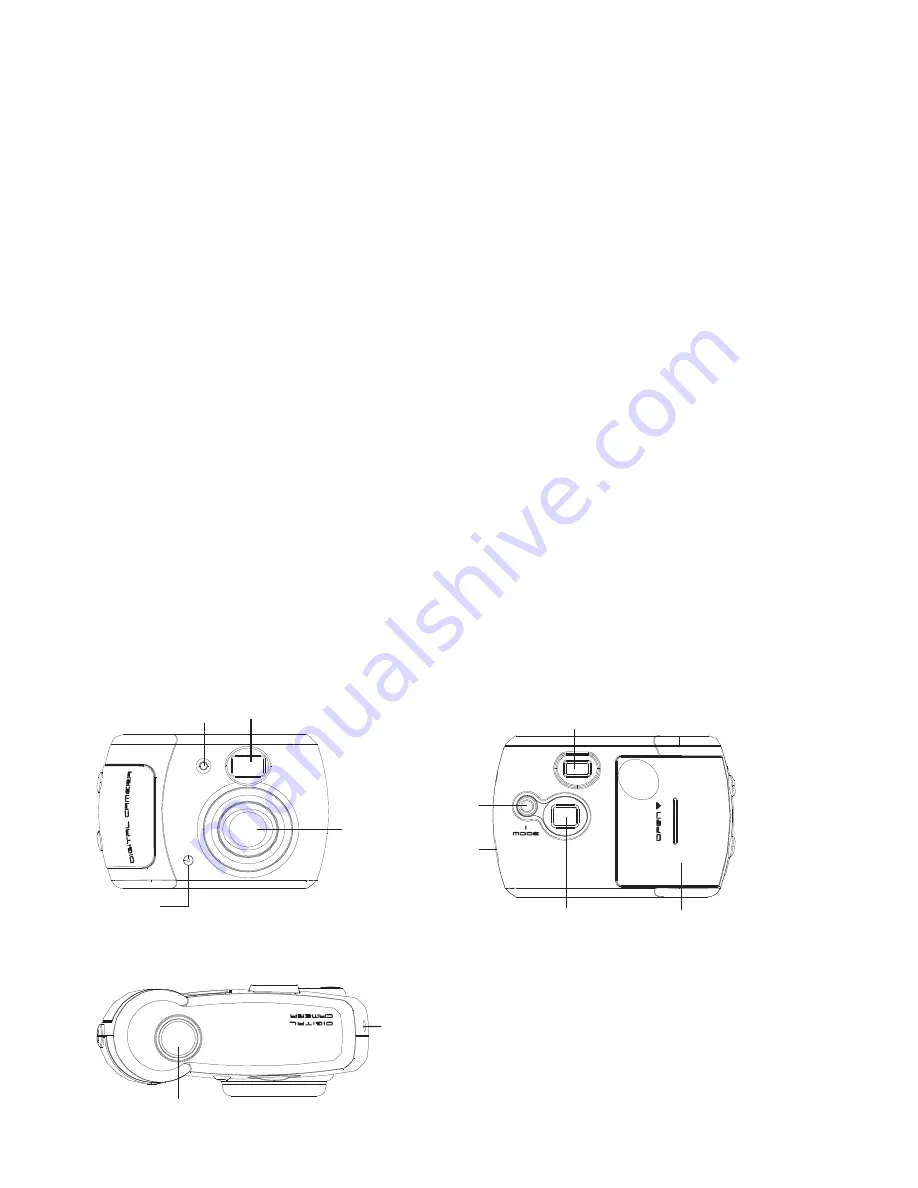
SDC2000 Nomenclature

Front panel

Back panel

Top panel

3

Lens

LED Viewfinder window

Buzzer

Viewfinder

Mode button

LCD panel

Battery compartment
cover

USB cable

connector

USB cable connector

Shutter button

Summary of Contents for SDC2000

Page 1: ...Para manual de usuario en espa ol la visita www cpixcorp com Contact C Pix at cpixsupport cpixcorp com or visit www cpixcorp com STOP Need Help...

Page 2: ...rcsoft programs and camera drivers in Windows 98SE Me 2000 XP 7 Install camera drivers 7 Making Camera to PC connection 7 Downloading Images 7 Downloading photos using PhotoStudio 7 Downloading Images...

Page 3: ...FCC limits A high electrostatic discharge environment may cause the camera to malfunction Reset the camera by taking out the batteries and re inserting them FCC Notice In order to maintain compliance...

Page 4: ...oStudio User s Manual and Camera Drivers USB cable Quick Start Guide Warranty Card System Requirements Personal computer with a Pentium 300MHz microprocessor minimum and a CD ROM drive Operating Syste...

Page 5: ...Always remove old or dead batteries from the camera Do not short circuit the power supply terminals Check that the contact surfaces are clean and bright before installing batteries Battery Power Leve...

Page 6: ...ght To change the frequency 1 Press Mode button repeatedly until 60 Hz or 50 Hz is shown on the LCD panel 2 Press Shutter button to change from 60 Hz to 50 Hz or from 50 Hz to 60 Hz to match that coun...

Page 7: ...hear a beep and all images will be cleared NOTE If Shutter button is not pressed while is blinking the frame count will return on the LCD panel in 5 seconds Deleting Last Image Taken 1 Press Mode but...

Page 8: ...mber 3 Download DirectX 8 0 on the Installation CD setup screen to download a copy of DirectX 8 0 from Windows website for use with your camera You must be connected to the internet to access this lin...

Page 9: ...will be downloaded Click Select all photos in this page icon to select all images on a page 5 Click Page down icon to go to next page 6 Highlight the thumbnail s you want to download and click Transf...

Page 10: ...y DSC application program can transfer your images taken in Continuous Mode to AVI video format 1 Take some images in Continuous Mode with the digital camera NOTE It is recommended that you use Low Re...

Page 11: ...o view the movie playback Using Your Digital Camera as a PC Cam Besides taking videos with your digital camera you can record videos directly to your computer with the PC Cam application program WARNI...

Page 12: ...Start Capture from the pull down menu 8 Select OK button to start video capture 9 The time elapsed of the video capture is shown at the bottom of the screen 10 When video capture is finished click Ca...

Page 13: ...or other storage medium click add photo icon on get photo window 4 When an image thumbnail has been added to the get photo window double click the thumbnail 5 Set print options available and print th...

Page 14: ...clear your current template and any selected photos Click Save as icon to save your finished photo Click Send icon to send your finished photo as an email attachment NOTE If you want to find out more...

Page 15: ...re X is the name the hard disk was assigned iMac HD in this case whereas that for Funhouse is X Applications 6 Click Quit button to complete the installation Note that a shortcut for Funhouse will be...

Page 16: ...art the program 2 Click get photo icon on the layout window to select an image 3 To print an image already on your hard disk or other storage media click add photo icon on get photo window 4 When an i...

Page 17: ...lick 4 Add Text icon to add text to your project Click 5 Print Preview icon to view change the print settings for optimal printing Click Start over icon to clear your current template and any selected...

Page 18: ...roducts and therefore product specifications are subject to change without prior notification Frequently Asked Questions FAQs 1 I always take poor quality photos at home why It may be due to insuffici...

Page 19: ...erent frequency e g 50Hz you will get horizontal black stripes in those photos due to incorrect power frequency There will be no problems when taking photos under sunlight 10 Can I use the camera when...

Page 20: ...the Acquire dialog box and then re open it for the computer to recognize the connection to the camera 20 What should I do when my PC cannot recognize the camera when using the Arcsoft programs You sh...

Reviews: