background image

19

6.2 CGI /APK login

6.2.1 CGI /APK Login

Open the client software (before turning on the client software, first turn off the anti-virus 
software such as 360, avoid being mistaken for viruses and be prohibited from running by 
360). By default, admin login with user name and password can preview, record, screenshot, 
PTZ control, audio and video. Operations such as encoding configuration. At present, this 
version can be run on Windows7/32/64bits & windows 8 or higher. Multiple cameras are 
supported in the LAN for simultaneous display (up to 9 devices at the same time). 
The Menu language can supports Chinese and English.

6.2.2. CGI /APK Overviews

6.2.2.0 Interface Preview

6.2.2.1 Language

6.2.2.2 Multi-Image Channel Display

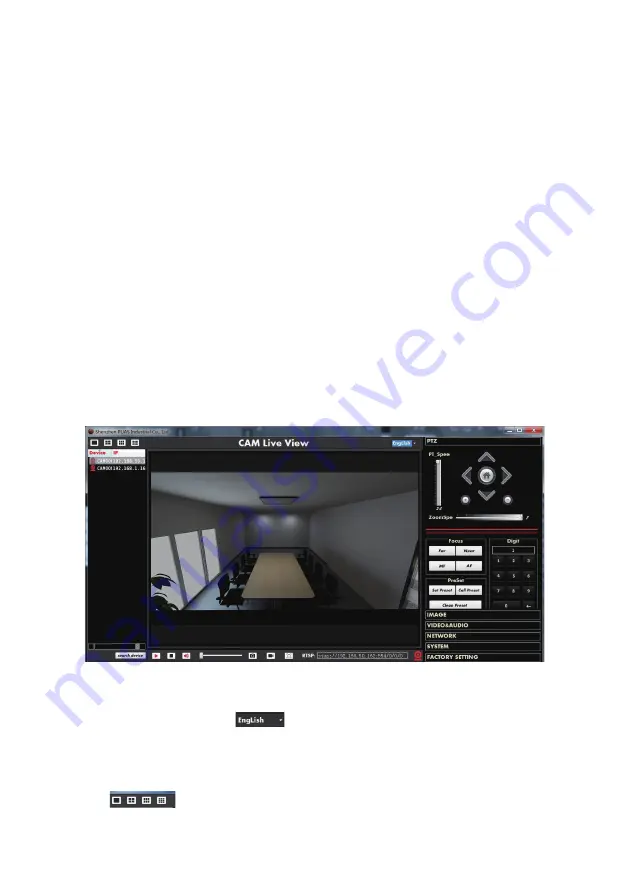
After the login is successful, the system will be automatically searches for devices connected 
to the LAN, and enters the management interface as shown in the following pictures.

Chooses the drop-down menu                    to switch the language to Chinese/English.

This version of the software supports 1*CH, 4*CH, 6*CH, 9*CH, click on the interface software 
icon                           , it also can support selection it by Click” Right” Button of Mouse.

Summary of Contents for BG-VPTZ-HSU3

Page 1: ...MiniPRO VIDEO PTZ CAMERA User Manual BG VPTZ HSU3...

Page 2: ...tion Instruction 10 4 1 Camera ID Select 10 4 2 Pan Tilt Control 10 4 3 Focus 11 4 4 Preset Setting 12 4 5 Function of Touch Button 12 5 Camera Setting 13 5 1 EXPOSURE 13 5 2 COLOR 14 5 3 PICTURE 14 5...

Page 3: ...ower Supply Product supplies 12V DC power and Power on Ethernet Function optional Installation with Care Don t turn camera head manually Doing so may result in mechanical damage Product should be put...

Page 4: ...X RJ45 RS485 Control Protocol VISCA PELCO D PELCO P Visca Over IP ONVIF Baud Rate 2400 4800 9600 115200 Audio Input Double Channel 3 5mm Linear Input Audio Compression Format ACC G711A G711U Network I...

Page 5: ...r ways video with Quiet Pan and Tilt Movement Using high precision stepping motor and advance motor driven chip to make sure it rotates stably under di erent speed and without any noise and howling Re...

Page 6: ...1 Lens 6 RJ45 IP Streaming POE 2 IR receiver 7 SDI 3 Power light 8 HDMI 4 DC12V Input 9 USB 3 0 5 COM RS485 RS232 10 Audio IN 1 3 2 2 DC12V COM LAN SDI USB3 HDMI A IN 0 4 5 6 8 7 9 10 1 3 2 2 DC12V C...

Page 7: ...5 RXD 5 GND 6 GND 6 DSR 7 IR OUT 7 RTS 8 NC 8 CTS 9 RI CAMERA Mini DIN 1 DTR 1 DTR 2 DSR 2 DSR 3 TXD 3 TXD 4 GND 4 GND 5 RXD 5 RXD 6 GND 6 GND 7 IR OUT 7 NC 8 NC 8 NC RS232INPUT NO Function Defi niti...

Page 8: ...8 3 3 Camera Dimension The Size for HD video conference camera is as below 146 120 120 3 0 9 0 175 175 MM...

Page 9: ...ss Reset Number 1 9 to reset the corresponding Preset 9 Preset Setting Key Press Preset Number 1 9 to save the corresponding Preset 10 Focus Key AUTO Automatic focus MANUAL Manual focus FAR Manual foc...

Page 10: ...D Select Select the target camera ID from No 1 to No 4 4 2 Pan Tilt Control Turn camera lens up Turn camera lens down Turn camera lens right R on 4 3 Menu Display Click the MENU button to display the...

Page 11: ...zoom out AUTO Enable camera to automatically focus MANUAL Switch to manual control mode FAR Manually focus on a distant object NEAR Manually focus on a nearby object Strong background light can create...

Page 12: ...cations Click the P T RST button the camera will be reset and go back to its home position 1 To save a preset press PRESET then press any of the numbers no 1 9 You can save up to 9 presets 2 To call a...

Page 13: ...Press the MENU button to display the OSD menu press arrow keys to move to EXPOSURE and then press right button to enter sub menu as the right picture EXPOSURE AE MODE AUTO AE LEVEL N A EXPCOMP OFF BA...

Page 14: ...5000K 6500K R TUNING 0 32 B TUNING 0 32 G TUNING 0 32 SATURATION 60 200 COLOR HUE 0 14 AWB SENS HIGH NORMAL LOW RED GAIN 0 255 only under MANUAL BLUE GAIN 0 255 only under MANUAL 5 3 PICTURE BRIGHT 0...

Page 15: ...REEZE OFF D ZOOM ON BACK EXIT FILP ON OFF L R DIRECTION ON OF AF MODE AUTO MANUAL ZOOM AF SENS HIGH NORMAL LOW PRESET FREEZE ON OFF D ZOOM ON OFF 5 5 Noise Reduction Press the MENU button to display t...

Page 16: ...to display the OSD menu press the arrow keys to move to SYSTEM SETTING press right button to the sub menu as the right picture shown SYSTEM INFO press right button to the sub menu as the right picture...

Page 17: ...the computer should add Network of 1 Specific process as below First open Properties at computer s local network then select Internet Protocol Version 4 TCP IPv4 and double click or click its Propert...

Page 18: ...king it could follow the steps as above to check if the network works For example open DOS commend window and input ping 192 168 1 176 and press the ENTER button If it comes up with information as bel...

Page 19: ...ltiple cameras are supported in the LAN for simultaneous display up to 9 devices at the same time The Menu language can supports Chinese and English 6 2 2 CGI APK Overviews 6 2 2 0 Interface Preview 6...

Page 20: ...nt camera screen image Click Record Button to Select the saved path to save the current camera Video Output Note Clicking the play and pause button during the recording process is invalid In single Im...

Page 21: ...lick the camera searched in the list to adjustment the brightness and contrast Chroma saturation sharpness etc function of the current camera The PTZ control is as shown in the figure below Double cli...

Page 22: ...ect 2D noise reduction by the drop down menu turn on noise reduction and select different levels of noise reduction Noise reduction level 1 5 Select 3D noise reduction by the drop down menu turn on no...

Page 23: ...6 2 2 13 13 FLIP 6 2 2 13 14 Save and default Restore To Select different video styles through the drop down menu video style standard Bright RTSP Soft styles Click left of the mirror button to turn o...

Page 24: ...be selected and edited When VBR is selection IFrame PFrame can t be edited When FIX QP is selection Quality can be edited I Streaming Quality High Middle Low Streaming quality only valid when the Bit...

Page 25: ...t be selected and edited When VBR is selection IFrame PFrame can t be edited When FIX QP is selection Quality can be edited i Streaming Quality High Middle Low Streaming quality only valid when the Bi...

Page 26: ...SP Port default 554 c RTMP Port default 1935 d HTTP Port default 80 Note Changing the port number requires restarting the camera to valid In order to avoid port conflicts please be careful to modify a...

Page 27: ...554 e Save Restore default Click Save Button to Saved the ONVIF Parameters of Camera Click default Button to restore the ONVIF Parameter to default of Camera 6 2 2 15 4 RTSP Streaming address 6 2 2 16...

Page 28: ...difying the account and password if the original account and password are incorrect the new account and password cannot be activated The super account that the system logs in administrator Super passw...

Page 29: ...the bottom of the camera with 4 pieces of PM 8 screws orientation as like picture B 4 The two brackets mismatch facing the fit from left to right side of the bracket hook screws to the side of the slo...

Page 30: ...n today s AV world without having to break the bank BZBGEAR is the solution for small to medium sized applications requiring the latest professional products in AV We live in a DIY era where resources...

Page 31: ......

Page 32: ......

Reviews: