MM3156A DRUM SANDER
4
4.
DO NOT SAND MATERIAL
shorter than
3” or narrower than 3/4”.
5.
MAINTAIN THE PROPER RELATIONSHIP
between the infeed and outfeed surfaces and the
sander drum path.
6.
SUPPORT THE WORK PIECE ADEQUATELY
at all times during operation; maintain control of
the work at all times.
7.
DO NOT BACK THE WORK
toward the infeed table.
8.
DO NOT ATTEMPT TO PERFORM
an abnormal or little used operation without the use of sturdy
and adequate jigs, fixtures, stops, and a thorough understanding of the operation being
performed.
9.
BEFORE STARTING,
re-check to make certain adjustments are correct and all locks and screws
are tight.
10.
ALWAYS STOP THE MOTOR
and disconnect the power source before making any adjustments
or changing abrasve strips.
11.
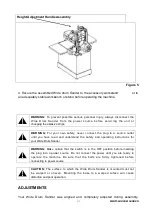
STOP THE MACHINE
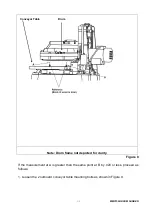
and re-check the motor/drum mounting bolts and feed rollers for tightness
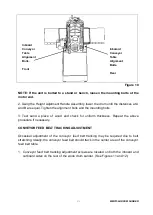
after about 50 hours of operstion. (See Figure8.)
12.
DO NOT FORCE-FEED THE WORK PIECE
through the machine. Let the sander apply the
proper feed rate.
13.
CHECK THE FEED BELT
occasionally to be sure there is no debris or sawdust between any
components.
14.
SAND ONLY SOUND LUMBER;
there should be no loose knots and as few tight knots as
possible. Make sure the work piece is free from nails, screws, stones, or other foreign objects
that could damage the sanding drum or feed belt.
15.
NEVER STAND DIRECTLY IN LINE
with either the infeed or outfeed sides. Stand to one side.
16.
MAKE SURE THE ABRASIVE STRIP IS ATTACHED
as described in the operation instructions.
An improperly attached abrasive could come loose during operation and damage the work piece
or intenal components.
17.
NEVER PUT YOUR FINGERS
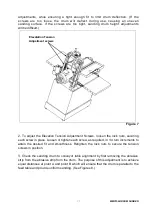
into the dust port or under the drum dust cover. (See Figure2.)
18.
ALLOW THE SANDING DRUM
to reach full speed before using the Wide Drum Sander.
GROUNDING INSTRUCTIONS
1. In the event of an electrical malfunction or breakdown, grounding provides a path of least
resistance for electric current to reduce the risk of electric shock. This tool is equipped with an electric
cord having an equipment grounding conductor and a grounding plug. The plug must be plugged into
a grounding outlet. The plug must be plugged into a matching outlet that is properly installed and
grouded in accordance with all local coodes and ordinances.
2. Do not modify the plug provided.If it will not fit the outlet, have the proper outet installed by a
qualified electrician.
3. Improper connection of the equipment-grounding conductor can result in a risk of electric shock.
The conductor with insulation having an outer surface that is green with or without yellow stripes is
the equipment-grounding conductr. If repair or replacement of the electric cord or plug is
necessary,do not connect the equipment-grounding conductor to a live terminal.
4. Check with a qualified electrician or service personnel if the grounding instructions are not


