background image

5


Installation

Logano plus SB325 – 6 720 806 328 (2013/07)

17

5

Installation

5.1

Siting the boiler

Installation room requirements:
• The support surface must provide sufficient load-bearing capacity 

and solidity.

• The installation room must be dry and free from the risk of frost.
• The size of the installation room must be adequate to ensure correct 

operation.

Minimum wall clearances

Observe the specified minimum wall clearances for the foundations or 
installation surface (

 Fig. 10, and Tab. 12, page 17). The surface on 

which the boiler is to be positioned must be of load-bearing capacity, 
even and level. The front edge of the boiler should be flush with the edge 
of the plinth.

The combustion chamber door can be fitted to open from right to left or 
vice-versa (

 chapter 5.10 from page 24). 

Fig. 10   Installation room (for dimensions see Tab. 12), dimensions 

in mm

[1]

In addition to the burner length, take dimension A2 into 
consideration when installing a third party


burner.

[2]

If using a flue gas silencer, take its installation dimensions into 
account.

[3]

Take account of burner dimensions - available from burner 
manual.

It is advantageous if there is a drain in the vicinity of the installation 
location.

For the installation and operation of the heating system, 
observe all country-specific standards, guidelines and 
local regulations. 
The information on the data plate is binding and must be 
observed.

DANGER: 

Risk to life through poisoning!

Insufficient ventilation can lead to dangerous flue gas 
leaks!

▶ Never close off or reduce the size of ventilation and 

extract air vents.

▶ Never operate the boiler unless faults are rectified 

immediately. 

▶ Inform the operator in writing of any faults and their 

associated risks. 

DANGER: 

 Risk of fire through flammable materials or 

liquids.
▶ Never store flammable materials or liquids in the 

immediate vicinity of the heat source.

NOTICE: 

System damage due to frost!

▶ Install the heating system in a room protected from 

the risk of frost.

Allow extra space if a flue gas silencer or a control unit 
are to be installed on one side of the boiler.

If separation between the installation location and the 
boiler is required to prevent the transfer of structure-
borne noise, apply anti-vibration measures (e.g. anti-
vibration supports) before installing the boiler.

Boiler size

50 kW

 70 kW

 90 kW

 115 kW

A

1

1)

1) If using a flue gas silencer, take its installation dimensions into account.

700 

(400)

A

2

2)

2) In addition to the burner length, take dimension A2 into consideration when 

installing a third party burner.

1200 

(700)

Length L

1084

Width B

820

Foundation
length

1084

Foundation
width

680

Tab. 12  Recommended (and minimum) wall clearances mm

2

3

6 720 804 354-02.1ITL

Summary of Contents for Logano plus SB325

Page 1: ...refully before carrying out installation and maintenance Installation and service instructions for contractors Floor standing condensing boiler Logano plus SB325 6 720 804 354 00 1ITL 6 720 806 328 2013 07 GB ...

Page 2: ...iler to the pipework 19 5 5 Installing the condensate hose and neutralising system 20 5 6 Installing the minimum pressure switch and minimum pressure limiter accessories 21 5 7 Installing the low water level limiter accessory 21 5 8 Filling the boiler and checking connections for leaks 21 5 9 Fitting the casing 21 5 9 1 Fitting the connection plates 21 5 9 2 Fitting the side panels 22 5 9 3 Routin...

Page 3: ...s low water indicator requirements 39 11 3 7 Burner requirements 39 11 3 8 Boiler controller 39 1 General safety instructions and explanation of symbols 1 1 Key to symbols Warnings The following keywords are defined and can be used in this document NOTICE indicates a situation that could result in damage to property or equipment CAUTION indicates a situation that could result in minor to medium in...

Page 4: ... reduce the size of air vents in doors windows or walls If draught proof windows are fitted ensure there is an adequate combustion air supply Ensure that the boiler installation room remains free from the risk of frost The heating system must be installed and operated in accordance with the current applicable standards rules and regulations Thermal disinfection Risk of scalding Monitor any operati...

Page 5: ...livery but are required to operate the boiler Burner Boiler safety assembly Safety equipment Cleaning brushes Control unit 2 7 Operating conditions Type Output SB325 50 kW 70 kW 90 kW 115 kW Tab 2 Type overview Observe all standards and directives applicable to the installation and operation of this heating system in your country Observe the information on the data plate These are definitive and m...

Page 6: ...rmohydraulic return connections for the high and low temperature heating circuits The SB325 must be equippedwithaburnerthatissuitablefortheboiler Theboileroperates according to the three pass system Fig 1 Optional accessories are listed in the general catalogue The main components of the boiler are Fig 2 page 7 Boiler shell 1 in conjunction with a burner The boiler block transfers the heat produce...

Page 7: ...or 3 Reversing chamber door 4 Boiler flow connection 5 Test point sensor pocket 6 Safety valve connection 7 Connection for pressure switch 8 Return connection 2 high temperature return 9 Flue gas connection 11 Drain return connection 1 low temperature return 12 Condensate outlet 6 720 804 354 03 1IT L 2 1 3 8 11 12 5 6 7 4 9 ...

Page 8: ...ction HVSL Height safety valve connection L Boiler length incl casing LBR Burner length LK Boiler block length MDW Connection for minimum pressure switch RK1 Boiler return connection 1 low temperature return RK2 Boiler return connection 2 high temperature return VK Boiler flow connection VSL Safety valve and flow safety line connections for open vented systems 2 12 1 Measurements L VK M VSL MDW AK...

Page 9: ...l load max kW 47 4 66 4 85 3 109 0 Partial load 40 kW 19 0 26 6 34 1 43 6 Net weight kg 294 300 314 321 Water content l 237 233 250 240 Gas content l 90 120 138 142 Available draught Pa 501 subject to burner 1 Maximum recommended pressure difference Pressure drop on the hot gas side mbar 0 43 0 50 0 59 0 77 Pressure drop on the water side mbar Fig 4 page 10 Standby loss Fig 5 page 10 Maximum flow ...

Page 10: ...eragesacrosstheseries Themeasuredfluegastemperaturemaydiffer depending on the burner setting and actual temperature of the system Full load C 45 45 45 45 Partial load 40 C 30 30 30 30 Flue gas mass flow rate Full load kg s 0 0189 0 0268 0 0344 0 0443 Partial load 40 kg s 0 0074 0 0103 0 0133 0 0171 System temperatures 80 60 C Rated output gas Full load kW 46 0 64 4 82 7 105 7 Partial load 40 kW 18...

Page 11: ...ng system Every load cycle burner on off causes thermal stresses loads on the boiler shell The number of burner starts must therefore not exceed 15 000 per year The following recommendations and settings are designed to meet this criterion see also information on setting the control unit and the hydraulic connection to the heating system If you still cannot meet this criterion please contact the s...

Page 12: ...ntrol unit must therefore be prevented from becoming ineffective i e through the boiler water controller switching the burner on and off Maintain the minimum differential between the selected shutdown temperature of the high limit safety cut out the temperature controller the maximum boiler water temperature and the maximum temperature demand Tab 10 page 12 Select set temperatures for the heating ...

Page 13: ... shut off valve SAV in the gas train may lock out Select control equipment that allows a gentle start up with a time delay when the system is cold Aftertheburnerenable anautomatictimer forexample shouldlimit the burner to low load for a period of approx 180 seconds A restricted heat demand will prevent uncontrolled cycling of the burner Itmustbepossibletoshowthenumberofburnerstartsonthecontrol uni...

Page 14: ...Setting value maximum pressure limiter 5 bar 0 5 bar 4 5 bar Minimum pressure limiter The minimum pressure limiter not part of the standard delivery accessory must be set in such a way that no steam bubbles form in the boiler while still operating the boiler safely This setting depends on the system conditions and the siting of the boiler system The set point is based on the boiling pressure corre...

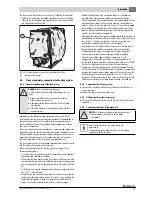
Page 15: ...the boiler with a crane Hangliftingropehooksonthedesignatedliftingeyesonthetopofthe boiler Attach the hoist crane lifting hooks to the lifting rope Fig 7 Lifting the boiler with a crane 1 Crane hooks with safety mechanisms 2 Lifting eyes DANGER Risk to life from inadequately secured boiler Use suitable means to transport the boiler e g several pallet trucks a forklift truck or a crane Whentranspor...

Page 16: ... trucks Fig 9 Moving the boiler with two pallet trucks DANGER Risk to life through falling load Distribute the boiler weight evenly across the forklift truck pallet truck when lifting and moving the boiler Observetheweightoftheboilerandthatofthemeans of transport When transporting secure the boiler to prevent it falling NOTICE System damage due to damaged boiler shell Only move the boiler with a f...

Page 17: ...stem observe all country specific standards guidelines and local regulations The information on the data plate is binding and must be observed DANGER Risk to life through poisoning Insufficient ventilation can lead to dangerous flue gas leaks Never close off or reduce the size of ventilation and extract air vents Never operate the boiler unless faults are rectified immediately Inform the operator ...

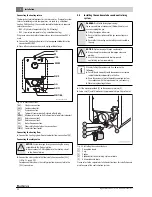
Page 18: ...ound thermal insulation mat with two spring hooks 1 on each side Fig 13 Position the thermal insulation strip 2 at the top around the boiler shell ring and secure to the right and the left onto the lower front insulationsectionwithtwospringhooksoneachside 1 Fig 13 Place the upper front insulation section 3 on the front of the boiler shell Fig 13 Fitting and fastening the lagging 1 Spring hooks 2 S...

Page 19: ...hey would have a detrimental effect on air borne and structure borne noise as well as the start up pressure hammer Prevent sharp edged joints between rectangular connection flanges and the connection pipe As with any reductions expansions that may be required the angle of the joint should not exceed 30 Wherepossible connectionpiecesshouldbejoinedtothechimneyto provide optimum flow characteristics ...

Page 20: ... safety pipe flow is connected to the VSL connection 5 5 Installing the condensate hose and neutralising system Fit the siphon provided 3 to the condensate drain 5 Undo cap 2 and fill siphon with approximately two litres of water Fig 16 Installing the condensate hose 1 Connection bend 2 Cap 3 Siphon 4 Siphon outlet to neutralising system or drain 5 AKO condensate drain Please refer to the separate...

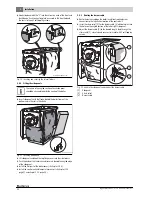
Page 21: ...allpressure controlandsafetyequipmentis working correctly 5 9 Fitting the casing 5 9 1 Fitting the connection plates Fit front tie bar with trapezoid cut out facing down so that the 2 holes match up with the threaded pins at the top and fix with nuts Fitreartiebar withtrapezoidcut outfacingdown sothatthe2 holes match up with the threaded pins at the top and fix with nuts Balance the front and rear...

Page 22: ...all the first part of the boiler cover chapter 5 9 6 Install the control unit and temperature sensor chapter 5 14 page 27 and chapter 5 13 page 26 5 9 3 Routing the burner cable Route the burner cable on the boiler insulation from the burner connection to the installation location of the control unit Insert the strain relief 2 for the burner cable 3 with both pins into the holes on the angled sect...

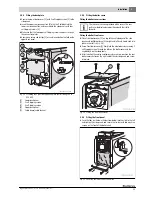
Page 23: ...ting the boiler front cover Place front boiler cover 1 on top of the angled edges of the side panels and pull forwards until the right and left hand hooks click into place in the slot Fig 24 Screw front boiler cover 1 firmly into the side tie bars by screwing 2 self tapping screws through the tabs on the boiler cover and the angled edge on the side panels After installing the cables and temperatur...

Page 24: ...amber door Tighten the screws with a torque of 25 Nm 5 10 2 Refitting the door hinges As standard the combustion chamber door opens from left to right The following instructions assume the standard direction Ifrequired duetospacerestrictions thecombustionchamberdoorcan be converted to open to the left Open the combustion chamber door Pull the hinge pin Fig 27 1 out of the hinge Hook combustion cha...

Page 25: ...door 3 Thermal insulation for combustion chamber door 4 Insulating rings 5 Blast tube Close the combustion chamber door and tighten the hexagon bolts chapter 5 10 1 page 24 DANGER Injury system damage through excess loads Use suitable lifting gear for mounting the burner WARNING Damage to health including skin and eye irritation as a result of inhaling or coming into contact with fibre dust Fibre ...

Page 26: ...pushed back automatically when it is inserted Fig 32 Fig 32 Inserting the plastic coil into the sensor pocket 1 Compensating spring 2 Plastic spiral 3 Sensor retainer 4 Sensor pocket Never kink excess lengths of capillaries Route the sensor lead to the control unit Connect the sensor lead to the control unit NOTICE System damage through damaged capillaries or incorrectly fitted temperature sensor ...

Page 27: ...Cover 2 Flexible hooks 3 Rectangular openings in the front boiler cover 4 Locking tabs 5 Oval holes in front boiler cover 6 Cable feed in the front boiler cover 7 Holes for self tapping screws DANGER Danger to life through electric shock Before opening the boiler isolate the heating system across all poles and secure against unintentional reconnection Carefully route the cables leads and capillary...

Page 28: ... prevent contamination in the boiler flush the heating system prior to commissioning Flush the system prior to connection to the boiler or Isolate the heating flow and return to the boiler Connect the heating flow to a water connection Connect hose to the heating return of the heating system Route hose from the heating return to a drain Open connected consumers e g radiators Flush the heating syst...

Page 29: ... tightness Check the control unit connections and temperature sensor positions Fill the condensate siphon 6 4 Commissioning the control unit and burner By commissioning the control unit you automatically commission the burner as well The burner can then be started by the control unit For further information see the installation instructions of the relevant control unit or burner chapter 3 9 page 1...

Page 30: ...ll safety equipment 7 Check the fuel line for tightness 8 Starting the burner See technical burner documentation 9 Complete the burner test report regarding the individual output stages 10 Conduct a tightness test on the hot gas side After a short time in operation tighten the screws in the combustion chamber door to prevent leakage around the door as a result of the packing cord settling 11 Check...

Page 31: ...al days due to a fault shutdown and there is a risk of frost drain the heating water at the drain fill valve Also leave the air vent valve at the highest point in the system open NOTICE System damage due to frost The heating system can freeze as a result of a power failure or if the power has been switched off Checkthe Controlunitsettings toensurethesystem remainsoperational especiallywhenthereisa...

Page 32: ...ng when opened Make sure that both hinge pins Fig 12 1 page 18 are inserted NOTICE Boilerdamageduetonotusingtheappropriate cleaning equipment Onlyusethemanufacturer sowncleaningequipment 6 720 804 349 07 1ITL NOTICE System damage through using incorrect cleaning equipment If cleaning with a brush use only genuine cleaning brushes from the manufacturer When cleaning only use brushes made of nylon o...

Page 33: ... the gasket on the cleaning cover has to be replaced chapter 8 3 4 Close and secure the combustion chamber door chapter 5 10 1 page 24 Close and tightly seal the cleaning cover on the flue gas collector chapter 8 3 5 Continue to ensure adequate ventilation of the boiler room Remove the foil from the control unit Restart the heating system Replace the gasket in both the flue gas collector cover and...

Page 34: ...tem water pressure Topuptheheatingwaterifthepressuregaugeneedle 3 dropsbelow the green band 2 Top up with water via the filling valve in the heating system pipework Vent the heating system Check the water pressure once more Fig 40 Manometer for sealed unvented heating systems 1 Red needle 2 Green marking 3 Manometer needle 8 4 3 Installations with automatic pressurisation systems For installations...

Page 35: ...er of flue gas collector 6 Check and clean the burner Visual inspection and remove any contamination Check all safety equipment safety shutdown Function check Flue gas analysis with test report for each output stage See technical burner documentation 7 Check the flue for function and safety See technical burner documentation 8 Check the hydraulic seal of the condensate trap and supplement if requi...

Page 36: ...the cleaning cover of flue gas collector Page 33 5 Check that the condensate drain pipe is clean and filled with a hydraulic seal 6 Check the neutralising system where fitted See technical documentation of the neutralising system 7 Start up the heating system Page 28 8 Final check of the maintenance work take measurements and record values and test results See technical burner documentation 9 Chec...

Page 37: ...e participate in country specific recycling processes that ensure optimum recycling All of our packaging materials are environmentally compatible and can be recycled Obsolete equipment Old appliances contain materials that should be recycled The relevant assemblies are easy to separate and all plastics are identified In this manner the individual components are easily sorted and added into the rec...

Page 38: ...er or a replacement measure approved by the manufacturer for each boiler 12 Non return valve 13 Drain fill valve DFV 14 Expansion line 15 Shut off valve protected against unintentional closure e g by sealed cap valve 16 Drain upstream of the expansion vessel 17 Expansion vessel DIN EN 13831 Low water level limiter to protect against overheating InaccordancewithEN12828 2003 alowwaterlevellimiterisr...

Page 39: ... F ID Observe the information in chapter 5 6 of the installation instructions Limiters with a time delay must not be installed The limiter sits on the boiler safety assembly chapter 2 11 and 2 12 Possible connection with G 11 3 5 Minimum pressure limiter as low water level limiter requirements Appliances which are suitable for responding under decreasing pressure must be installed e g type tested ...

Page 40: ...Buderus Cotswold Way Warndon Worcester WR4 9SW All Enquiries 0844 892 3004 www buderus co uk In the UK and IE Buderus is a brand name of Bosch Thermotechnology Ltd ...

Reviews: