Page 4
PROGRAMMING NOTES
• If only 1 Occupied period is selected in step 1 on page 3, Occupied 2
and 3 programming steps are skipped. Further, if only 2 occupied
periods are selected, Occupied 3 programming steps are skipped.
• Heat and Cool set points for Occupied 1 are the same for every day
of the week. Heat and Cool set points for Occupied 2 and 3 can be
adjusted differently for each day of the week, if desired.
•
If the start time is set later in the day than the stop time,
the pro-
gram will run from the start time to midnight and from midnight to the
stop time on the same day.
For example: 9:00pm start, 8:00am stop,
on Monday. In this example the program will run from 12:00am Mon-
day to 8:00am Monday and again from 9:00pm Monday to 12:00pm
Monday.
• The Unoccupied settings take effect at all times when: (
1
) the pro-
gram is on
and (2
) the current time is outside a preset occupied
period. For this reason start and stop times are not necessary for
unoccupied.
• If the
same
start and stop times are programmed in for an occupied
period, then it will run 24 hours.
• If one occupied period starts and stops within another occupied
period the lower occupied number has priority.
For example: If Occu-
pied 3 is programmed to be “on” 24 hours, and Occupied 2 is pro-
grammed to run that day, then Occupied 2 settings will take over from
Occupied 3 between Occupied 2 start and stop times.
• To program Occupied 2 and Occupied 3 modes repeat programming
steps for Occupied 1.
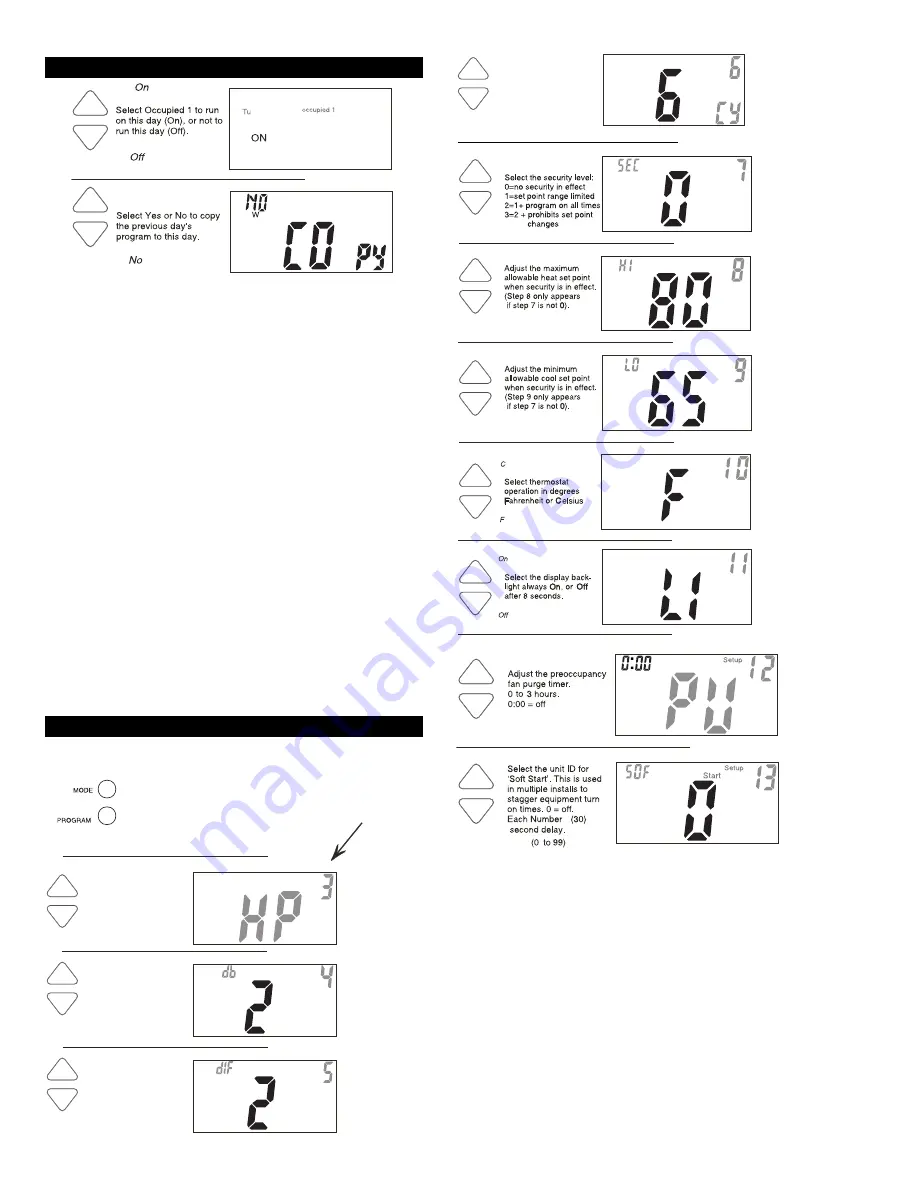
Steps 1 and 2 were performed on page 2. Advanced setup begins with
Step 3.
Programming
Occupied and Unoccupied Periods
Advanced Setup
Yes
Selecting Yes, then pressing mode will copy the previous day’s program and
then will ask the same copy question again. If yes is selected each time, this
routine will repeat until Saturday is copied to Sunday. After Saturday is copied
to Sunday, the copy command is unavailable.
If no is selected, as in previous steps, flashing prompts for input will appear
for start and stop times for Occupied 1. If more than one occupied period was
selected in Step 1 on page 3, then cool/heat set point temperatures, and
start/stop times for additional occupied periods will be prompted.
NOTE: Each step number is located
at the top right corner of the
display for easy reference.
Select residential Heat
Pump, On or Off.
On
Off
O
F
F
Setup
Adjust the deadband
from 1 to 6 F.
Setup
Adjust the minimum
difference
between
cooling and heating
set points.
(0 to 6 F)
Setup
(1 to 6 F)
Unoccupied123
Press the Mode button.
While holding the Mode button,
press the Program button to
enter the Advanced Setup
screens.
Select the cycles per
hour limit.
d=cycles per hour
limit defeated.
d1=d + defeat 5 min.
Compressor lockout.
(d, d1, 2 - 6)
Setup
Setup
Locked
Setup
Locked
Setup
Locked
Setup
ON
Setup
(35 to 99 F)
(35 to 99 F)
=
Press the Mode button. While holding the Mode button, press the Program button
leave the Setup screens. If no buttons are pressed, the display will leave the setup
screens after 30 seconds.


