-38-
16.
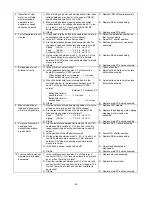
LARGE ONE-POINT PATTERN SHAPE (SOFT ADJUSTMENT)
STANDARD
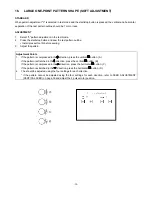
When pattern adjustment "3" is selected in test mode and the start/stop button is pressed, the vertical and horizontal
separation of the test pattern outline should be 1 mm or less.
ADJUSTMENT
1.
Select "3" pattern adjustment in the test mode.
2.
Press the start/stop button and sew the test pattern outline.
*
Install presser foot N before sewing.
3.
Adjust the pattern.
Adjustment Points
1.
If the pattern is compressed in the direction, press the vertical
button. (A)
If the pattern is stretched in the direction, press the vertical
button. (B)
If the pattern is compressed in the direction, press the horizontal
button. (C)
If the pattern is stretched in the direction, press the horizontal
button. (D)
2.
The should be adjusted using the four settings for each direction.
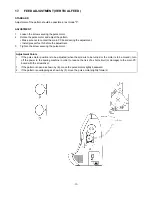
* If the pattern cannot be adjusted using the four settings for each direction, refer to FEED ADJUSTMENT
(VERTICAL FEED) on page 39 and adjust the F pulse motor position.
Summary of Contents for PC8200 SUPER GALAXIE 2000
Page 1: ...SERVICE MANUAL FOR COMPUTERIZED SEWING MACHINE PC8200 SUPER GALAXIE 2000 9 1997 ...
Page 4: ... 2 1 MECHANICAL CHART EMBROIDERY UNIT MECHANISM ...
Page 6: ... 4 3 ELECTRONIC PARTS ARRANGEMENT CHART PC 8200 Model 985 4 CONTROL SYSTEM BLOCK DIAGRAM ...
Page 16: ... 14 ...
Page 18: ... 16 ...
Page 20: ... 18 ...
Page 23: ... 21 2 LEAD WIRE ARRANGEMENT PC 8200 Model 985 ...
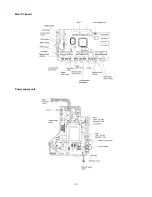
Page 53: ... 51 Main PC board Power supply unit ...
Page 54: ... 52 LCD unit Other PC boards 985 ...
Page 55: ... 53 PC8200 SG2000 H7070093 ...

