18
Ch. 2 Getting Started
Getting St
ar
te
d
8
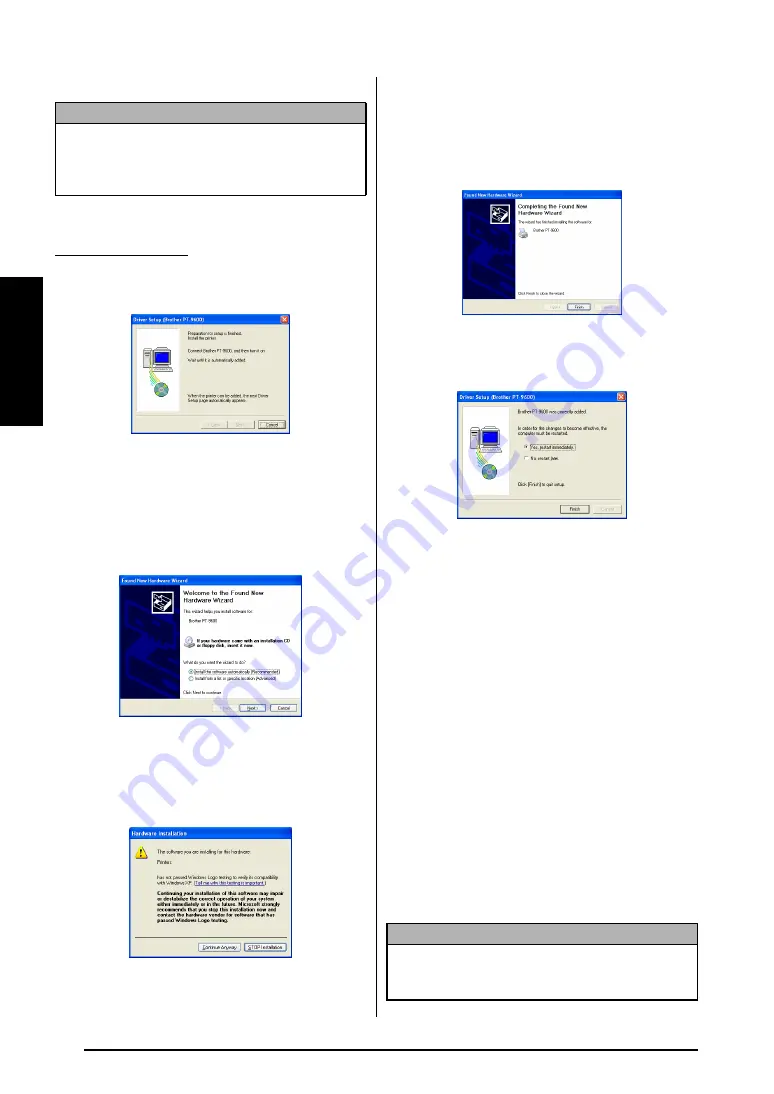
Click the Finish button.
6
A dialog box appears, instructing you to
connect the P-touch to the computer.
7
Connect the P-touch to the computer using
the enclosed USB interface cable as
described on page 9, and then turn on the
P-touch. A dialog box appears, indicating
that the printer driver has been installed.
The first Found New Hardware Wizard dia-
log box appears.
8
Select “Install the software automatically
(Recommended)”, and then click the Next
button. A dialog box appears, warning that
the software has not passed Windows
®
Logo testing.
9
Click the Continue Anyway button to con-
tinue with the installation. A Found New
Hardware Wizard dialog box appears, indi-
cating that the Found New Hardware Wiz-
ard has finished installing the software for
the PT-9600/3600.
0
Click the Finish button. A Driver Setup dia-
log box appears, indicating that the printer
driver has been installed.
A
Select “Yes, restart immediately”, click the
Finish button to restart the computer, and
then remove the CD-ROM from the com-
puter.
On a Macintosh Computer
The Mac version of the software is for a Macin-
tosh with an English operating system. If the
software is installed on a Macintosh with an
operating system in a different language, the
software may not run properly.
Before installation
Check that your system configuration meets the
following requirements.
Computer:
Macintosh with Power PC processor
Operating system:
Mac OS 8.6 or later, or Mac
OS X v10.1 or v10.2
Hard disk free space:
At least 20 MB (100 MB
for a full installation)
NOTE
If a dialog box appears, explaining that the com-
puter should be restarted, select the option for
restarting the computer, and then click the Finish
button.
With Windows
®
XP:
NOTE
Up to 100 MB of hard disk free space may be
needed when printing long labels or large amounts
of data.
Summary of Contents for P-Touch 3600
Page 9: ...1 Ch 1 Before You Start Before You Start Chapter 1 Before You Start ...
Page 13: ...5 Ch 2 Getting Started Getting Started Chapter 2 Getting Started ...
Page 45: ...37 Ch 3 Functions Functions Chapter 3 Functions ...
Page 81: ...73 Ch 4 Machine Adjustments Machine Adjustments Chapter 4 Machine Adjustments ...
Page 97: ...89 Appendix Appendix Appendix ...
Page 113: ...105 Appendix Appendix ...
Page 126: ......
Page 127: ...Printed in China LA8770001 ...
Page 132: ...ii ...
Page 133: ...1 Ch 1 Getting Started Getting Started Chapter 1 Getting Started ...
Page 135: ...3 Ch 2 Advanced Functions Advanced Functions Chapter 2 Advanced Functions ...
Page 155: ...23 Appendix Appendix Appendix ...
Page 159: ...Printed in China LA8784001 ...


