background image

Chapter 2

10

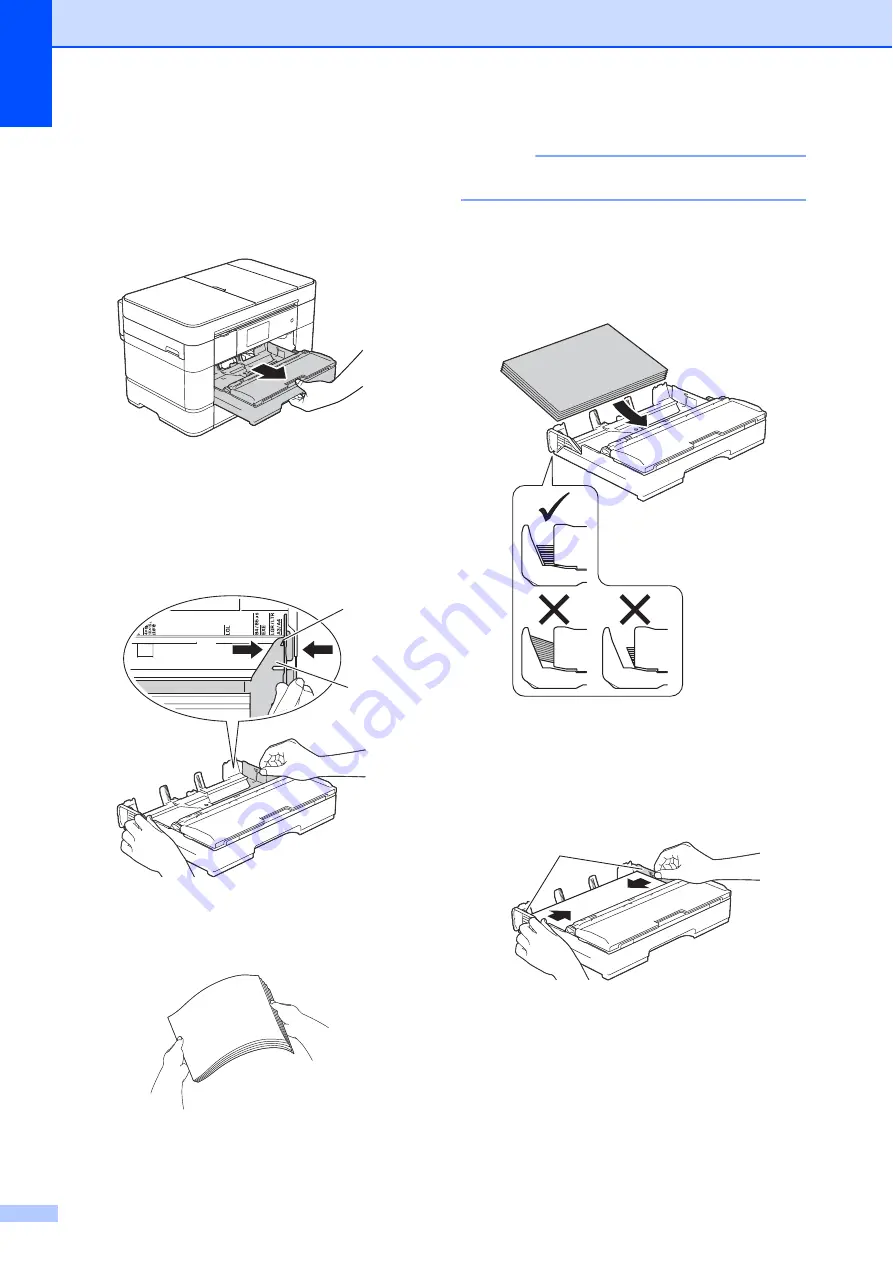
When using Letter, A4 or Executive size 
paper:

2

a

Pull Tray #1 completely out of the 
machine.


b

Gently press and slide the paper 
guides (1) to fit the paper size.
Make sure the triangular mark (2) on the 
paper guide (1) lines up with the mark 
for the paper size you are using.


c

Fan the stack of paper well to avoid 
paper jams and misfeeds.


NOTE

Always make sure the paper is not curled.


d

Load paper in the paper tray with the 
printing surface 

face down

.

Check that the paper is flat in the tray.

Landscape orientation


2

e

Gently adjust the paper guides (1) to fit 
the paper.
Make sure the paper guides touch the 
sides of the paper.


1

2

1

Summary of Contents for MFC-J5620DW

Page 1: ...Basic User s Guide MFC J5520DW MFC J5620DW MFC J5720DW Version 0 USA CAN ...

Page 2: ...r your product on line at http www brother com registration By registering your product with Brother you will be recorded as the original owner of the product Your registration with Brother may serve as confirmation of the purchase date of your product should you lose your receipt may support an insurance claim by you in the event of product loss covered by insurance and will help us notify you of...

Page 3: ...ration 1 USA only You can also complete and fax the Brother Warranty Registration and Test Sheet FAQs frequently asked questions The Brother Solutions Center is our one stop resource for all your Fax Machine Multi Function Center needs Download the latest software documents and utilities read FAQs and troubleshooting tips and learn how to get the most from your Brother product http support brother...

Page 4: ...y results use only genuine Brother accessories which are available at most Brother retailers If you cannot find the accessory you need and have a Visa MasterCard Discover American Express credit card or PayPal account you can order directly from Brother Visit us online for a complete selection of the Brother accessories and supplies that are available for purchase NOTE In Canada only Visa and Mast...

Page 5: ...d black LC203BK Prints approx 550 pages 1 Ink Cartridge High Yield yellow LC203Y Prints approx 550 pages 1 Ink Cartridge High Yield cyan blue LC203C Prints approx 550 pages 1 Ink Cartridge High Yield magenta red LC203M Prints approx 550 pages 1 Premium Plus Glossy Photo Paper Ledger size 20 sheets BP71GLGR Letter size 20 sheets BP71GLTR 4 6 size 20 sheets BP71GP20 Multipurpose Paper Plain Paper Le...

Page 6: ...ARISING OUT OF THE USE OR INABILITY TO USE THE SOFTWARE EVEN IF BROTHER S LICENSOR HAS BEEN ADVISED OF THE POSSIBILITY OF SUCH DAMAGES BECAUSE SOME STATES IN THE USA AND SOME PROVINCES IN CANADA DO NOT ALLOW THE EXCLUSION OR LIMITATION OF LIABILITY FOR CONSEQUENTIAL OR INCIDENTAL DAMAGES THE ABOVE LIMITATIONS MAY NOT APPLY TO YOU IN ANY EVENT BROTHER S LICENSOR S LIABILITY TO YOU FOR ACTUAL DAMAGE...

Page 7: ...Tray 2 MFC J5720DW only 250 sheets Up to Ledger or A3 Mobile Connect Web Connect Brother Apps Add Shortcuts Use Brother iPrint Scan to print and scan images and files from mobile devices See Mobile Print Scan Guide for Brother iPrint Scan at solutions brother com manuals 3 4 2 1 250 250 80 1 Scan and upload images and files to popular web services directly from your machine Capture and convert inf...

Page 8: ...opy Fax MFC models only and PhotoCapture Center and Brother ControlCenter operations useful information is included about using the machine on a network HTML CD ROM Windows Brother Solution Center 1 Macintosh Web Connect Guide This Guide provides useful information about accessing Internet services from the Brother machine as well as downloading images printing data and uploading files directly to...

Page 9: ...re at the top of the page 1 Search Box 2 Navigation Index 3 Feature Summary 4 Step by Step Instructions Where can I find the Online User s Guide Windows Click Start All Programs Brother Brother Utilities MFC XXXX XXXX is your model name Support User s Guides Windows 8 Tap or click Brother Utilities MFC XXXX XXXX is your model name Support User s Guides Macintosh or other options Visit Brother Solu...

Page 10: ...s FAQs Provides several ways to search Displays related questions for additional information Receives regular updates based on customer feedback The FAQ home page will vary depending on your model Where can I find these FAQs Brother Solutions Center http support brother com ...

Page 11: ...ying 28 How to copy 28 Stop copying 28 Copy options overview 28 Paper Type 29 Paper Size 29 Tray Select 29 6 Scanning to a computer 30 Before scanning 30 How to scan a document as a PDF file using ControlCenter4 Windows 30 How to scan a document as a PDF file using the Touchscreen 31 7 PhotoCapture Center Printing photos from a memory card or USB flash drive 32 PhotoCapture Center operations PHOTO...

Page 12: ...ubleshooting 47 Identifying the problem 47 Error and maintenance messages 47 Error animations 57 Transferring your faxes or Fax Journal report 57 Document jam 58 Printer jam or paper jam 60 Troubleshooting for Wireless LAN setup 66 Wireless LAN report 66 If you are having difficulty with your machine 67 Dial Tone detection 77 Telephone Line Interference or VoIP System 77 Machine Information 78 Che...

Page 13: ...se to the lower left corner of the Start screen and click if you are using a touch based device swipe up from the bottom of the Start screen to bring up the Apps screen When the Apps screen appears tap or click Brother Utilities b Select your machine c Choose the operation you want General information 1 Bold Bold typeface identifies buttons on your computer screen Italics Italicized typeface empha...

Page 14: ...his User s Guide show the MFC J5720DW 1 3 7 Touchscreen LCD Liquid Crystal Display Access the menus and options you want by pressing them as they are displayed on the Touchscreen LCD You can adjust the angle of the Touchscreen LCD and Touchpanel by lifting it To lower this control panel press the release button that is located behind it as shown in the illustration 1 ...

Page 15: ...s to turn on the machine Press and hold down to turn off the machine The Touchscreen LCD displays Shutting Down and stays on for a few seconds before turning off If you have connected an external telephone or TAD it is always available If you turn off the machine using it still periodically cleans the print head to maintain print quality To prolong print head life provide better ink efficiency and...

Page 16: ...1 The Basic Functions screen displays the date and time and provides access to Fax Copy and Scan modes More screens 1 The More screens display the date and time and provides access to additional features such as Photo Web Apps and Ledger Copy Shortcuts Shortcut screens 1 Create Shortcuts for frequently used operations such as sending a fax making a copy scanning and using Web Connect For instructi...

Page 17: ...ne User s Guide Check the Ink Volume 4 Settings Press to access the settings See Settings screen on page 7 5 Shortcuts Press to access the Shortcuts screens 6 Date Time Displays the date and time that has been set in the machine 7 Modes Fax Press to access Fax mode Copy Press to access Copy mode Scan Press to access Scan mode Photo Press to access Photo mode Web Press to connect the Brother machin...

Page 18: ...ax es displays how many new faxes you have received and stored in the machine s memory Press View to view your faxes on the Touchscreen 11 Warning icon The warning icon appears when there is an error or maintenance Press Detail to view the message and then press to return to Ready mode See Error and maintenance messages on page 47 NOTE This product adopts the font of ARPHIC TECHNOLOGY CO LTD Masco...

Page 19: ... a wireless network connection A four level indicator on the screen displays the current wireless signal strength if you are using a wireless connection 4 Date Time Displays the date and time that has been set in the machine Press to access the Date Time menu to adjust date and time 5 Quiet Mode Displays the Quiet Mode setting Press to access the Quiet Mode menu When this menu is set to On is disp...

Page 20: ...ress Inserting spaces 1 To enter a space press Space or c NOTE The characters that are available may differ depending on your country Making corrections 1 If you entered an incorrect character and want to change it press d to move the cursor to highlight the incorrect character and then press Enter the correct character You can also use the cursor to go back and insert characters To erase all the ...

Page 21: ...ine or load paper in the MP Tray Change the paper size and paper type settings if needed according to the instructions on the Touchscreen See Check Paper setting on page 23 We explain how to load paper for each tray Tray 1 See page 9 Tray 2 See page 14 MP Tray See page 17 Manual feed slot See page 19 Loading paper in paper tray 1 2 Paper size and loading orientation 2 The paper size determines the...

Page 22: ...uide 1 lines up with the mark for the paper size you are using c Fan the stack of paper well to avoid paper jams and misfeeds NOTE Always make sure the paper is not curled d Load paper in the paper tray with the printing surface face down Check that the paper is flat in the tray Landscape orientation 2 e Gently adjust the paper guides 1 to fit the paper Make sure the paper guides touch the sides o...

Page 23: ...y out of the machine Rest the tray on a flat surface b Push the blue slider until it locks in the release position and then extend the tray until the blue slider returns to and locks in the default position Open the tray cover and make sure the triangular mark inside the tray 1 lines up with the mark 2 for B4 JIS LGL as shown in the illustration Push the blue slider a second time until it locks in...

Page 24: ... load paper in the paper tray with the printing surface face down Check that the paper is flat in the tray Portrait orientation 2 f Gently adjust the paper guides 1 to fit the paper Make sure the paper guides touch the sides of the paper g Check that the paper is flat in the tray and below the maximum paper mark 1 Overfilling the paper tray may cause paper jams MFC J5520DW J5620DW Go to step i MFC...

Page 25: ...ay 1 3 Lift the A4 LTR stopper 1 if Letter or A4 size paper is in Tray 2 4 Slowly push Tray 2 completely into the machine i Slowly push Tray 1 completely into the machine MFC J5520DW J5620DW MFC J5720DW j Unfold the paper support flap k Change the paper size setting in the machine s menu if needed See Set Paper Size and Type on page 22 1 ...

Page 26: ...til it locks in the release position and then extend the tray until the blue slider returns to and locks in the default position Make sure the triangular mark inside the tray 1 lines up with the mark 2 for B4 JIS LGL as shown in the illustration Push the blue slider a second time until it locks in the release position and then extend the tray until the blue slider returns to and locks in the defau...

Page 27: ... misfeeds NOTE Always make sure the paper is not curled e Gently load the paper into the paper tray with the printing surface face down Portrait orientation 2 f Gently adjust the paper guides 1 to fit the paper Make sure the paper guides touch the sides of the paper g Check that the paper is flat in the tray and below the maximum paper mark 1 Overfilling the paper tray may cause paper jams h Slowl...

Page 28: ...er and extend Tray 1 to Ledger or A3 size so it is even with Tray 2 j Open the output paper tray and lift the A4 LTR stopper 1 if Letter or A4 size paper is in Tray 1 k Close the output paper tray cover and slowly push Tray 1 completely into the machine l Unfold the paper support flap m Change the paper size setting in the machine s menu if needed See Set Paper Size and Type on page 22 1 ...

Page 29: ...bout other paper sizes see Online User s Guide Load Paper in the Multi purpose Tray MP Tray When using Letter A4 or Executive size paper 2 a Using both hands use the finger holds to open the upper cover 1 and MP Tray 2 b Using both hands pull up the paper tray until it locks into place MP Tray A4 Letter Executive Landscape orientation A3 Ledger Legal Folio A5 A6 Photo Photo L Photo 2L Index card E...

Page 30: ...re the paper is not curled or wrinkled You can load up to 80 sheets of plain paper f Gently load the paper in the MP Tray with the printing surface face up Make sure you load the paper in the MP Tray and not the manual feed slot Landscape orientation 2 NOTE If you cannot load the paper in the MP Tray lift the cover 1 forward and push the release lever 2 toward the back of the machine and then load...

Page 31: ... Use the manual feed slot to load special print media one sheet at a time The manual feed slot cannot be used for printing faxes Paper size and loading orientation 2 The paper size determines the orientation when loading paper in the manual feed slot See the details in this chapter For information about other paper sizes see Online User s Guide Load Paper in the Manual Feed Slot 1 2 Manual feed sl...

Page 32: ...er 1 and MP Tray 2 b Slide the manual feed slot paper guides to match the width of the envelope you are using c Press the corners and sides of the envelopes to make them as flat as possible d Load only one envelope in the manual feed slot with the printing surface face up Portrait orientation 2 1 2 ...

Page 33: ...the front edge touches the paper feed roller Let go of the envelope when you hear the machine pull it in a short distance The Touchscreen displays Manual Feed Slot ready NOTE Push the envelope into the manual feed slot until you feel it grab the envelope g Pull out the paper support 1 until it locks into place and then unfold the paper support flap 2 2 1 ...

Page 34: ...1 or MP Tray press Paper Type Press Plain Paper Inkjet Paper Brother BP71 or Other Glossy Press Paper Size Swipe up or down or press a or b to display the option you want to set and press it NOTE When Brother BP71 or Other Glossy is selected Tray 1 is not available for paper larger than Letter or A4 size If information about loading the paper in the MP Tray appears on the Touchscreen read it and t...

Page 35: ...y Setting f Press Tray Setting g Swipe up or down or press a or b to display Check Paper h Press Check Paper i Press Off or On j Press Recommended print media 2 To get the best print quality we recommend using the following paper Handling and using print media 2 IMPORTANT DO NOT use the following kinds of paper Damaged curled wrinkled or irregularly shaped 1 0 08 in 2 mm or greater curl may cause ...

Page 36: ... fan the pages before placing them in the ADF Document Sizes and Weights 3 How to load documents 3 IMPORTANT DO NOT pull on the document while it is feeding DO NOT use paper that is curled wrinkled folded ripped stapled paper clipped glued or taped DO NOT use cardboard newspaper or fabric DO NOT leave a thick document on the scanner glass If you do this the ADF may jam Make sure documents with ink...

Page 37: ...OTE DO NOT load your document underneath the supports 1 If you load a small size document and cannot remove it open the stack tray 1 and then remove the document Close the stack tray before closing the ADF document support Using the scanner glass 3 Use the scanner glass to fax copy or scan one page at a time Document Sizes Supported 3 1 Length Up to 11 7 in 297 mm Width Up to 8 5 in 215 9 mm Weigh...

Page 38: ...and the ADF document support must be closed a Lift the document cover b Place the document face down in the upper left corner of the scanner glass 1 Document Cover c Close the document cover IMPORTANT If you are scanning a book or thick document DO NOT slam or press on the document cover 1 ...

Page 39: ...ons Center See Quick Setup Guide b From your application select the Print command c Select the name of your machine in the Print dialog box and click Properties or Preferences depending on the application you are using d Select the settings you want to change in the Properties dialog box Commonly used settings include Media Type Print Quality Paper Size Orientation Color Grayscale Ink Save Mode Sc...

Page 40: ... 99 d Press Black Start or Color Start Stop copying 5 To stop copying press Copy options overview5 To change copy options press Copy and then press Options Swipe up or down or press a or b to scroll through the copy settings When the setting you want is displayed press it and choose your option When you have finished changing options press OK For more information about changing the following copy ...

Page 41: ...io paper a Load your document b Press Copy c Enter the number of copies you want d Press Options e Swipe up or down or press a or b to display Paper Size f Press Paper Size g Swipe up or down or press a or b to display Letter Legal Ledger A4 A5 A3 Executive 4 x6 or Folio and then press the option you want NOTE If you are using the manual feed slot insert only one sheet of paper at a time See Loadi...

Page 42: ...vanced Mode Windows NOTE The screens on your PC may vary depending on your model This section is based on using Advanced Mode in ControlCenter4 ControlCenter4 is a software utility that lets you access the applications you use most often without having to manually launch specific applications a Load your document See How to load documents on page 24 b Click the ControlCenter4 icon in the task tray...

Page 43: ...ars in the center of the Touchscreen e Press OK If the machine is connected to a network press the PC Name Do one of the following To use the default settings go to step j To change the default settings go to step f f Press Options g Press Scan Settings and then press Set at Device h Choose the settings for 2 sided Scan 1 Scan Type Resolution File Type Scan Size Skip Blank Page 1 and Remove Backgr...

Page 44: ...s Photo d Swipe left or right to display View Photos e Press View Photos Press OK f Do one of the following To choose the photos you want to print or to print multiple copies of an image go to step g To print all the photos press Print All Press Yes to confirm Go to step j g Swipe left or right or press d or c to display the photo you want to print and then press it h Enter the number of copies Pr...

Page 45: ...e other print settings if needed When finished press OK m Press Start n Wait until the message on the Touchscreen disappears after printing and then remove the memory card or USB flash drive from the media slot PhotoCapture Center print settings overview7 The Print Settings you change are temporary for your current printout The machine returns to its default settings after printing is complete NOT...

Page 46: ...elephone company s Distinctive Ring service For more information and setup instructions See How to choose the correct Receive Mode on page 39 See Distinctive Ring on page 34 See Online User s Guide Voice Mail Distinctive Ring 8 Distinctive Ring is a telephone company service that allows you to have two different phone numbers on a single line Each telephone number has its own ring pattern You can ...

Page 47: ... For more information and setup instructions See Online User s Guide External TAD Telephone Answering Device See Online User s Guide Connect an External TAD See Online User s Guide Record an Outgoing Message OGM on the External TAD External and extension telephones 8 You can connect a separate telephone to the jack labeled EXT on the Brother machine If you answer an incoming fax on the telephone y...

Page 48: ...eview is set to On press Fax and then Sending Faxes The Touchscreen displays c To change the fax sending settings press Options Swipe up or down or press a or b to scroll through the fax settings When the setting you want is displayed press it and choose your new option When finished changing options press OK For more advanced fax sending operations and settings see Online User s Guide Send a Fax ...

Page 49: ...tep f If you select Color in the Color Setting the Touchscreen asks if you want to send a color fax Press Yes Color fax to confirm The machine dials and sends the page f When the Touchscreen displays Next Page do one of the following To send a single page press No The machine sends the document To send more than one page press Yes and go to step g g Place the next page on the scanner glass Press O...

Page 50: ...s How to set your Station ID 9 Set your machine s Station ID so that the date and time appear on each fax you send If you are not using this machine for faxing the Station ID is not required a Press Settings b Press All Settings c Swipe up or down or press a or b to display Initial Setup Press Initial Setup d Press Station ID e Press Fax f Enter your fax number up to 20 digits using the Touchscree...

Page 51: ...calls See Online User s Guide Voice Mail Will you be using a Telephone Answering Device on the same telephone line as your Brother machine Your external telephone answering device TAD will automatically answer every call Voice messages are stored on the external TAD and fax messages are printed Choose External TAD as your Receive Mode See Online User s Guide External TAD Telephone Answering Device...

Page 52: ...the Distinctive Ring Pattern i Press Fax Only Fax Tel External TAD or Manual j Press Receive Modes overview 10 Some Receive Modes answer automatically Fax Only and Fax Tel You may want to change the Ring Delay before using these modes See Ring Delay on page 42 Fax Only 10 Fax Only mode will automatically answer every call as a fax call Fax Tel 10 Fax Tel mode recognizes and manages incoming fax an...

Page 53: ...t repeating beeps press Fax Start and choose Receive The Easy Receive feature lets you receive faxes by lifting a handset on the same line as the machine See Online User s Guide Set Easy Receive External TAD 10 External TAD mode lets an external answering device manage your incoming calls Faxes will be received automatically Voice callers can record a message on the external TAD To connect your Ex...

Page 54: ... your machine receives a call you and your caller will hear the normal telephone ring The number of rings is set in the Ring Delay setting If the call is a fax your machine will print or store it If the call is a voice call the machine will sound the F T Ring a fast pseudo double ring for the number of seconds you have set for the F T Ring Time If you hear the F T Ring it means you have a voice ca...

Page 55: ...oistened with a non flammable glass cleaner c In the ADF unit clean the white bar 1 and the glass strip 2 with a lint free cloth moistened with a non flammable glass cleaner d MFC J5720DW Close the document cover and open the ADF cover Clean the white bar 1 and the glass strip 2 with a soft lint free cloth moistened with a non flammable glass cleaner e MFC J5720DW Close the ADF cover Routine maint...

Page 56: ... check and then go to step j If you can see missing short lines as shown in the illustration press Yes g The Touchscreen prompts you to check the print quality of each color Following the instructions on the Touchscreen press 1 2 3 or 4 to select the example most similar to the Print Quality Check Sheet for each color h If you press number 2 3 or 4 the Touchscreen prompts you to start cleaning Pre...

Page 57: ...NOTE You can also press and then Maintenance b Press Improve Print Quality c Press Alignment d Press Next e Swipe up or down or press a or b to display the paper size options and then press the paper size that needs a print alignment adjustment and then press it f Press Basic alignment or Advanced alignment g Following the instructions on the Touchscreen load plain paper of the selected size in Tr...

Page 58: ...t repeat step h for patterns B to Z NOTE j Press NOTE For more information about cleaning and checking the machine see Online User s Guide Clean Your Brother Machine and Check Your Brother Machine i When the print alignment is not adjusted properly text looks blurry After the print alignment is adjusted properly text looks sharp ...

Page 59: ...above checks See If you are having difficulty with your machine on page 67 Error and maintenance messages B As with any sophisticated office product errors may occur and supplies must be replaced If this happens your machine identifies the error or required routine maintenance and displays the appropriate message The most common error and maintenance messages are shown in the table Troubleshooting...

Page 60: ... set to Plain Paper you can make copies in black and white 2 sided copy is not available when this message appears Faxing If the paper type is set to Plain Paper or Inkjet Paper the machine will receive and print the faxes in black and white If a sending machine has a color fax the machine s handshake will ask that the fax be sent as black and white Replace the ink cartridges See Online User s Gui...

Page 61: ...artridges See Supplies on page 83 Cannot Detect Ink Volume If you are not using Genuine Brother Innobella ink the machine may not detect the ink volume Use a new Genuine Brother Innobella Ink Cartridge If the error is not cleared call Brother Customer Service Cannot Print Replace ink One or more of the ink cartridges have reached the end of their life The machine will stop all print operations Whi...

Page 62: ...ge 77 Document Jam too Long The document was not inserted or fed correctly or the document scanned from the ADF was too long See Using the ADF on page 24 See Document jam on page 58 DR Mode in Use The machine is in Distinctive Ring mode You cannot change the Receive Mode from Manual to another mode Set Distinctive Ring to Off See Online User s Guide Register the Distinctive Ring Pattern High Tempe...

Page 63: ...ause non Brother ink could cause poor print quality which is resolved by cleaning The more cleaning the machine requires the faster these boxes will fill up NOTE Repairs resulting from the use of non Brother supplies may not be covered under the stated product warranty The ink absorber box or flushing box must be replaced Call Brother Customer Service or a Brother Authorized Service Center to have...

Page 64: ...nd format it correctly Put the card firmly into the slot again to make sure it is in the correct position If the error remains check the media drive slot of the machine by putting in another memory card that you know is working Media is Full The memory card or USB flash drive you are using already contains 999 files Your machine can save to your memory card or USB flash drive only if it contains l...

Page 65: ...e Jam Clear Cover is not closed correctly Make sure the Jam Clear Cover is closed evenly at both ends See Printer jam or paper jam on page 60 Paper dust has accumulated on the surface of the paper pick up rollers Clean the paper pick up rollers See Online User s Guide Clean the Paper Pick up Rollers and Clean the Paper Pick up Rollers for Paper Tray 2 The paper is jammed in the machine Remove the ...

Page 66: ...perations on page 65 MFC J5520DW J5620DW Paper Tray not detected MFC J5720DW Paper Tray 1 not detected Paper Tray 2 not detected The paper tray is not completely inserted Slowly push the paper tray completely into the machine Jammed paper or a foreign object has prevented the paper tray from being inserted properly Pull the paper tray out of the machine and remove the paper or foreign object If yo...

Page 67: ...nnect the machine from the power for several minutes and then reconnect it The machine can be turned off without losing faxes stored in the memory See Transferring your faxes or Fax Journal report on page 57 If the problem continues call Brother Customer Service Unusable Device Disconnect device from front connector turn machine off then on A broken device is connected to the USB direct interface ...

Page 68: ...size and the paper orientation press OK on the Touchscreen The paper orientation is not proper for the paper size You did not set the paper guides in the tray to the indicators for the paper size you are using If you are printing from your computer make sure the paper size you choose in the printer driver matches the size of paper in the tray For more information see Online User s Guide Change the...

Page 69: ... set your Station ID on page 38 a Press to temporarily interrupt the error b Press Settings c Press All Settings d Swipe up or down or press a or b to display Service e Press Service f Press Data Transfer g Press Fax Transfer h Do one of the following If the Touchscreen displays No Data there are no faxes in the machine s memory Press Close and then press Enter the fax number where faxes will be f...

Page 70: ... your Station ID you cannot enter fax transfer mode See How to set your Station ID on page 38 a Press to temporarily interrupt the error b Press Settings c Press All Settings d Swipe up or down or press a or b to display Service e Press Service f Press Data Transfer g Press Report Transfer h Enter the fax number where the Fax Journal report will be forwarded i Press Fax Start Document jam B Docume...

Page 71: ...de the ADF B a Take any paper that is not jammed out of the ADF b Lift the document cover c Pull the jammed document out to the right 1 Document Cover d Close the document cover e Press Paper scraps are jammed in the ADF B a Lift the document cover b Insert a piece of stiff paper such as cardstock into the ADF to push any small paper scraps through 1 Document Cover c Close the document cover d Pre...

Page 72: ...ug the machine from the AC power outlet b If paper is loaded in the MP Tray remove the paper c MFC J5520DW J5620DW Pull Tray 1 1 completely out of the machine MFC J5720DW Pull Tray 1 and then Tray 2 2 completely out of the machine d Pull out the jammed paper 1 e Lift the Jam Clear Flap and remove the jammed paper f Make sure you look carefully inside the machine above and below the Jam Clear Flap ...

Page 73: ...e h Using both hands use the finger holds on each side of the machine to lift the scanner cover 1 into the open position i Slowly pull the jammed paper 1 out of the machine j Move the print head if necessary to take out any paper remaining in this area Make sure that jammed paper scraps are not left in the corners of the machine 1 and 2 1 1 1 2 ...

Page 74: ...ly wash it off with soap or detergent k Gently close the scanner cover using the finger holds on each side Do one of the following If the Touchscreen displays Paper Jam Front go to step r If the Touchscreen displays Paper Jam Front Rear go to step l l Open the MP Tray Make sure you look carefully inside for jammed paper If there is jammed paper slowly pull it out of the MP Tray If you cannot remov...

Page 75: ... support flap 2 s Reconnect the power cord If the Touchscreen displays Paper Jam Rear follow these steps B a Unplug the machine from the AC power outlet b Open the MP Tray If the paper is loaded in the MP Tray remove it c Slowly pull the jammed paper out of the MP Tray If you cannot remove the jammed paper lift the cover 1 forward and push the release lever 2 toward the back of the machine Then re...

Page 76: ...re closed properly i Using both hands use the finger holds on each side of the machine to lift the scanner cover 1 into the open position j Slowly pull the jammed paper 1 out of the machine k Move the print head if necessary to remove paper remaining in this area Make sure paper scraps are not left in the corners of the machine 1 and 2 1 1 1 1 2 ...

Page 77: ...there is a repeat paper jam a small scrap of paper may be stuck in the machine See Additional paper jam clear operations on page 65 Additional paper jam clear operationsB a If you experience paper jam repeatedly 3 times or more the Touchscreen displays a message asking if you want to remove the scraps Press Yes to return to the Home screen b Press Settings c Press Maintenance d Press Remove Paper ...

Page 78: ...le to move it back to its previous location TS 04 Unsupported authentication encryption method has been detected on your wireless access point router Your wireless access point router is using an authentication encryption method that is not supported by the device Check that you are selecting the correct SSID network name TS 05 The specified SSID and network key are incorrect Check that you are se...

Page 79: ...e document is displayed on the screen but they do not show up when it is printed There is an unprintable area on the top and bottom of the page Adjust the top and bottom margins in your document to allow for this See Online User s Guide Unprintable Area Print speed is too slow Try changing the printer driver setting The highest resolution needs longer data processing sending and printing time Try ...

Page 80: ... supplies may affect the print quality hardware performance and machine reliability Make sure you are using one of the recommended types of paper See Online User s Guide Acceptable Paper and Other Print Media The recommended environment for your machine is between 68 F to 91 F 20 C to 33 C White horizontal lines appear in text or graphics Letter A4 and Executive Ledger A3 Legal Folio A5 A6 envelop...

Page 81: ...face down in the paper tray Make sure you are using Genuine Brother Innobella Ink If you are using photo paper make sure that you have set the correct paper type If you are printing a photo from your PC set the Media Type in the printer driver Ink is smudged or wet when using glossy photo paper Be sure to check the front and back of the paper Place the glossy surface printing surface face down See...

Page 82: ...aper tray Remove all the paper from the tray and fan the stack of paper well then put it back in the tray Make sure you do not push the paper in too far Make sure the Jam Clear Cover is closed correctly See Printer jam or paper jam on page 60 Make sure the Base Pad in the paper tray is not dirty See Online User s Guide Clean the Paper Pick up Rollers and Clean the Paper Pick up Rollers for Paper T...

Page 83: ...k No dial tone Check all line cord connections Make sure the telephone line cord is plugged into the telephone wall jack and the LINE jack inside the machine Canada only Change the Tone Pulse setting See Online User s Guide Set Tone or Pulse Dialing Mode Send a manual fax by pressing Hook and dialing the number Wait to hear fax receiving tones before pressing Fax Start If there is no dial tone con...

Page 84: ...your Brother machine is on a line with the Distinctive Ring subscriber service see Online User s Guide Distinctive Ring If your Brother machine shares a line with other telephones and you want it to automatically answer all incoming faxes select Fax Tel mode In Fax Tel mode your Brother machine will automatically receive faxes and produce a pseudo double ring to alert you to answer voice calls If ...

Page 85: ...t your Brother machine s Receive Mode to External TAD See How to choose the correct Receive Mode on page 39 Make sure your Brother machine s Easy Receive feature is turned On Easy Receive is a feature that allows you to receive a fax even if you have answered the call on an external or extension telephone See Online User s Guide Set Easy Receive If you often get transmission errors due to possible...

Page 86: ...y mistakenly interpret certain voices or music on the line as a fax machine calling and respond with fax receiving tones Deactivate the machine by pressing Try avoiding this problem by turning Easy Receive to Off See Online User s Guide Set Easy Receive Sending a fax call to the machine If you answered on an extension telephone press your Fax Receive Code the factory setting is l 5 1 If you answer...

Page 87: ...ines appear in the scanned data Clean the white bar and the glass strip underneath it See Cleaning the scanner on page 43 Try using the scanner glass See Using the scanner glass on page 25 PhotoCapture Center Difficulties Difficulty Suggestions Removable Disk does not work correctly 1 Take out the memory card or USB flash drive and put it back in again 2 If you have tried Eject from within Windows...

Page 88: ...Receive feature does not work Windows It is necessary to set the third party Security Firewall Software to allow PC FAX Rx Add port 54926 for Network PC FAX Rx See Online User s Guide My Brother Machine Cannot Print Scan or PC FAX Receive over the Network The Brother software cannot be installed Windows If the Security Software warning appears on the PC screen during the installation change the Se...

Page 89: ...gs b Press All Settings c Swipe up or down or press a or b to display Initial Setup d Press Initial Setup e Swipe up or down or press a or b to display Compatibility f Press Compatibility g Press High Normal or Basic for VoIP Basic for VoIP reduces the modem speed to 9 600 bps and turns off color fax receiving and Error Correction Mode ECM except for color fax sending Unless interference is a recu...

Page 90: ... operations are available 1 Machine Reset You can reset all the machine s settings that you have changed such as Date and Time and Ring Delay The icon will be restored to the Home screen USA only 2 Network You can reset the print server back to its factory settings such as the password and IP address information 3 Address Book Fax Address Book Fax resets the following settings Address Book Address...

Page 91: ...s b Press All Settings c Swipe up or down or press a or b to display Initial Setup d Press Initial Setup e Swipe up or down or press a or b to display Reset f Press Reset g Press the type of reset you want to do Machine Reset Network Address Book Fax or All Settings h Press Yes to confirm i Press Yes for two seconds to reboot the machine ...

Page 92: ... 29 using ADF 24 using scanner glass 25 Custom telephone features on a single line 74 D Dialing a pause 37 Document loading 24 26 E Envelopes 9 17 19 Error messages on Touchscreen 47 F Fax from PC See Online User s Guide Fax stand alone receiving 39 difficulties 71 72 F T Ring Time setting 42 Ring Delay setting 42 telephone line interference or VoIP system 77 sending 36 difficulties 73 telephone l...

Page 93: ...l 39 Receive Mode 39 Telephone line difficulties 71 interference or VoIP system 77 Text entering 8 Transferring your faxes or Fax Journal report 57 Tray Select 29 Troubleshooting document jam 58 error and maintenance messages on Touchscreen 47 if you are having difficulty copying 75 incoming calls 74 Network 76 paper handling 70 phone line or connections 71 PhotoCapture Center 75 print quality 68 ...

Page 94: ...82 ...

Page 95: ...igh Yield Magenta LC203M Black Yellow Cyan and Magenta Approximately 550 pages 1 1 Approx cartridge yield is declared in accordance with ISO IEC 24711 For more information about the replacement supplies visit http www brother com pageyield What is Innobella Innobella is a range of genuine supplies offered by Brother The name Innobella derives from the words Innovation and Bella meaning Beautiful i...

Page 96: ...rother International Corporation Canada Ltd 1 rue Hôtel de Ville Dollard des Ormeaux QC Canada H9B 3H6 Visit us on the World Wide Web http www brother com These machines are approved for use in the country of purchase only Local Brother companies or their dealers will support only machines purchased in their own countries ...

Reviews: