


Network Scanning
206
13
Using the Scan key
13
You can use
(
SCAN
) on the control panel to scan documents into your word processing, graphics or
E-mail applications or a folder on your computer.
Before you can use
(
SCAN
) on the control panel, you have to install the Brother MFL-Pro Suite and
connect the machine to your computer. If you installed the MFL-Pro Suite from the included CD-ROM then
the correct drivers and ControlCenter4 or ControlCenter2 are installed. Scanning by
(
SCAN
) follows
the configuration on the
Device Scan Settings
screen of ControlCenter4 or
Device Button
tab of
ControlCenter2. (For Windows
®
, see
Configuring Scan button settings
on page 75 for
Home Mode
or
Configuring Scan button settings
Advanced Mode
. For Macintosh, see
For details about how to configure the scan settings of ControlCenter4 or ControlCenter2 buttons and to
launch the application of your choice using
(
SCAN
on page 63 or
Scan to E-mail
13
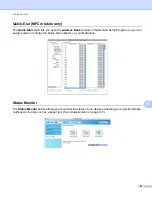
When you choose Scan to E-mail (PC) your document will be scanned and sent directly to the computer you
designated on your network. ControlCenter4 or ControlCenter2 will activate the default E-mail application on
the designated computer. You can scan and send a black and white or colour document from the computer
as an attachment.
a
Load your document.
b
Press (
SCAN
).
c
Press
a
or
b
to choose
Scan to PC
.
Press
OK
.
d
Press
a
or
b
to choose
.
Press
OK
.
e
Press
a
or
b
to choose the destination computer you want to use for E-mailing your document.
Press
OK
.
If the LCD prompts you to enter a PIN number, enter the 4-digit PIN number for the destination computer
on the control panel.
Press
OK
.
f
Press
Start
.
The machine starts the scanning process.


