background image

To set Auto Review:

From the Record menu, select 

Auto Review

.

Use the


 or   keys to scroll through each selection.

Press the 

SeT

 button to save and apply changes.

ReCoRDInG MoVIeS

The Movie Record function lets you record movies with your camera. The available recording 
time depends on the capacity of the memory card. Movies can be recorded until the 
maximum memory capacity has been reached.  
However the length of a single movie may be limited  
(the limitation depends on the camera model).

Adjust the switch mode to 

Movie Record

.

 Focus your camera on the subject that you want to take.
Press the 

Shutter

 button to start recording.

 Use the 

 control to zoom in and zoom out on  

an image.
To pause recording, press the   key.
To continue recording, press the   key again.
To stop recording, press the 

Shutter

 button.

Note

    •   When the maximum capacity for a single video has been reached, simply press  

the shutter button again to continue recording.

•   The camera will automatically stop recording when the memory capacity is full.
•  Digital zoom is not available in movie Recording Mode.
•  Sound cannot be recorded while pressing the 

 control.

•  Power save is not available in Movie Record or Pause Record modes.

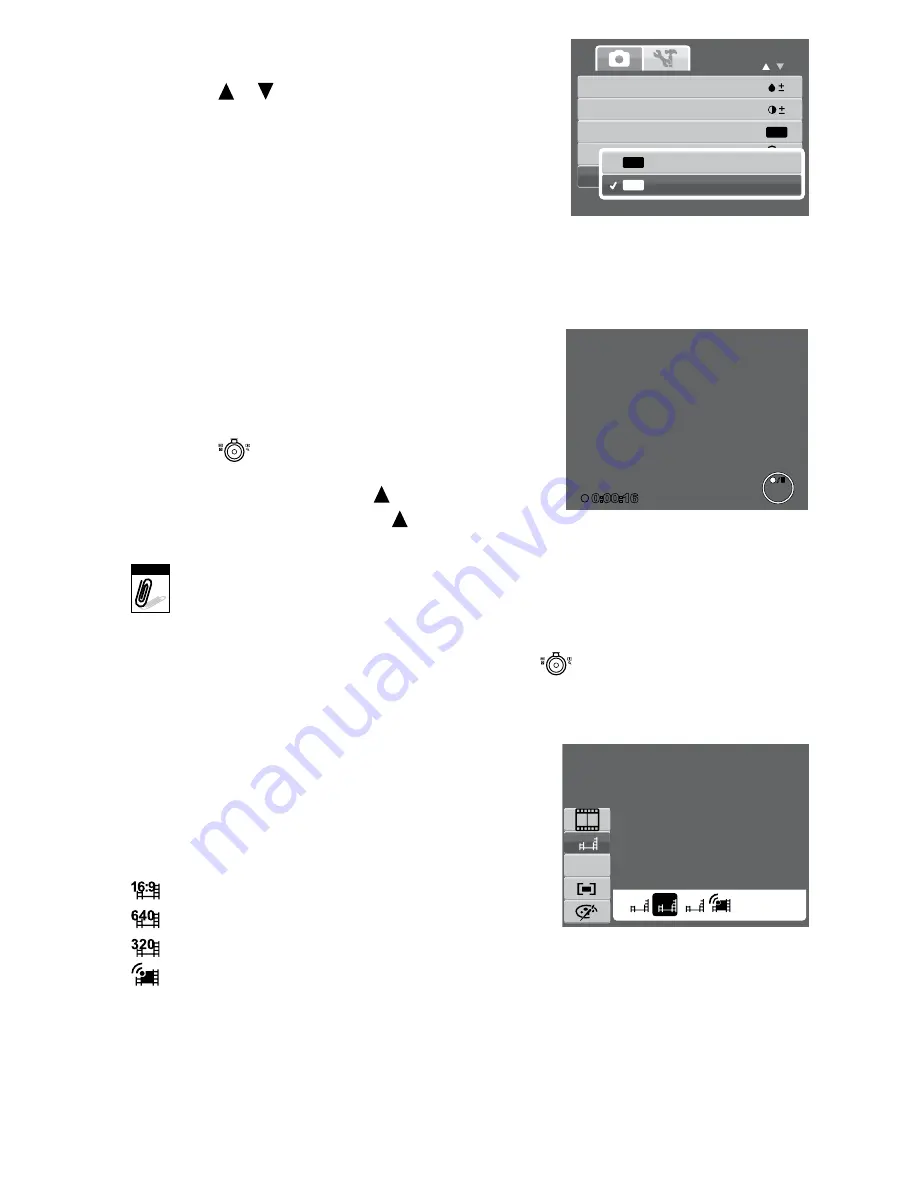
SeTTInG THe MoVIe SIZe

The Movie Size function icon appears only in  
Movie mode. Use this function to adjust the  
resolution and quality of movie clips.
The table below shows the available size and 
corresponding image quality settings.

icon   frame size   image Quality


720 x 400  

HDTV


640 X 480  

High Quality


320 x 240  

Normal


640 x 480  

 For Internet, see “Internet Mode” on page 27.

To set other movie mode settings, please refer to “Using the Function Menu” on page 15.

1.
2.
3.

1.
2.
3.
4.

5.
6.
7.

Saturation
Contrast
Digital Zoom
Date Stamp

Auto Review

OFF

OFF

On

Off

OFF

ON

0:00:16

N

AWB

640

640

320

16:9

High Quality

26

6

41

31

6_

in

s

_1

m

g

p

 D

ig

ita

l c

am

er

a_

s

iz

e:

 4

.7

5”

W

 x

 7

.2

5”

H

_o

ut

pu

at

 1

00

%

_p

rin

ts

 1

/0

 B

la

ck 

Summary of Contents for Ultra-Thin Digital Camera

Page 1: ...Ultra Thin Digital Camera 10 megapixel 2 7 screen 3x zoom FPO...

Page 2: ...he Focus Mode 15 Using the Function Menu 15 Using the Record Menu Recording Movies 26 Recording Voices 27 Playback Viewing in Single Navigation 27 Viewing thumbnails 28 Zooming images 28 Playing Movie...

Page 3: ...type power cord is required in order to meet FCC emission limits and to prevent interference to radio and television reception Use only shielded cable to connect I O devices to this equipment Any cha...

Page 4: ...ype and use a fully charged battery There is a risk of explosion if battery is replaced by an incorrect type Dispose of used batteries according to the instructions Using this Menu Symbols used in thi...

Page 5: ...Strap For Windows Windows 2000 XP Vista Processor Pentium II 450MHz or above Memory 512MB or above HDD space 200 MB or above 16bit color display monitor Microsoft DirectX 9 0C USB port and CD ROM dri...

Page 6: ...een LED Indicator Menu Button Function Delete Button Set Button 4 way Navigation Control Mode Switch 1 2 3 4 5 6 7 8 9 10 Power Button Stabilizer Button Shutter Button Zoom Battery SD Card Compartment...

Page 7: ...Face Tracking Rotate Button Macro Button Set Button Flash Button Display Help Button Button Usage SET Confirm a selection when using the OSD menus Flash Right 1 In Record mode press to scroll through...

Page 8: ...the camera automatically saves all images videos and audio clips in the external storage card The icon indicates the camera is using SD card Warning Not all storage cards are compatible with your came...

Page 9: ...urning the Power On and Off Press the POWER button to turn on off the camera When turning on the camera it may function differently depending on the switched mode When the camera is switched to Movie...

Page 10: ...e between Photo Record Movie Record and Playback modes Selecting the Photo Record mode options Maximize the quality and ease of use of your camera by using the different mode options The mode options...

Page 11: ...e 14 ISO Displays ISO settings 15 Focus area Use to frame subject for image capture 16 Shutter speed Displays shutter speed settings 17 Aperture value Displays aperture settings 18 Shake warning Indic...

Page 12: ...tion Displays the resolution settings Playback mode of videos No Item Description 1 Playback mode Indicates playback mode 2 Protect Indicates file is protected 3 Movie clip Indicates the file is a mov...

Page 13: ...buttons to press on the camera to apply the functions 10 Played time Indicates played time 11 Playing status Displays playing status Changing the LCD Monitor Display The type of information displayed...

Page 14: ...button to capture image When the shake warning icon appears hold the camera steadily with your arms at your side or use a tripod to stabilize the camera to prevent blurred images Using the Stabilizer...

Page 15: ...ired flash mode is displayed on the LCD monitor Your camera is equipped with five flash modes Auto The flash fires automatically whenever extra lighting is needed Red eye reduction The flash fires twi...

Page 16: ...ISO Metering and Color Mode Press the button of your camera to launch the Function Menu Press the button again to close the menu The Menu bar displays the current status of your camera settings Only t...

Page 17: ...ss the or keys to increase decrease the value As you adjust the settings the LCD monitor synchronously displays the image applying the EV settings Press the SET button to save and apply changes The av...

Page 18: ...ering function lets you select the area of the subject or frame by which the camera measures light to record still images or movies As you move through each selection the preview on the LCD monitor ch...

Page 19: ...move through the menu selections 3 To select an item press 4 Change the submenu settings using the 4 way navigation control 5 Press the SET button to save and apply settings Setting the Scene Mode Se...

Page 20: ...orks explosions Snow This feature is used for beach and snow scenes Sports This feature captures still images in high speed motions Party This feature is used for wedding or indoor party settings Cand...

Page 21: ...to automatically capture images This feature is most useful in capturing different angles and smiles of moving people When capturing an image with more than one person the camera detects the smile of...

Page 22: ...et when sunset lighting is detected Macro This mode is set when There is no face detected The focus distance is within the macro range This mode can only be detected when you half press the shutter bu...

Page 23: ...aperture value to match the brightness To activate Shutter Priority 1 Select from the Scene Mode submenu 2 Press SET button to enter the adjust mode 3 Use the or keys to select the shutter speed optio...

Page 24: ...the image again Burst Performs continuous shooting when the shutter button is pressed Stops shooting when the shutter button is released Off Captures an image without time delay Setting the AEB AEB s...

Page 25: ...aturation in your photos Use a higher saturation setting for rich colors and a lower saturation setting for more natural tones To set Saturation 1 From the Record menu select Saturation 2 Use the or k...

Page 26: ...tion allows you to add the recorded date and time on your photos The recording date and time are based on your camera s clock settings Once date and time are stamped on a photo they can no longer be e...

Page 27: ...single video has been reached simply press the shutter button again to continue recording The camera will automatically stop recording when the memory capacity is full Digital zoom is not available i...

Page 28: ...menu select Voice The Voice Recording screen layout is displayed on the LCD monitor Press the Shutter button to start recording Press the Shutter button again to stop recording Note Voice recording w...

Page 29: ...h the desired zoom view The 4 arrows on the LCD monitor indicate that the image is zoomed in You can zoom view an image up to 12X Use the navigation controls to view the zoomed image Press the Menu M...

Page 30: ...vigation controls to scroll through the saved images When viewing a voice recording file the LCD monitor displays the screen layout of Audio clips See example at the right Press the SET button to play...

Page 31: ...rmation selection appears on screen 6 Select Delete 7 Press the SET button to delete 8 The next image is displayed on the LCD monitor To delete another file use the or keys to scroll through the image...

Page 32: ...ve unwanted files in the internal memory or on the memory card Protected files cannot be erased To delete unprotect the file first See Protect on pages 32 33 To delete a photo video audio clip From th...

Page 33: ...ideo audio clip is highlighted press the SET button to mark the image video audio clip for deletion Repeat step 3 until all desired images for deletion are marked Press the MENU button A confirmation...

Page 34: ...selection appears Select Yes Press the SET button to lock files and go back to Playback mode To protect all files Select Lock all in the Protect submenu A confirmation message appears Select Yes Pres...

Page 35: ...button to launch the Playback menu Select Voice Memo Select Start then press the SET button to start recording Select Stop then press the SET button to stop recording Note When you record voice memo...

Page 36: ...size This function is only available for still images To trim an image Set the camera to Playback mode Use the or keys to scroll and select an image to trim Press the MENU button to launch the Playba...

Page 37: ...old file with the new one Save As Save the new file as a new one Cancel Cancel resize 7 Press the SET button to save cancel changes Note Resize function 3 2 16 9 and VGA are not available for photos w...

Page 38: ...e use the or keys to scroll and select an image to mark for printing 3 Specify the number of copies Use the or to increase decrease number 4 Press the FUNC button to toggle between turning on off the...

Page 39: ...ion Startup Sound 1 Selects the startup sound when camera is turned on Sound 2 Sound 3 Off Shutter On Off Enables or disables shutter sound when shutter button is pressed Shutter sound is not availabl...

Page 40: ...changes Setting Language The Language menu allows you to choose the language of the on screen display OSD menu Use the navigation control to scroll through the list and select the desired language Pr...

Page 41: ...ry Copy to Card Select to copy all files stored in the internal memory to the memory card Note If there is a memory card inserted in the memory slot the camera automatically saves all files to the mem...

Page 42: ...re displayed on the TV Connecting the Camera to a PC You can transfer photos videos and audio files to your PC 1 Connect the camera to a PC using the USB cable 2 Turn on the camera 3 The PC detects th...

Page 43: ...AM or _AUCT or _UTUBE Each folder holds up to 9999 files If new files are saved a new folder named in sequence will be automatically created File Naming File names begin with DSCI and followed by a 4...

Page 44: ...locked See Protect on pages 32 33 LCD screen displays The memory card is protected Remove the Card locked card and slide the write protect switch to its unlock position LCD screen displays The memory...

Page 45: ...ht Cloudy Tungsten Fluorescent 1 Fluorescent 2 Custom Exposure Control 2EV to 2EV 1 3EV steps Metering Multi Center Spot Driver Mode 10 sec 2 sec Double Burst Off Flash Auto Red eye Reduction Forced O...

Page 46: ...45 notes...

Page 47: ...emark trade name or logo affixed to them or their packaging The Limited Warranty does not apply to any non Brookstone products Manufacturers or suppliers other than Brookstone may provide their own wa...

Page 48: ...641316 Merrimack New Hampshire USA 03054 800 846 3000 www Brookstone com...

Reviews: