background image

bromic.com

11

USER OPERATION 

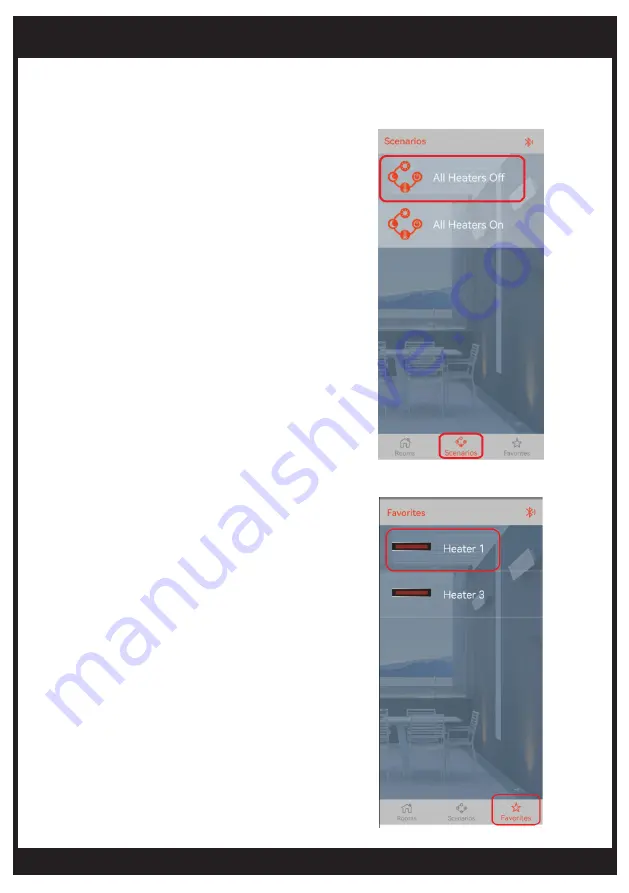
Section 2 (Optional) –Send A Scenario

Section 3 (Optional)–Access Favourite Heater(s)

The Scenario feature allows multiple Bromic Heaters 
to be set at preferred settings with a single tap. 

Refer to section 4 under “DEVICE SETUP” for  
instructions to create Scenario(s).

1. Tap on the Scenario icon from the Home page. 

2. Click on a Scenario from your list to send it.

3. Check the actual status of all Heaters to ensure the  
operation is successful. 

Note: Communication can be affected by radio  
interference or Bluetooth range. Always verify the 
status of all Heaters after any operation, especially 
when turning Heaters off. 

This feature allows easy access to your favourite 
Heater(s).

Refer to Section 2 under “DEVICE SETUP“ for  
instructions to add a Heater to the favourite list. 

1. Tap on the “Favorites” icon from the Home page. 

2. Choose the Heater from the list to access its  
operation screen.

Note: Communication can be affected by radio  
interference or range. Always check  the status of the 
Heater after any operation, especially when turning 
the Heater off. 

Summary of Contents for SMART-HEAT CONNECT

Page 1: ...1 0 AU UK BROMIC SMART HEATTM CONNECT SETUP AND USER MANUAL IMPORTANT READ THIS MANUAL CAREFULLY SEE INSIDE COVER FOR IMPORTANT INFORMATION ABOUT THIS MANUAL KEEP INSTRUCTION WITH APPLIANCE FOR FUTURE...

Page 2: ...reproduced in any form without prior written consent from Bromic Pty Ltd This manual contains important information about the configuration and operation of the Bromic Smart HeatTM Connect Please pay...

Page 3: ...like Arrange cord away from traffic area and where it will not be a trip hazard This Setup and User manual should not be removed from the site of installation Installer should leave man ual with the...

Page 4: ...Radio Range to Controllers max 30m Radio Transmission frequency AU 916 MHz UK 868 MHz Bluetooth Module Bluetooth 4 1 at 2 4GHz Bluetooth Range to Smart device max 10m Number of Heaters per Smart Heat...

Page 5: ...ng instructions in section 3B under DEVICE SETUP and the instruction manual supplied with the Controller Note Test the Remote in the same location where the Smart Heat Connect will be permanently loca...

Page 6: ...ner of the screen to enter setup section Note The unique 4 character code can be found on the label at the back of the Smart Heat Connect 7 Successful pairing is indicated once the version is automati...

Page 7: ...e according to the Heater and Controller installed i e ON OFF Dimmer Eclipse ON OFF 2CH Note For a split element Heater choose Device ON OFF 2CH Note Multiple Heaters connected to a single Controller...

Page 8: ...trician only after they have reviewed the appropriate Heater Controller Manual Follow the Controller installation manual to pair the App with the Controller Substitute the remote with corresponding Ap...

Page 9: ...A small file with tbackup extension will be generated as an attachment 4 Send it to the intended recipient The email should also be sent to oneself as backup Section 6 Optional Restore Function Note t...

Page 10: ...eater Important Note Always verify the device status after any operation The App does not provide feedback on the status of the Heater s Important Note Ensure the Bluetooth symbol is on This indicates...

Page 11: ...re the operation is successful Note Communication can be affected by radio interference or Bluetooth range Always verify the status of all Heaters after any operation especially when turning Heaters o...

Page 12: ...Heat Connect with no obstacles Check if the Bluetooth symbol on the top right corner is present to indicate device connected Device out of range Connect the Smart Heat Connect to a power supply closer...

Reviews: