


Not for
Reproduction
5.
Install foam filter into air cleaner cover.
6.
Install air cleaner cover and engage two retaining clips
to secure.
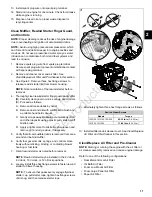
Paper Air Filter
1.
See Figure 8. Loosen two hex flange screws (A) to
release air cleaner cover (B).
2.
Remove pre-cleaner (C), if equipped, and filter (D).
3.
Gently tap filter on a hard surface to loosen dirt and
debris. Carefully brush and/or vacuum as necessary.
NOTE: Use of pressurized air or solvents will damage
pre-cleaner and filter.
4.
Gently wash pre-cleaner in warm, soapy water.
Thoroughly rinse with clean water and allow to air dry
completely. Do not oil pre-cleaner.
5.
Carefully inspect pre-cleaner and filter. Replace parts
if they cannot be adequately cleaned or if any damage
is observed.
6.
Install pre-cleaner and filter.
7.
Install air cleaner cover and start two hex flange screws.
Tighten screws to 9-12 lb-in (1-1.4 N-m).
8
Clean/Inspect Muffler and Spark Arrester
NOTE: Avoid using high pressure compressed air, which
can force dirt and debris deeper into engine cavities and
crevices. Do not use a pressurized water spray as water
intrusion can contaminate both oil and fuel systems and
lead to corrosion.
1.
Remove spark plug wire from spark plug terminal.
Secure spark plug wire to prevent contact with spark
plug terminal.
2.
Clean area around and behind muffler. Proceed as
follows:
A. Remove all loose debris by hand.
B. Remove dust and dirt with a soft bristle brush and
a portable hand held vacuum.
C. Gently scrape away stubborn accumulations of dirt
and other deposits using a plastic putty knife or stiff
bristle brush.
D. Apply a light solvent to bristle brush to loosen and
remove grit and oily residue, if necessary.
3.
Remove three hex flange screws to release wire guard
or stamped guard from muffler.
4.
Inspect muffler for holes, split seams, cracked welds,
loose internal parts, corrosion, and other damage.
5.
Inspect muffler tube and mounting flange for cracked
welds, breakage, and other damage.
6.
Install three hex flange screws to fasten wire guard or
stamped guard to muffler. Tighten wire guard screws
to 30-50 lb-in (3.4-5.7 N-m). Tighten stamped guard
screws as follows.
Muffler Stamped Guard Screws
Torque
Models
80-110 lb-in (9-12.4 N-m)
130G00, 131G00, 13R200
27-44 lb-in (3-5 N-m)
13U100, 13U200
7.
Verify that two hex nuts on muffler studs are tightened
as follows.
Muffler Stud Nuts
Torque
Models
80-110 lb-in (9-12.4 N-m)
130G00, 131G00, 13R200
195-266 lb-in (22-30 N-m)
13U100, 13U200
8.
Inspect spark arrester for dirt, debris, and carbon
buildup. Proceed as follows:
A. Remove screw(s) to release spark arrester from
muffler/muffler guard. Note orientation of spark
arrester before removal.
B. Remove screening element from spark arrester.
C. Gently clean screening element with a stiff bristle
brush. If carbon buildup is present, soak or spray
with Carburetor Cleaner (Part No.'s 100041 or
100042). Blow dry from the inside-out with low
pressure compressed air. Exercise caution to avoid
bending or puncturing screening element. Replace
screening element if it cannot be adequately
cleaned or if any damage is observed.
D. Install screening element into spark arrester.
E. Orient spark arrester as noted before removal, and
install screw(s) to fasten to muffler/muffler guard.
Tighten screw(s) as follows.
14
2
Summary of Contents for 130G00
Page 1: ...N o t f o r R e p r o d u c t i o n ...
Page 2: ...N o t f o r R e p r o d u c t i o n ...
Page 6: ...N o t f o r R e p r o d u c t i o n ...
Page 8: ...N o t f o r R e p r o d u c t i o n ...
Page 26: ...N o t f o r R e p r o d u c t i o n 20 2 ...
Page 32: ...N o t f o r R e p r o d u c t i o n 26 3 ...
Page 44: ...N o t f o r R e p r o d u c t i o n TOP END DISASSEMBLY 41 38 5 ...
Page 50: ...N o t f o r R e p r o d u c t i o n 44 5 ...
Page 90: ...N o t f o r R e p r o d u c t i o n 123 84 8 ...
Page 100: ...N o t f o r R e p r o d u c t i o n 94 8 ...
Page 108: ...N o t f o r R e p r o d u c t i o n This page is intentionally left blank 102 9 ...
Page 109: ...N o t f o r R e p r o d u c t i o n This page is intentionally left blank 103 9 ...
Page 110: ...N o t f o r R e p r o d u c t i o n This page is intentionally left blank 104 9 ...
Page 111: ...N o t f o r R e p r o d u c t i o n This page is intentionally left blank 105 9 ...


