


Not for
Reproduction
8.
Install spark plug wire onto spark plug terminal.
Clean/Replace In-Tank Fuel Filter
1.
Start and run engine until fuel tank is empty.
2.
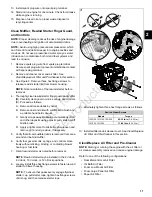
See Figure 11. Remove spark plug wire from spark plug
terminal (A). Secure spark plug wire to prevent
unintentional contact with spark plug terminal.
3.
Remove air cleaner cover and air filter (B). See
Clean/Replace Air Filter and Pre-Cleaner in this section.
4.
Remove plastic knob from throttle control lever.
5.
If equipped, remove hex flange screw to release high
oil fill tube flange from control panel trim.
6.
Remove three hex flange screws (C) to release control
panel trim from fuel tank. Disengage control panel trim
from slot in air cleaner base.
11
12
7.
Remove two hex flange nuts (D) from fuel tank studs.
8.
On opposite side of fuel tank, remove hex flange screw
(E) to release fuel tank from crankcase flange.
NOTE: For best access to screw, move throttle control
lever left to the FAST position and use a 8 mm socket
with extension.
NOTE: Exercise care to avoid dropping screw between
engine and blower housing. A dropped screw may be
caught by the flywheel magnet where further
disassembly would be required to retrieve it.
9.
See Figure 12. Squeeze tangs and move hose clamp
(F) away from fuel filter fitting (G).
10. Remove hose (H) from fuel filter fitting. For best results,
use Fuel Hose Remover (Part No. 19620).
11. Using hex, remove fuel filter fitting from fuel tank.
12. Unthread fuel filter (I) and remove O-ring (J) from fuel
filter fitting.
13. Inspect fuel filter for dirt and debris. Clean or replace
as necessary.
14. Inspect O-ring for cuts, tears, or general deterioration.
Replace as necessary.
15. Install O-ring onto fuel filter fitting. Verify O-ring is fully
seated in groove.
16. Thread fuel filter into fuel filter fitting.
17. Install fuel filter fitting into fuel tank. Tighten fitting as
follows.
Fuel Filter Fitting
Torque
Models
60-70 lb-in (6.8-7.9 N-m)
130G00, 131G00, 13R200
62-71 lb-in (7-8 N-m)
13U100, 13U200
18. Inspect hose for cuts, nicks, cracks, or general
deterioration. Replace hose if necessary.
19. Place fuel tank onto engine.
20. Install hex flange screw to fasten fuel tank to crankcase
flange. Tighten screw as follows.
Fuel Tank Screw
Torque
Models
75-95 lb-in (8.5-10.7 N-m)
130G00, 131G00, 13R200
71-124 lb-in (8-14 N-m)
13U100, 13U200
21. On opposite side, install two hex flange nuts onto fuel
tank studs. Alternately tighten nuts as follows.
Fuel Tank Nuts
Torque
Models
90-110 lb-in (10.2-12.4 N-m)
130G00, 131G00, 13R200
71-124 lb-in (8-14 N-m)
13U100, 13U200
16
2
Summary of Contents for 130G00
Page 1: ...N o t f o r R e p r o d u c t i o n ...
Page 2: ...N o t f o r R e p r o d u c t i o n ...
Page 6: ...N o t f o r R e p r o d u c t i o n ...
Page 8: ...N o t f o r R e p r o d u c t i o n ...
Page 26: ...N o t f o r R e p r o d u c t i o n 20 2 ...
Page 32: ...N o t f o r R e p r o d u c t i o n 26 3 ...
Page 44: ...N o t f o r R e p r o d u c t i o n TOP END DISASSEMBLY 41 38 5 ...
Page 50: ...N o t f o r R e p r o d u c t i o n 44 5 ...
Page 90: ...N o t f o r R e p r o d u c t i o n 123 84 8 ...
Page 100: ...N o t f o r R e p r o d u c t i o n 94 8 ...
Page 108: ...N o t f o r R e p r o d u c t i o n This page is intentionally left blank 102 9 ...
Page 109: ...N o t f o r R e p r o d u c t i o n This page is intentionally left blank 103 9 ...
Page 110: ...N o t f o r R e p r o d u c t i o n This page is intentionally left blank 104 9 ...
Page 111: ...N o t f o r R e p r o d u c t i o n This page is intentionally left blank 105 9 ...