background image


2) Preparation of the system 


2.1 Before you can clock


    Before you can time pigeons, you must go through the following steps :  


    -If you have more than one antenna pad connected to the system, then you must have carried  


    out the programming of the antenna pad numbers  (see section  1.6).  


     -After having programmed the antennas, the installation can then be completed by connecting  


    the X-treme and the antennas pads to each other within the system 


     -The ring numbers of the birds can then be linked to the electronic chip rings 


2.2 Exploring the menu.


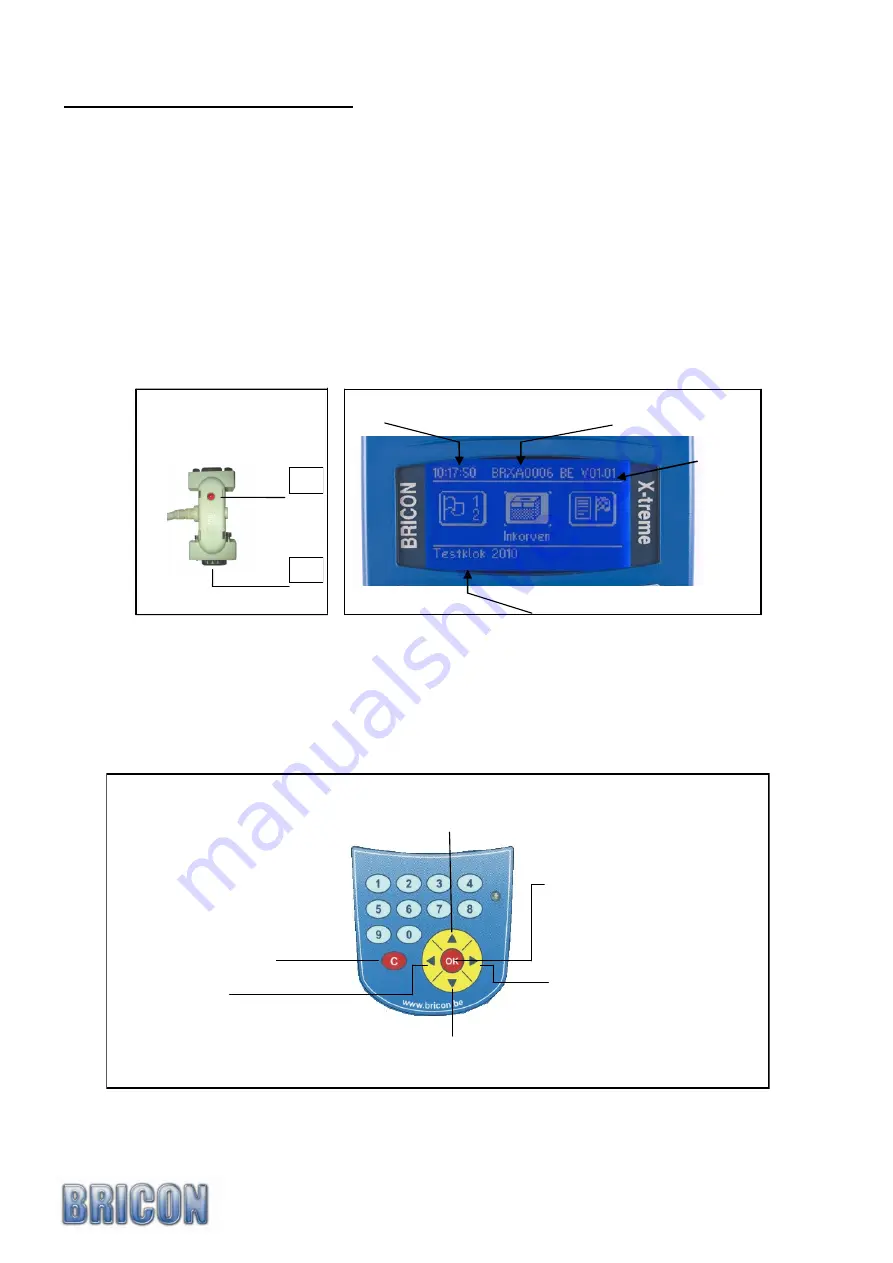
     After connecting the clock to the antennas, you can plug the power supply into the antenna  


     connector, and the red power light will illuminate (2).


     After the start-up initialisation you will see the following screen display on the X-treme. 


    The X-treme is very easy to use having navigation buttons on the keypad which completely  


     control  the functionality of the clock


X-treme 

Fig 1 

Antenna connection Box 

Time 

Serial number 

Version 

<Next> 
This button is used for for-
warding or to increment.


<

C> 

To stop an action undo or to 
select ‘No’.


<OK> 
To confirm an action, 
To continue an item or to 
select “Yes”


Name Fancier 

<Previous> 
This button is used for re-
turning or decrement 

<Up> 
Increment. 

<Lower> 
Decrement. 

<Numeric> 
To enter numbers. 

Summary of Contents for X-treme

Page 1: ...User Guide UK BRICON nv Europark Oost 15C 9100 Sint Niklaas Tel 32 3 777 39 74 Fax 32 3 778 07 35 Website www bricon be email bricon bricon be versie UK 1 50 or higher X treme...

Page 2: ......

Page 3: ...tennas 7 2 4 Antenna testing 8 2 5 Installing the antennas 9 2 6 Connecting and testing the system 12 3 X treme a quick start 3 1 Linking birds 13 3 2 Browse pigeons 13 3 3 Clocking in training 14 3 4...

Page 4: ...treme to the antennas Connect now the power supply to the connector of the loft antenna With a good working system all red lights on all the antenna plugs are on and the display of the X treme light...

Page 5: ...X treme 5 M F M F 1 X treme 2 Power supply 3 Antenna 4 Antenna connection 5 End plug M Male pins F Female 1 2 3 3 4 5...

Page 6: ...he menu After connecting the clock to the antennas you can plug the power supply into the antenna connector and the red power light will illuminate 2 After the start up initialisation you will see the...

Page 7: ...start the X treme Set date time Browse pigeons Racepoints Delete Basketing Races Antenna test Clocking The X treme is menu driven The complete functionality of X treme is accessed through a menu stru...

Page 8: ...ntennas It is recommended that you test the antennas at regularly perform Fig 2 The X treme indicates how many antennas are connected With a chip you can test the pro per functioning of the antennas E...

Page 9: ...f any loft There are four pad sizes available the 1 field 163 mm wide 2 field 282 mm 4 field 482 mm and 6 field 700 mm Bricon antenna will record over the entire width of the pad and therefore tunnels...

Page 10: ...que way in which the electro magnetic fields within a Bricon antenna overlap each other Having to place a tunnel over the pad and entrance will in most circumstances prove to be a major disadvantage w...

Page 11: ...of the birds is optimised Another method giving similar results is to build a raised area This raised area is also needed if you have a landing board made from zinc as metal causes interference to th...

Page 12: ...The mail side pins directed to the clock Mount additional antennas after they are programmed If you connect more than one antenna it is recommended to place the power centrally between the antennas A...

Page 13: ...re pigeons in the X treme you can scroll through the pigeon list With and Use the and to select the first or last pigeon in the list 3 2 Browsing pigeons X treme 13 Whit this feature you start the clo...

Page 14: ...nfirm the selection with OK If you wand to clock the same birds again you must first erase the data 10 17 59 BRXA0001 UK V01 60 Delete Delete confirm by pressing OK all clockings are deleted Attention...

Page 15: ...ts automatically in clocking mode You can not leave the clocking mode by pressing the C button Check carefully if the clock finds all connected antennas Features while clocking Key 1 After pressing ke...

Page 16: ...OK Or Connect the X treme to your antennas press C If you see the overview screen select with deleting and confirm with OK 4 Other functions PC connection The X treme is connected to the PC via a sta...

Page 17: ...ked in training Clocking list Press clocking list to preview al clocked birds Linking list Shows the list of al pigeon in the clock 4 3 3 To read out update your X treme Start up PrintManager Press re...

Page 18: ...will read out the clock After the read out is finished a message you can disconnect the clock by unplugging the USB cable After the read out is done the above message may appear requesting to upgrade...

Page 19: ...and wait till the screen says no antennas found The flights including training are read The clocked pigeons are displayed on the screen Attention While you are in the monitor screen do not disconnect...

Page 20: ...ir should be performed by BRICON After start up you see a date for service If your clock approaches this date you must bring in the clock for a complete check by Bricon or a Bricon distributor We repl...

Page 21: ...paraat voor transponders 125kHz In overeenstemming is met 3 van de R TTE Richtlijn Gezondheid en veiligheid 3 1 a Gebruikte standaards EN60950 1992 A1 A2 1993 A3 1997 A11 1997 EMC 3 1 b Gebruikte stan...

Reviews: