background image

Basic Cutting Operation 

z


Connect the machine to mains by using an 
approved RCD circuit breaker. 

z


Make sure you have marked your tile for 
cutting. 

z


Move the sliding table back and forward slowly 
to check the blade should not make contact 
with either the cutting groove on the top of the 
table or the fence on the back edge of the 
table. 

z


Pull the sliding table back far enough from the 
blade to place the tile on the table. 

z


Turn on the on/off witch. Allow the blade to 
come up to full speed. Check that the blade 
looks wet. 

z


Using both hands, hold the tile securely 
against the fence at the back edge of the 
sliding table. 


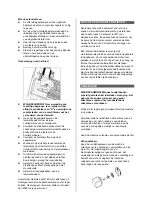
WARNING! Do not allow your hands or 
fingers to protrude over the notches at the 
back edge of the sliding table. The blade 
will enter this space during the cutting 
operation. 


z


Slowly push the sliding table and tile forward 
into the blade. Feed the tile smoothly into the 
blade. Do not apply heavy pressure to bump 
the tile against the blade. 

z


Carefully follow your working line adjusting tile 
cutting position if required. 

z


Never cut dry. Be sure the blade remains wet 
during cutting operation. Frequently check the 
water level in the water tray and add water as 
often as necessary. Make sure the pump is 
well below the water level. 

z


If the motor slows down, slow down your feed 
rate or pull the tile smoothly back from the 
blade.  

z


Wipe clean top with sponge during use to 
reduce build up of debris. Always ensure the 
machine is switched off when carrying out this 
action. 

z


Stop the machine by using the on/off switch. 
Allow the blade to come to a stop on its own. 
Do not manually stop the blade by grabbing it 
or holding an object against it.  


WARNING! Do not attempt to pick up an off-
cut or to remove the holding tile before the 
cutting blade has completely stopped. 
 

z


Remove the plug from power supply after use. 
Empty the water tray, clean the machine and 
pump. Lock the sliding table before 
maintenance, transportation or storage. 

 
Straight Cutting 

z


Loosen the screw knob of the mitre gauge. 

z


Fit the mitre gauge onto the left side fence at 
the back edge of the sliding table. 

z


Set the mitre gauge to the desired size using 
the embossed ruler guide.  

z


Relock the screw knob.  

z


Position the tile against the fence of the sliding 
table and against the mitre gauge when 
cutting. 


Diagonal Cutting  


z


Loosen the screw knob of the mitre gauge.  

z


Fit the mitre gauge onto the left side fence at 
the back edge of the sliding table. 

z


Set the mitre gauge to the distance required. 

z


Relock the screw knob. 

z


Loosen the angle adjustment knob at the top. 

z


Adjust to the desired angle (from 0º to 45º).  

z


Relock  the angle adjustment knob.  

z


Place the tile against the mitre gauge when 
cutting.


45 Degree Bevel Cutting 

z


Pull the sliding table back far enough to clear 
from the blade. 

z


Loosen the angle adjusting knob on the back 
of the motor assembly. 

z


Pivot the motor assembly to 45 degree 
position.. 

z


Relock the angle adjusting knob. 

z


Loosen the height adjusting knob on the front 
of the motor assembly. 

z


Lift the motor assembly to its highest point 
position. 

z


Relock the height adjusting knob. 

z


Push the sliding table forward slowly to check 
that the blade should not contact either the 45 
degree cutting groove on the top of the table or 
the fence on the back edge of the table.  

 
Using the Extension Bracket 

z


The extension bracket can be used to give 
additional support for larger tiles if necessary. 

z


Pull out the extension bracket on the left side 
of the sliding table to the distance required, but 
do not remove it from the sliding table. 

z


Tighten the two knobs on both rods to lock in 
place. 

z


Move the side stop upwards. 

z


Place the tile against the fence of the sliding 
table and the side stop of the extension 
bracket when cutting. 

Summary of Contents for 5411074121846

Page 1: ...CCRPI1150 180 FR COUPE CARREAUX NL TEGELSNIJMACHINE GB TILE CUTTER 2008...

Page 2: ......

Page 3: ......

Page 4: ......

Page 5: ......

Page 6: ...gants 11 N abusez pas du cordon Ne transportez jamais les outils par leur cordon ni ne tirez dessus pour les d brancher Tenez le cordon l abri de la chaleur de l huile et des objets pointus 12 Ne sur...

Page 7: ...v rifiez que toutes les cl s et outils de r glage ont t enlev s 7 N essayez jamais de couper avec les mains libres Coupez uniquement les tuiles qui sont fermement maintenues contre la barre d appui d...

Page 8: ...table glissante est bloqu e pendant le transport Veuillez la d bloquer avant de l utiliser z Faites tourner le bouton de blocage de la table dans le sens des aiguilles d une montre z Tirez la table gl...

Page 9: ...et la pompe Bloquez la table glissante avant l entretien le transport ou le rangement Coupe droite z D faites le bouton vissable du guide inclinable z Installez le guide inclinable sur la barre d app...

Page 10: ...ur maintenir la temp rature du moteur dans une gamme de fonctionnement normale En cas de surchage ou du surchauffe du moteur le thermostat interne teindra automatiquement le moteur Si cela se produit...

Page 11: ...ls sur le recyclage GARANTIE Pour les clauses de garantie reportez vous aux conditions de garantie ci jointes 2008 Fabriqu en Chine Tension Fr quence 230V 50Hz Profondeur max pour la coupe 90 40mm Pui...

Page 12: ...et om het van bak los te koppelen Houd snoer van hitte olie en scherpe randen weg 12 Ga niet te ver Houd gepaste steun en evenwicht altijd bij 13 Handhaaf werktuigen voorzichtig Houd snijdende werktui...

Page 13: ...jderd is 7 Probeer nooit met de losse hand te snijden Enkel sneetegel die veilig kwalijk het hek van de glijdende tafel of het mijtermeetinstrument wordt genomen Probeer nooit stukken te snijden die t...

Page 14: ...elektricien INSTRUCTIES VOOR HET BEDIENEN Het afsluiten en openmaken van de glijdtafel z De glijdende tafel wordt tijdens levering afgesloten Maak alstublieft het voor het gebruik open z Draai de tafe...

Page 15: ...stop het lemmet niet door het te graaien of vasthouden van een voorwerp tegen het z WAARSCHUWING Probeer om geen van snee op te nemen of de bezittegel te verwijderen voor het snijdende lemmet volledi...

Page 16: ...geen lemmet schatte voor minder dan 6500 toeren per minuut FUNCTIES EN KARAKTERISTIEKEN Het lemmet kan tot 45 kantelen voor schuine snijden Het mijtermeetinstrument op de tafel kan aan hoeken tussen 0...

Page 17: ...en de plastic delen TECHNISCHE SPECIFICATIES Voltage Frequentie 230V 50Hz Max diepte van 90 snijd 40mm Motormacht 1150W S2 30min Max diepte van 45 snijd 28mm Snelheid zonder laden 5800 min Max snijdle...

Page 18: ...with care Keep cutting tools sharp and clean for better and safer performance Follow instructions for lubricating and changing accessories Inspect tool cords periodically and if damaged have repaired...

Page 19: ...are too small to be held securely or that do not allow you to keep your hands safely away from the blade 8 Ensure that the work piece that will be cut off has sufficient room to move sideways Failure...

Page 20: ...ne can cause an electrical shock Be sure that the power supply outlet is earthed If there is any doubt have it checked by a qualified electrician OPERATING INSTRUCTIONS Locking and Unlocking the Slidi...

Page 21: ...mpletely stopped z Remove the plug from power supply after use Empty the water tray clean the machine and pump Lock the sliding table before maintenance transportation or storage Straight Cutting z Lo...

Page 22: ...urn the switch off and wait 5 minutes until the motor has cooled down to restart the machine by on off switch again This feature helps to protect the motor from damage due to overheating MAINTENANCE W...

Page 23: ...not be disposed of with household waste Please recycle where facilities exist Check with your Local Authority or retailer for recycling advice GUARANTEE Refer to the enclosed guarantee conditions for...

Page 24: ...BRICK Rue de Goz e 81 6110 Montigny le Tilleul Belgique T l 0032 71 29 70 70 Fax 0032 71 29 70 86...

Reviews: