
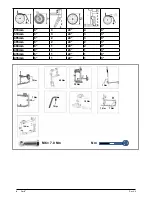


17
PariX
2
ENGLISH
Rev.2.0
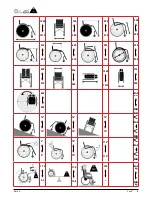
Options - Lap Belt
WARNING!
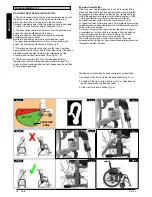
Before using your wheelchair
ensure the seat belt is worn and
correctly adjusted before use.
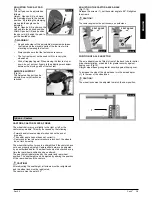
The lap belt is fitted to the
wheelchair as shown in the
illustrations. The seat belt
comprises 2 halves. They are
fitted using the existing arm rest
fixing bolt fitted through the eyelet
on the belt.
The belt is routed under the rear of
the side panel.
Adjust the belt position so buckles
are in the centre of the seat.
(Fig.25-26)
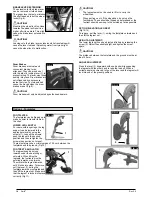
Adjust lap belt to suit the user’s needs as follows:
To increase the belt
length
To reduce the belt
length
Feed free belt
through slide adjust-
ers and male buckle
to provide more belt
length.
Feed free belt back
through male buckle
and slide adjusters.
Ensure belt is not
looped at male
buckle.
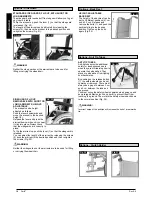
When fastened check space
between the lap belt and user,
when correctly adjusted it should
not be possible to insert more than
the flat of the hand between the
lap belt and the user. (Fig. 27)
Generally the Lap Belt should be
fixed so that the straps sit at an
angle of approximately 45°, and
when correctly adjusted should not
allow user to slip down in the seat.
(Fig. 28)
Type A
Type A
Type A
Fig. 27
Fig. 28
FIG. 25
FIG. 26
Type B
Type B
Type B
To fasten buckle:
Firmly push male buckle into
female buckle.
To release belt:
Press exposed sides of male
buckle and push towards
centre / push the press button
of the female buckle whilst
gently pull ing apart.
ADVICE TO CLIENT
DANGER!
•
Do not rely on the lap belt only when the wheelchair and
occupant are transported in a vehicle, use the separate
occupant lap and diagonal restraints provided in the
vehicle.
•
Before use we recommend that the lap belt be checked to
ensure that it is adjusted correctly, free from any
obstruction or adverse wear and that the buckle engages
securely.
•
Failure to make sure that the lap belt is secure and
adjusted prior to use could cause serious injury to the user.
e.g. too loose a strap may allow the user to slip down in
the chair and risk suffocation.
Maintenance:
Check lap belt and securing components at regular intervals for
any sign of fraying or damage. Replace if necessary. Clean the
lap belt with warm soapy water and allow it to dry.
DANGER!
The lap belt should be adjusted to suit the end user as detailed
above Sunrise Medical also recommend that the length and fit
of the belt is checked on a regular basis to reduce the risk of
the end user inadvertently re-adjusting the belt to an excessive
length.
If in doubt about the use and operation of the seat belt then ask
your healthcare professional, wheelchair dealer, carer or
attendant for assistance.
Options - Therapy Table
THERAPY TABLE
The tray provides a flat surface for
most activities. Before using a
tray, it first has to be adjusted to
the width of the seat by an
authorised dealer. The user must
be sitting in the wheelchair during
this adjustment (Fig. 29).
Fig. 29


