Breezy PariX2 Directions For Use Manual Download Page 12

12

ENGLISH

PariX

2

Rev.2.0

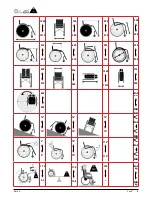
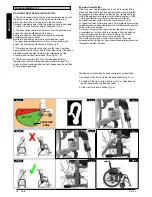
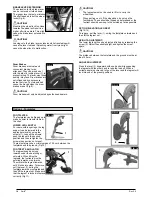
OCCUPANT RESTRAINTS INSTRUCTION:

1. The pelvic restraint belt must be worn low across the front of 

the pelvis so that the angle of the pelvic belt is within the 

preferred zone of 30 to 75 degrees to the horizontal.

A steeper (greater) angle within the preferred zone is desirable 

i.e. closer to, but never exceeding 75degrees. (Fig C)

2. The upper torso restraint belt must fit over the shoulder and 

across the chest as illustrated Fig d and e

Restraint belts must be adjusted as tightly as possible 

consistent with user comfort.

Restraint belt webbing must not be twisted when in use.

The upper torso restraint belt must fit over the shoulder and 

across the shoulder as illustrated in Fig D and E.

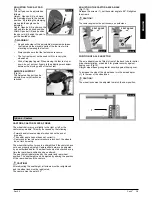
3. The attachment points to the chair are the inner front side 

frame just above the castor, and the rear side frame. The straps 

are fitted around the side frames at the intersection of the 

horizontal and vertical frame tubes. (See Figs G - K)


4. The tie down symbol (Fig F) on the wheelchair frame 

indicates the position of the wheelchair restraint straps. The 

straps are then tensioned after the front straps have been fitted 

to secure the wheelchair.

Positioning of wheelchair tie down restraints on wheelchair:

1. Location of the front and rear tie down labels (Fig.G - H).
2.  Position of the front, (Fig.I) and rear, (Fig.J), wheelchair tie 

down restraint and the tie down label.

3. Side view of tie down straps, (Fig.K).

Fig.D

Fig.E

Fig.C

PREFERED 

ZONE

Fig.F

Transportability >>>

Fig.H

Fig.I

Fig.G

Fig.

J

Fig.

K

Minimum User Weight

When the user being transported is a child, less than 22Kg 

mass and the vehicle involved has less than eight (8) seated 

passengers it is recommended that they be transferred to an 

UNCE Regulation 44 compliant child restraint system (CRS).

This type of restraint system provides a more effective 

occupant restraint system than the conventional 3 point 

occupant restraint system and some CRS systems also include 

additional postural supports to assist in maintaining the position 

of the child when seated.

Parents or care providers may consider the option, in some 

circumstances, for their child is to remain in their wheelchair 

whilst in transport due to the level of posture control and 

comfort provided by the set up in the wheelchair.

We would recommend in such circumstances that a risk 

assessment be carried out by your healthcare professional and 

relevant competent persons.

Summary of Contents for PariX2

Page 1: ...DIRECTIONS FOR USE GEBRAUCHSANWEISUNG PariX WHEELCHAIR ROLLSTUHL 2 000690914...

Page 2: ...gegen Aufpreis erh ltlich DE Wheelchair Components We at SUNRISE MEDICAL have been awarded the ISO 9001 certificate which affirms the quality of our products at every stage from R D to production This...

Page 3: ...d 4 Seat sling 5 Footrest 6 Castors 7 Foot plate 8 Castor Fork 9 Folding Frame 10 Wheel locks 11 Rear Wheel 12 Arm Pad 6 Rollstuhl 1 Schiebegriffe 2 R ckenbespannung 3 Seitenteil 4 Sitzbespannung 5 Fu...

Page 4: ...5 510mm 8 3 24 4 0 510mm 8 3 24 3 3 485mm 8 2 24 3 0 485mm 8 2 24 2 3 460mm 8 1 24 2 0 460mm 8 1 24 1 3 435mm 6 1 22 1 0 435mm 6 1 22 1 3 1 2 3 1 2 3 4 45 Nm 10 Nm 30 Nm 7 Nm 7 Nm 7 Nm 7 Nm 7 Nm 7 Nm...

Page 5: ...0 1060 1010 740 580 1060 1010 950 875 MAX mm MIN mm 510 435 425 410 255 235 535 530 10 10 10 10 3 0 79 79 115 115 500 350 425 410 530 390 11 0 9 5 MAX kg MIN kg 125 17 6 16 6 310 300 10 10 820 800 MA...

Page 6: ...de may not correspond in every detail exactly to your own model However all instructions are completely relevant regardless of possible detail differences The manufacturer reserves the right to alter...

Page 7: ...your wheelchair In case there is no authorised dealer in your area or you have any questions contact Sunrise Medical either in writing or by telephone Use Light weight wheelchairs are exclusively for...

Page 8: ...otherwise this could lead to a serious tumble Afterwards the anti tip tubes must be set back to their correct position Make sure that the attendant only holds the wheelchair using securely mounted par...

Page 9: ...very cold 0 Always make sure that if fitted the quick release axles on the rear wheels are set properly and lock in locking ball bearings are showing completely through the axle sleeve If the button...

Page 10: ...ue wear as a direct result of an original manufacturing defect These items include amongst others upholstery tyres inner tubes and similar parts 7 The above warranty conditions apply to all product pa...

Page 11: ...on the following page and not to any attachments or accessories e g not around the spokes of wheels brakes or footrests Fig A 7 The tie down restraints should be attached as close as possible at an a...

Page 12: ...ter the front straps have been fitted to secure the wheelchair Positioning of wheelchair tie down restraints on wheelchair 1 Location of the front and rear tie down labels Fig G H 2 Position of the fr...

Page 13: ...of the seat and with both feet firmly on the ground one foot well back push up into the upright position WARNING When standing do not stand on the footplates or the wheelchair will tip up It is easier...

Page 14: ...er extension to break CAUTION Leaning onto the brake lever extension while transferring will cause the lever to break Splashing water from tyres might cause the wheel lock to malfunction FIG 8 Drum Br...

Page 15: ...not been set properly The castor angle has not been set correctly Castor and or rear wheel air pressure is incorrect the wheels do not turn smoothly The wheelchair will not move in a straight line if...

Page 16: ...tube and the ground You must swing the safety wheels upwards when going up and down large obstacles such as a kerb to prevent them from touching the ground Then rotate the safety wheels back down to...

Page 17: ...centre push the press button of the female buckle whilst gently pull ing apart ADVICE TO CLIENT DANGER Do not rely on the lap belt only when the wheelchair and occupant are transported in a vehicle u...

Page 18: ...requiring more effort to move the chair forward Low tyre pressure also has a negative impact on manoeuvrability If the tyre pressure is too high the tyre could burst The correct pressure for a given t...

Page 19: ...ELCHAIR PULLS TO ONE SIDE Check tyre pressure pneumatic tyres only Check to make sure wheel turns easily bearings axle Check the castor angles are set consistently and make proper contact with the gro...

Page 20: ...e die in diesem Handbuch abgebildet und beschrieben sind entsprechen m glicherweise nicht in allen Einzelheiten genau Ihrem eigenen Modell Dennoch sind alle Anweisungen trotz m glicher Detailunterschi...

Page 21: ...er Falls sich kein zust ndiger Fachh ndler in Ihrer N he befindet oder falls Sie Fragen haben k nnen Sie Sunrise Medical auch schriftlich oder telefonisch erreichen Verwendung Leichtgewichtrollst hle...

Page 22: ...beim Transport nicht auf die Stufen aufsetzen k nnen da es sonst zu schweren St rzen kommen kann Anschlie end m ssen die Sicherheitsr der wider korrekt eingestellt werden Achten Sie darauf dass die Be...

Page 23: ...ngestellt sind und ganz einrasten Kugellager sind ganz durch die Achsaufnahme sichtbar Bei nicht gedr cktem Knopf der Steckachse darf sich das Antriebsrad nicht entfernen lassen VORSICHT Sowohl die Wi...

Page 24: ...hler verursacht Zu diesen Teilen geh ren u a Bespannungen Reifen Schl uche und hnliche Teile 7 Die obigen Garantiebedingungen gelten f r alle Produkt Teile von Modellen die zum vollen Verkaufspreis er...

Page 25: ...des Rollstuhls und nicht an Anbauten oder Zubeh r z B nicht um die Speichen der R der die Bremse oder Fu raste befestigt werden Fig A 7 Das R ckhaltesystem muss so nah wie m glich mit einem Winkel von...

Page 26: ...unkt Fig F markiert Wenn die vorderen Gurte zur Befestigung des Rollstuhls angebracht sind werden die Gurte gestrafft Lage der Befestigungspunkte f r das R ckhaltesystem am Rollstuhl 1 Lage der vorder...

Page 27: ...icht auf die Fu platten stellen da der Rollstuhl sonst umkippt Das Einsteigen in Ihren Rollstuhl ist einfacher und sicherer wenn Sie die Fu platten nach oben klappen und zur Seite schieben oder sie vo...

Page 28: ...ngshebels kommen VORSICHT Wenn Sie sich beim Ein und Aussteigen auf den Verl ngerungshebel st tzen bricht der Verl ngerungshebel ab Spritzwasser von den R dern kann zur Fehlfunktion der Feststellbrems...

Page 29: ...r Radlauf vorw rts oder r ckw rts ist nicht richtig eingestellt Der Laufradwinkel ist nicht richtig eingestellt Der Druck im Laufrad und oder Hinterrad ist nicht korrekt die R der drehen sich nicht sa...

Page 30: ...Bordstein befahren m ssen die Sicherheitsr der nach oben gedreht werden damit sie den Boden nicht ber hren Drehen Sie die Sicherheitsr der anschlie end wieder auf die normal vorgesehene Stellung herun...

Page 31: ...cken und zur Mitte schieben oder die L setaste am Gurtschloss dr cken und vorsichtig auseinanderziehen HINWEISE F R DEN PATIENTEN GEFAHR Wenn Rollstuhl und Benutzer in einem Fahrzeug transportiert wer...

Page 32: ...e Reibung beim Fahren und der Antrieb erfordert gr eren Kraftaufwand Auch die Man vrierf higkeit wird von einem zu niedrigen Reifendruck beeintr chtigt Wenn der Druck zu hoch ist kann der Reifen platz...

Page 33: ...treifen Pr fen ob sich das Rad reibungslos dreht Lager Achse berpr fen dass die Lenkradwinkel einheitlich eingestellt sind und die Lenkr der richtig auf dem Boden aufliegen Sicherstellen dass sich die...

Page 34: ...34 PariX2 Rev 2 0...

Page 35: ...35 PariX2 Rev 2 0...

Page 36: ...Sunrise Medical AG L ckhalde 14 3074 Muri Bern Schweiz Suisse Svizzera Fon 41 0 31 958 3838 Fax 41 0 31 958 3848 www SunriseMedical ch Sunrise Medical AS Dynamitveien 14B 1400 SKI Norway Telef 47 0 6...

Reviews: