background image

3

ENGLISH

1. PI5 Carton Contents

PI5 Headphones with Ear Tips (M)  
Charging Case 
USB-C Charging Cable  
Ear Tips (S/L) 
Literature Pack

2. Getting to know your PI5

2.1 Switching Headphones On and Off

Switching On/Off


PI5 does not have a power control, instead the 
power management is automatic. Your PI5 earbuds 
will automatically charge when placed into the 
charging case, and will be ready to use when they 
are removed from the case.

When your earbuds are removed from the charging 
case, and not used for 5 minutes, they will enter a 
power saving mode. To exit power saving mode, 
start using the earbuds again by connecting your 
paired device, streaming audio or placing the 
earbuds into your ears.

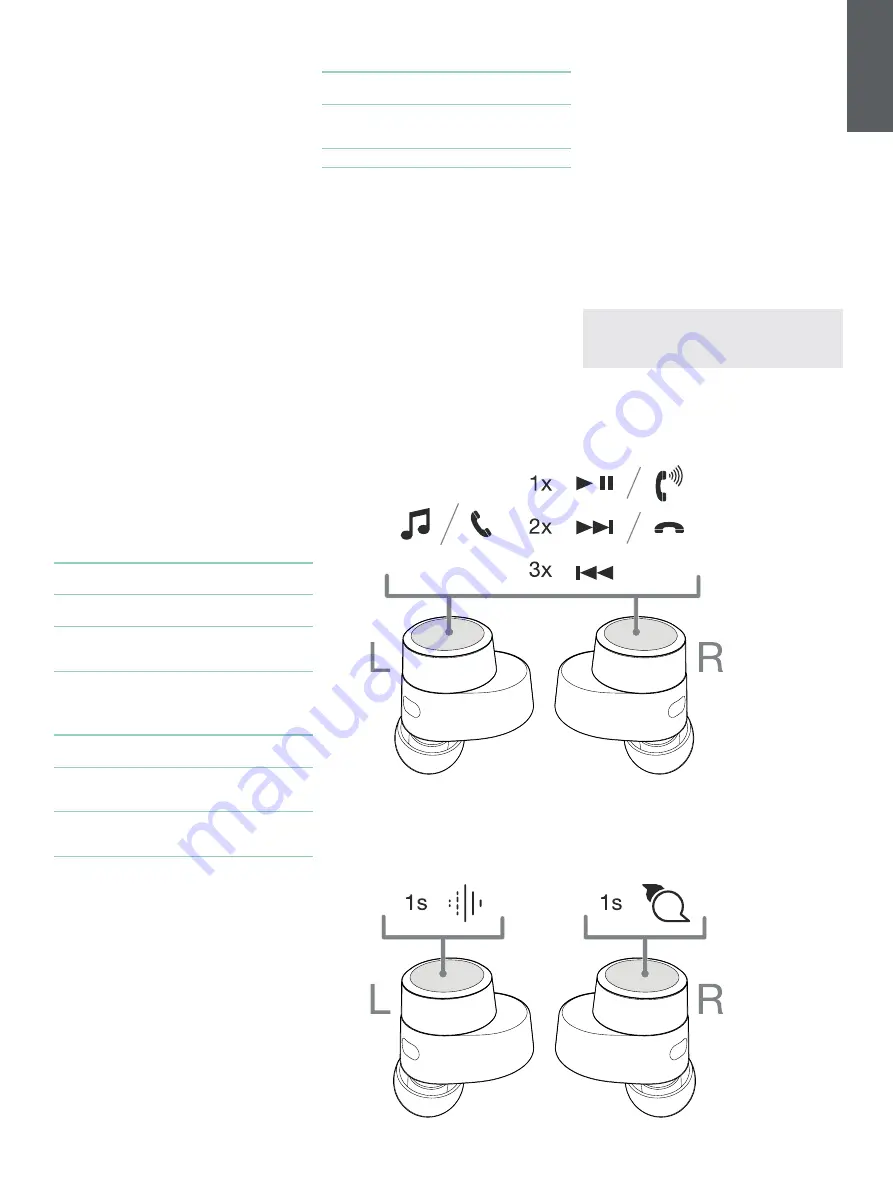
2.2 Headphone Controls

Each earbud has a Multi-function button located on 
the top cap of the earbud, see Diagram 1. The Multi-
function button controls are as follows:

Media Playback:

Function

Action

Play or pause

Press the Multi-function button 
once.

Play to next track

Press the Multi-function button 
twice in quick succession.

Play previous track

Press the Multi-function 
button three times in quick 
succession.

Phone call functionality:


Function

Action

Answer call

Press the Multi-function button 
once with incoming call.

End call 

When incoming call occurs, 
press the Multi-function button 
twice in quick succession.

Decline an  
incoming call

Press the Multi-function button 
twice in quick succession with 
incoming call.

3. Intelligent Features

3.1 Adaptive Noise Cancellation

Noise cancellation is a series of advanced 
technologies that aids in removing undesired noise 
from the surrounding environment.

PI5 features our latest innovations in adaptive noise 
cancellation, this includes intelligent sensing that 
adapts noise cancellation and tuning best suited to 
your surrounding environment. As your surroundings 
change, noise cancellation will auto adapt to 
complement your new environment.

The noise cancellation features is activated by 
pressing the left (L) earbud Multi-function button for 
1 second, additional 1 second presses cycle through 
the modes: On, Auto or Off. See Diagram 2 for 
button location.

Diagram 1 
Multi-function button

Diagram 2 
Headphone controls

Mode

Application

On

Removes undesired noise from the 
surrounding environment.

Auto

Intelligently adapts noise cancellation 
best suited to your current 
environment.

Off

Turns off the noise cancellation feature.

 
3.2 Voice Assistance

Voice Assistance is activated by pressing the right 
(R) earbud Multi-function button for 1 second. See 
Digram 2 for button location.

3.3 Ambient Pass-Through

PI5 features ambient pass-through which lets some 
external noise from the surrounding environment, 
such as safety announcements or conversations, to 
be heard without taking the headphones off.

Ambient pass-through can be enabled or disabled 
through Bowers & Wilkins headphone App. The 
level of ambient pass-through, High/Low/Off, can be 
adjusted to suite your needs through the App.

Noise Cancelling

Voice Assistant

3.4 Wear Sensors

PI5 incorporate our latest enhanced wear detection 
sensors in both earbuds. The sensors enable 
intelligent battery conservation by entering power 
saving mode when removed from the ears. When 
worn again, PI5 automatically wakes and connects 
to the last connected Bluetooth device.

The sensors will also pause audio when the earbuds 
are removed from your ears. Playback will auto 
resume when the earbud is placed back in the ear. 
Auto resume has been further optimised so it is 
ready only when you are.

Wear sensor can be turned off from the Bowers & 
Wilkins Headphone App.

Note: Take special care when wearing your 
earphones, hair or accessories trapped between 
your ears and the earbuds may interfere with 
proximity sensing.

Summary of Contents for PI5

Page 1: ...PI5 Wireless Headphones...

Page 2: ...hanced Wear Sensing technologies Our latest generation noise cancellation feature was designed from the ground up with intelligent environment sensing capabilities automatically selecting the appropri...

Page 3: ...ited to your surrounding environment As your surroundings change noise cancellation will auto adapt to complement your new environment The noise cancellation features is activated by pressing the left...

Page 4: ...ess charging station 2 Ensure that the rear of the charging case is on the charging station with the case indicator facing up Note During charging the case indicator will blink green When fully charge...

Page 5: ...Feature To add your headphones 1 Place the case no further than 10cm 4 inches away from Android device BT enabled and open the PI5 case lid 2 A GFP Google FastPair notification window will pop up sho...

Page 6: ...ar the paired devise history and restore all setting to their defaults To factory reset the earbuds open the charging case with the earbuds placed inside Press and hold the button on the inside of the...

Page 7: ...1 3 1 AVRCP v1 6 1 HFP v1 7 1 HSP v1 2 BLE GATT Generic Attribute Profile Frequency Band Tx mode 2402MHz to 2480MHZ ISM Band Rx mode 2402MHz to 2480MHz ISM Band RF output power 10 0 dBm Drive Units 9...

Page 8: ...du bruit de derni re g n ration est enti rement nouvelle Elle dispose de capacit s de d tection de l environnement ext rieur intelligentes en s lectionnant automatiquement le type de suppression de b...

Page 9: ...apte automatiquement votre nouvel environnement Les fonctions d annulation du bruit sont activ es en appuyant sur le bouton multifonctions de l couteur gauche L pendant 1 seconde En appuyant pendant 1...

Page 10: ...arri re du bo tier de charge est bien positionn sur le chargeur sans fil avec l indicateur lumineux du bo tier vers le haut Remarque pendant la charge l indicateur lumineux du bo tier clignote en ver...

Page 11: ...T activ et ouvrez le couvercle du bo tier du PI5 2 Une fen tre de notification GFP Google FastPair appara tra affichant Bowers Wilkins PI5 d tect et demandant de d marrer le process de jumelage 3 Appu...

Page 12: ...leurs valeurs par d faut Pour r initialiser les couteurs en mode usine ouvrez le bo tier de charge avec les couteurs plac s l int rieur Appuyez et maintenez le bouton l int rieur du bo tier pendant 5...

Page 13: ...AAC SBC Proflls Bluetooth A2DP v1 3 1 AVRCP v1 6 1 HFP v1 7 1 HSP v1 2 BLE GATT Generic Attribute Profile Bande de fr quence Mode TX 2402 Mhz 2480 Mhz Bande ISM Mode RX 2402 Mhz 2480 Mhz Bande ISM Pui...

Page 14: ...ancellation Umgebungsfilter Ambient Pass Through sowie verbesserte N herungssensor Technologien Unsere Ger uschunterdr ckung der neuesten Generation wurde von Grund auf mit intelligenten Umgebungserke...

Page 15: ...kung automatisch an Ihre neue Umgebung an Die Ger uschunterdr ckungsfunktion wird aktiviert indem Sie die Multifunktionstaste des linken Ohrh rers L 1 Sekunde lang dr cken Wenn Sie die Taste weiter je...

Page 16: ...eren Sie das Ladecase auf einer kabellosen Ladestation 2 Achten Sie darauf dass der Ladecase mit der R ckseite auf der Ladestation aufliegt Ladecase LED weist nach oben Hinweis W hrend des Ladens blin...

Page 17: ...Kopfh rer hinzu 1 Stellen Sie das Ladecase nicht weiter als 10 cm vom Android Ger t mit aktiviertem Bluetooth entfernt auf und ffnen Sie den Ladecase Deckel 2 Es erscheint ein GFP Benachrichtigungsfen...

Page 18: ...Ger te l schen und alle Einstellungen auf die Werksvoreinstellung zur cksetzen Um die Ohrh rer auf die Werkseinstellungen zur ckzusetzen ffnen Sie das Ladecase mit den darin platzierten Ohrh rern Hal...

Page 19: ...1 3 1 AVRCP v1 6 1 HFP v1 7 1 HSP v1 2 BLE GATT Generic Attribute Profile Frequenzband Tx Modus 2402 MHz bis 2480 MHZ ISM Band Rx Modus 2402 MHz bis 2480 MHZ ISM Band HF Ausgangsleistung 10 0 dBm Trei...

Reviews: