background image

5

ENGLISH

6. Bluetooth Connectivity

6.1 Pairing

Your PI5 earphones are designed to stream music 
wirelessly from Bluetooth audio devices, such as 
smartphones, tablets, or computers. To do so, the 
earphones and device must first be paired.

When you receive your PI5 earphones they will be 
ready to pair to any Bluetooth audio device.

6.1.1  iOS System / Android System without 

Google FastPair.

  1.   Download the Bowers & Wilkins  

Headphone App.

  2.  Open the case lid, the case indicator will  
    flash blue.

  3.   Go to the Bluetooth pairing menu of your 

device and select the “Bowers & Wilkins PI5” 
from the device list.

  4.   The case indicator will change to solid blue to 

indicate pairing is successful.

  5.   Open the Bowers & Wilkins app and add the 

headphones.

Note: Your earphones will automatically exit 
Bluetooth pairing mode if no device is paired 
within 5 minutes. If pairing fails, the indicator will 
rapid flash blue, please try pairing again.

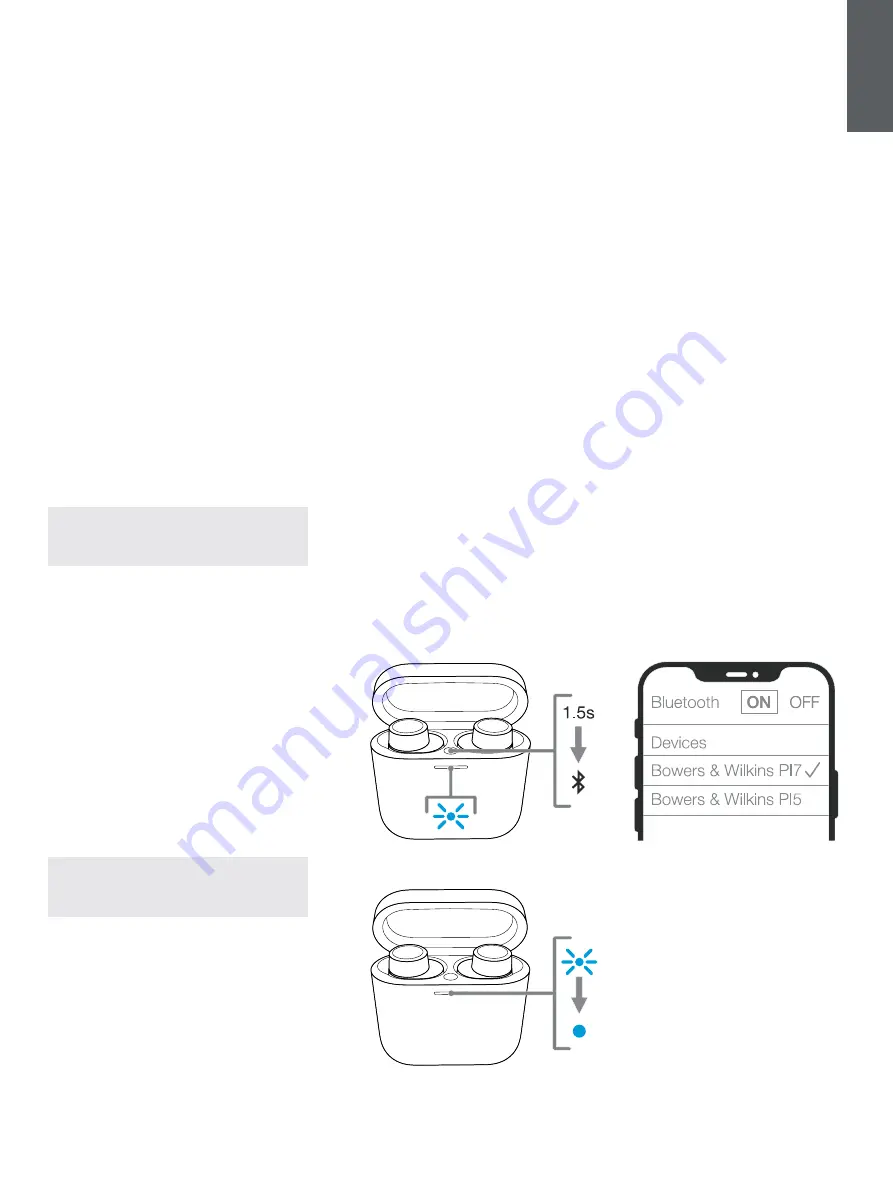
To pair to a subsequent device. See Diagram 4:

  1.   Open the case lid with the earbuds placed 

inside the case.

  2.   Press and hold the button inside the case for 

between 1 and 5 seconds, the case indicator 
will flash blue.

  3.   Go to the Bluetooth pairing menu of your new 

device and select the “Bowers & Wilkins PI5” 
from the device list.

  4.   The case indicator will change to solid blue to 

indicate pairing is successful.

PI5 can remember up to 4 paired Bluetooth Devices. 
Repeat the above steps to pair more devices.

Note: Your earbuds will automatically exit 
Bluetooth pairing mode if no device is paired 
within 5 minutes. If pairing fails, the indicator will 
rapid flash blue, please try pairing again.

6.1.2  Google FastPair (For Android System 

integrated with GFP Feature)

To add your headphones:

  1.   Place the case no further than 10cm (4 inches) 

away from Android device (BT enabled) and 
open the PI5 case lid.

  2.   A GFP (Google FastPair) notification window 

will pop up showing “Bowers & Wilkins PI5 
detected” and request to start the pairing 
process.

  3.   Press “Notification” button on the window to 

enable the pairing, successful connection will 
be shown in GFP window.

  4.  Once paired:

    o    GFP window will direct you to the Google 

Play store to download and Install the 
Bowers & Wilkins App.

    o    L/R Earbud and case Battery Level can be 

seen on the GFP window

6.2 Disconnect from a Device

You can quickly disconnect PI5 from a device by 
putting the earbuds back to the case. Alternatively, 
you can manage connection in further detail using 
the Bowers & Wilkins Headphones app under 
Connections.

6.3 App features

The Bowers & Wilkins Headphones app provides 
extended setup and adjustments to features such 
as Adaptive Noise Cancellation, Ambient Pass-
Through, and Wear Sensors. The app also provides 
further customisations such as voice prompt, level 
of ambient pass-through, connection management, 
and headphone software updates. The app is 
available as a free download on iOS and Android 
devices.

To add your headphones:

  1.   From your mobile device, download and install 

the Bowers & Wilkins Headphones app.

  2.   Launch the app, then read and follow the 

instructions pertaining app notification and 
permissions.

  3.   After reaching the main screen, simply tap + 

and following the in-app instructions.

6.4 Headphone Software Update

Bowers & Wilkins will occasionally make available 
software updates that refine and optimise the 
performance of your headphones or add new 
features.

The Bowers & Wilkins Headphones app will notify 
you when a software update is available, tap on the 
notification and follow the in-app instructions.

Diagram 4
Bluetooth pairing - subsequent device

Summary of Contents for PI5

Page 1: ...PI5 Wireless Headphones...

Page 2: ...hanced Wear Sensing technologies Our latest generation noise cancellation feature was designed from the ground up with intelligent environment sensing capabilities automatically selecting the appropri...

Page 3: ...ited to your surrounding environment As your surroundings change noise cancellation will auto adapt to complement your new environment The noise cancellation features is activated by pressing the left...

Page 4: ...ess charging station 2 Ensure that the rear of the charging case is on the charging station with the case indicator facing up Note During charging the case indicator will blink green When fully charge...

Page 5: ...Feature To add your headphones 1 Place the case no further than 10cm 4 inches away from Android device BT enabled and open the PI5 case lid 2 A GFP Google FastPair notification window will pop up sho...

Page 6: ...ar the paired devise history and restore all setting to their defaults To factory reset the earbuds open the charging case with the earbuds placed inside Press and hold the button on the inside of the...

Page 7: ...1 3 1 AVRCP v1 6 1 HFP v1 7 1 HSP v1 2 BLE GATT Generic Attribute Profile Frequency Band Tx mode 2402MHz to 2480MHZ ISM Band Rx mode 2402MHz to 2480MHz ISM Band RF output power 10 0 dBm Drive Units 9...

Page 8: ...du bruit de derni re g n ration est enti rement nouvelle Elle dispose de capacit s de d tection de l environnement ext rieur intelligentes en s lectionnant automatiquement le type de suppression de b...

Page 9: ...apte automatiquement votre nouvel environnement Les fonctions d annulation du bruit sont activ es en appuyant sur le bouton multifonctions de l couteur gauche L pendant 1 seconde En appuyant pendant 1...

Page 10: ...arri re du bo tier de charge est bien positionn sur le chargeur sans fil avec l indicateur lumineux du bo tier vers le haut Remarque pendant la charge l indicateur lumineux du bo tier clignote en ver...

Page 11: ...T activ et ouvrez le couvercle du bo tier du PI5 2 Une fen tre de notification GFP Google FastPair appara tra affichant Bowers Wilkins PI5 d tect et demandant de d marrer le process de jumelage 3 Appu...

Page 12: ...leurs valeurs par d faut Pour r initialiser les couteurs en mode usine ouvrez le bo tier de charge avec les couteurs plac s l int rieur Appuyez et maintenez le bouton l int rieur du bo tier pendant 5...

Page 13: ...AAC SBC Proflls Bluetooth A2DP v1 3 1 AVRCP v1 6 1 HFP v1 7 1 HSP v1 2 BLE GATT Generic Attribute Profile Bande de fr quence Mode TX 2402 Mhz 2480 Mhz Bande ISM Mode RX 2402 Mhz 2480 Mhz Bande ISM Pui...

Page 14: ...ancellation Umgebungsfilter Ambient Pass Through sowie verbesserte N herungssensor Technologien Unsere Ger uschunterdr ckung der neuesten Generation wurde von Grund auf mit intelligenten Umgebungserke...

Page 15: ...kung automatisch an Ihre neue Umgebung an Die Ger uschunterdr ckungsfunktion wird aktiviert indem Sie die Multifunktionstaste des linken Ohrh rers L 1 Sekunde lang dr cken Wenn Sie die Taste weiter je...

Page 16: ...eren Sie das Ladecase auf einer kabellosen Ladestation 2 Achten Sie darauf dass der Ladecase mit der R ckseite auf der Ladestation aufliegt Ladecase LED weist nach oben Hinweis W hrend des Ladens blin...

Page 17: ...Kopfh rer hinzu 1 Stellen Sie das Ladecase nicht weiter als 10 cm vom Android Ger t mit aktiviertem Bluetooth entfernt auf und ffnen Sie den Ladecase Deckel 2 Es erscheint ein GFP Benachrichtigungsfen...

Page 18: ...Ger te l schen und alle Einstellungen auf die Werksvoreinstellung zur cksetzen Um die Ohrh rer auf die Werkseinstellungen zur ckzusetzen ffnen Sie das Ladecase mit den darin platzierten Ohrh rern Hal...

Page 19: ...1 3 1 AVRCP v1 6 1 HFP v1 7 1 HSP v1 2 BLE GATT Generic Attribute Profile Frequenzband Tx Modus 2402 MHz bis 2480 MHZ ISM Band Rx Modus 2402 MHz bis 2480 MHZ ISM Band HF Ausgangsleistung 10 0 dBm Trei...

Reviews: