


09
39
Before You Start
10
01
SOURCE/PWR
AMS/MENU
BAND/TITLE
LOC/SUB -T
ST/AUDIO (mono or stereo/language or
channel selector)
OSD
SLOW (Slow Forward/Reward)
PTY/ANGLE
PROG(Program playing)
Mute
P/N( system adjusting)
ZOOM (to increase the picture)
GOTO (playing time/track)
RPT(Repeat Playing)
RDM (Playing Tracks at Random)
VOL+/VOL-/SEL
Tuner
DX/LOC Selector
During radio status, press LOC button
to select
or weak station reception.
strong
LOC ON
appears on the display and
only local station is available.
LOC OFF
appears on the display both distance and
local stations can be received.
5
The function is only valid on remote
control.
The function is invalid in AM tuning.
Note:
*
*
Selecting the Stored Station
During radio status, press button to
select the stored station upward, press to
select downward.
the stored station
27
The function is only valid on remote
control.
Note:
*
Note:
* Press BAND on the head unit or in
the monitor performs the same function.
FM2
AM2
AM1
FM3
FM1
During radio status, repeatedly press
BAND button to select bands in
lowing order:
the
fol
Band Selector
3
6
Briefly press it to show the current infor-
mation, press and hold it to set the current
information.
30
TA/LOUD (traffic alarm/loudness)
SETUP
(F.R/F.F)
CLEAR
0~9 (Number) Buttons
(Eject Button)
(Stop Playing)
(Pause/Play)
AF/EQ (alternative frequency/equalizer)
Button
(Previous/Next Track)
ENTER (Left/Right/Up/Down
ENTER)
BT (bluetooth mode) Button
PAIR
During bluetooth, press it to pair.
(
Dial,last phone,answer a phone)
(Hang up/refuse a phone)
Listening to the radio
Manual/Automatic Tuning
Manual Tuning: ress
(
button
on the remote control continuously to select
a
or
respectively.
P
or
)
station downward
upward
Automatic Tuning: ress and
) button
seconds, the radio
a station
or
respectively and plays when it
finds a station.
P
hold (
or
for more than 3
automatically searches
downward
upward
Press / on the head unit or in the
monitor performs the same function.
Note:
*
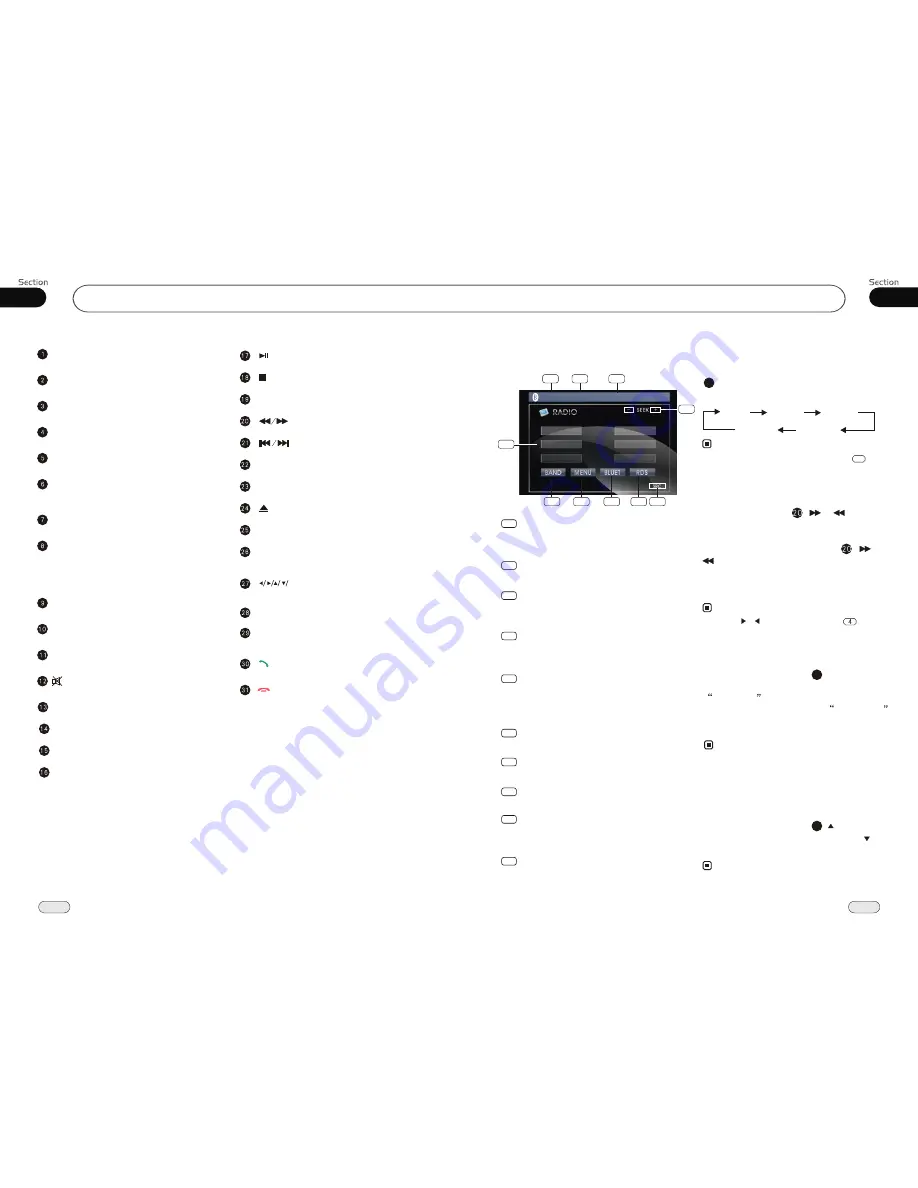
Band Indicator
Shows which band the radio is tuned
to.
1
Preset Number Indicator
Shows what preset has been selected.
2
Shows which frequency the tuner is
tuned.
Frequency Indicator
3
SEEK+/SEEK-
Briefly press to tune by the presettable
range,hold and press to tune automatically.
4
8
MENU
Press this button to set the main menu.
9
SRC
Press this button to select the signal
source.
5
The 6 stations of the current band.
Briefly press to select station, hold and
press to save the current station to one
of the 6 stations.
6
BAND
To select the bands.
10
BLUET
Press this button to switch to the bluetooth
interface.
7
RDS
Press it to enter RDS SETUP.
FM1
CH:1
87.50MHz
87.50M
90.10M
98.10M
87.50M
107.90M
106.10M
2
3
4
6
7
8
9
5
1
10
Summary of Contents for BV9985
Page 1: ......


