background image


 Pack201 | Maintenance | Section 6 

EN | 2

© Bosch Packaging Technology, Inc.
All rights reserved   2012

6 Cleaning and Maintenance

6.1 General Safety Information

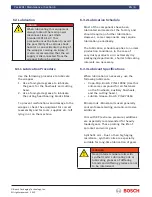
WARNING

Read the safety instructions 

before starting any cleaning or 

maintenance work.

DANGER

Lockout the main power source 
with the disconnect on the door 
of the electrical enclosure per 
OSHA Standard 1910.147.  This 
precaution must be taken to avoid 
the possibility of a serious shock 
hazard, or an accidental cycling of 
the Former which could cause a 
very serious injury.

• 

Switch off the compressed-air.

• 

Open all covers and doors.

• 

Allow heated elements to cool 
sufficiently.

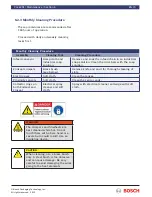
CAUTION

NEVER use compressed air to clean 

the machine. Always use a vacuum 

cleaner or a brush. Dust could 

be stuck in bearings or in gears, 

increasing the risk of premature 

wear. 

INFORMATION

Any Cleaning or maintenance work 

should only be carried out by 

trained personnel.  

• 

Do not remove parts for 
cleaning unless specified in 
these procedures. Unnecessary 
removal of parts could result in 
misalignment and subsequent 
damage to the machine.

• 

Remove all tools and cleaning 
supplies before running the 
machine again.

• 

To prevent malfunctions and 
damage to the Former, after 
performing maintenance tasks, 
check the equipment for correct 
reassembly.

Summary of Contents for 8-114-406-036

Page 1: ...r machines only and may neither be reproduced nor made know to third party without written approval Instruction Manual INSTRUCTION MANUAL Robert Bosch Limited Packaging Technology Business Unit Confectionary and Food 700 154 Moo 1 Amatanakorn Industrial Estate Tambon Baankao Amphur Panthong Chonburi 20160 Thailand Tel No 66 0 3846 5272 Fax No 66 0 3846 5273 ...

Page 2: ...e with these instructions is a condi tion of the guarantee This manual is copyrighted and is supplied solely for the purpose of operat ing and maintenance of the machine it must not be provided to or made available to third parties Manufacture of any parts based on this manual is expressly forbidden Bosch Packaging Technology Inc All rights reserved 2012 ...

Page 3: ...chine Specifications 4 1 2 1 Electrical 4 1 2 2 Air Supply 4 1 2 3 Weight 4 1 2 4 Noise Level 4 1 2 5 Speed 4 1 2 6 Maximum Film Size 4 1 2 7 Max Min Package Length 4 1 2 8 Dimensions 4 1 2 9 Machine name plate 5 1 3 General Description 6 1 3 1 Standard Features 6 1 3 2 Optional Features 6 1 4 Installation 7 1 4 1 Place the Equipment 7 1 4 2 Connect the Air 8 1 4 3 Connect the Electricity 8 1 5 Di...

Page 4: ...istance For customer convenience technical assistance is available from the Bosch Packaging Services help line 715 243 2555 between the hours of 7 00 AM to 5 00 PM Central Standard Time Monday through Friday 1 1 2 Instructions For Ordering Parts Always include the model and serial number of your machine along with the part name and stock number with every parts order Address orders to Bosch Packag...

Page 5: ...wrapper can wrap product depends in part on the type and diameter of the crimper Maximum 1 up 1 crimper per shaft capacity is 150 packages per minute Maximum 2 up 2 crimpers per shaft capacity is 250 packages per minute 1 2 6 Maximum Film Size The maximum reel diameter is 400 mm the maximum reel weight is 35 kgs and the maximum film width is 650 mm 1 2 7 Max Min Package Length Crimper Dia Length M...

Page 6: ...r under which the machine data are stored at Bosch 3 Wiring Diagram The electrical schematic for the machine 4 Largest Motor Amps This is the maximum amount of amps the drive motor will draw 5 Short Circuit Interrupt Amps This is the maximum amps the main circuit breaker can handle 6 Volts Hertz Phase This is the voltage frequency and phase required for the machine 7 Fla Watt This is the full load...

Page 7: ...76 mm reel Broken film detection Balance arm torsion spring loaded with break Film roller adjustable from the front Quick exchange former folding box 1 3 2 Optional Features Second reel holder with manual splice table Brackets for coder mount End of film and film breakage detection Automatic pneumatic film splicer Power feed roll with pinch roller which can be manually lifted First finwheel can be...

Page 8: ...he crossbars under the main section of the frame Position the forks under the crossbars not directly under the machine frame Check all access ways from the shipping and receiving dock to the installation location to ensure that they are wide enough for the machine to pass through Move the wrapper and all related equipment to the production area DANGER When lifting be sure to use a lifting de vice ...

Page 9: ...ead to L3 8 DANGER To avoid a very serious or fatal shock hazard the line cord and the wrapper must be attached to the building elec trical safety ground before making the electrical connections Connections must be made by a qualified electrician and in compliance with all national and local codes 1 5 Disassembly Storage Conservation The machine should only be disassembled by trained personnel To ...

Page 10: ..._________ ____________________________________________________________________________________________________________________________ ____________________________________________________________________________________________________________________________ ____________________________________________________________________________________________________________________________ _______________...

Page 11: ...All rights reserved 2012 EN 1 2 Contents 2 Safety 1 2 1 Safety Precautions 1 2 2 Safety Symbols 2 2 3 Safety Equipment 3 2 3 1 Emergency Stop Button 3 2 3 2 Safety Interlocks 3 2 3 3 Main Disconnect and Lockout 4 2 3 4 Maintenance Doors and Covers 4 Notes 5 ...

Page 12: ...f mechanical or electrical spare actuator to bypass or disable the safety interlocks on any guard door can result in a very serious injury Do not operate the controls or wrapper until the operating instructions have been thoroughly read and understood Wrapper main power must be connected to the build ing electrical safety ground Do not operate the wrapper with guards removed or with safety switche...

Page 13: ...areas and personnel are to exercise extreme caution at all times All personnel must be fully informed of operational safety instructions Symbol Significance Symbol Significance Safety Alert Danger Hot Surface Danger Electric Voltage Cur rent Danger Suspended Load Danger Crushing Hands Danger Explosive Atmosphere Danger Irritating Substances Danger Fire Danger Moving Parts Danger Explosive Substanc...

Page 14: ...pper can be started This button should be pushed in and the power source disconnected and locked out before performing any cleaning maintenance or mechanical setup procedures This button should not be used for normal stop situations Its may cause the wrapper to lose synchronization 2 3 2 Safety Interlocks To prevent accidents the wrapper is fitted with safety interlocks on the guards that must be ...

Page 15: ...ed Lockout the power according to OSHA Standard 1910 147 by placing the switch in the O OFF position and putting a lock through the hole in the switch as shown The Main Electronic Enclosure has a Disconnect Lockout located on the Main Power switch and on each door If the machine overloads and the main circuit breaker trips move the switch to the OFF position and lock it out before opening the elec...

Page 16: ..._________ ____________________________________________________________________________________________________________________________ ____________________________________________________________________________________________________________________________ ____________________________________________________________________________________________________________________________ _______________...

Page 17: ...tion 3 EN 1 Bosch Packaging Technology Inc All rights reserved 2012 3 Contents 3 Operator Instructions 2 3 1 Start of Production 2 3 2 Checks During Production 4 3 3 End of Production 5 3 4 Troubleshooting 6 3 5 Changeover 11 Notes 15 ...

Page 18: ...ircuits 2 Push the Emergency Stop button 3 Remove the outside chuck from the film spindle 4 Place a roll of film on the spindle and replace the outside chuck Turn to secure the chuck against the film roll 5 Adjust the centering cone on the film spindle as needed 6 Use the centering knob to find tune the film roll position 7 If necessary reposition the inclination arm and or roller for proper film ...

Page 19: ...ndseal Set Up Production 1 Select the desired recipe for the production run See Section 4 Operator Interface for a detailed description 2 Select the desired functions parameters for the production run 3 Push the START button and run the wrapper for a series of packages then push STOP 4 Examine the packages to make sure the film is centered and sealing properly 5 Make adjustments to finseal and or ...

Page 20: ...irst finwheel assembly If the film edges are not even turn the centering knob to adjust Examine the film flow into and out of the former fold ing box If film is not flowing properly Check to make sure the material is centered and remains mated properly in the former Check the position of the inclination arm and roller on the backstand Check position and alignment of the former wings Prepare Second...

Page 21: ... bring the wrapper to a cycle stop 2 Place the main disconnect in the OFF position 3 Turn off the compressed air 4 Remove all product from the infeed conveyor and the feeder 5 Open the finwheels and allow the heated elements to cool 6 Remove the film from the sealing table 7 Perform cleaning and or maintenance according to Section 6 of this manual ...

Page 22: ...s their associated causes and solutions If you are having a problem that is not listed here contact Bosch for additional information and or service Problem A Finwheel is not being heated Possible Cause Solution The Finwheel heating element connections are loose Have a qualified electrician tighten the heating element connections The Finwheel thermocouple connections are loose Have a qualified elec...

Page 23: ...d pitch is shorter than the product length Enter the correct infeed pitch and package length values Problem The product not placed consistently inside package it wanders or drifts inside package Possible Cause Solution The film is moving faster than the product when they enter the former the infeed pitch is shorter than the package length Enter a larger infeed pitch value and or a smaller package ...

Page 24: ...eel temperature setting is too low Increase the finwheel temperature setting The finwheels are not pressed together tight enough Decrease the gap between the finwheels The film is too narrow Load a wider film roll A finseal wheel is open Make sure all finwheels are closed Problem The endseals are not holding together Possible Cause Solution The crimper temperature setting is too low Increase the c...

Page 25: ...here are chicken tracks in the finseal Possible Cause Solution The finwheels are dirty Clean the finwheels The balance arm brake is not releasing properly Check that the balance arm brake is releasing properly If not releasing properly call Bosch for further assistance The finwheel caps are worn Call Bosch to order new finwheel caps The parent roll is bad Call Bosch to order a new parent roll Prob...

Page 26: ...e its own former Problem The finseal is too deep Possible Cause Solution The film is too wide Load a narrower film roll Problem The finseal is twisted Possible Cause Solution The film is too wide Load a narrower film roll Problem The blouse of the package is too loose Possible Cause Solution The pivot arm is too high Lower the pivot arm The first finwheel cant adjustment is wrong Adjust the first ...

Page 27: ...chain to the end of the old chain and pull the old chain off while feed ing the new chain onto the sprockets 5 Connect the ends of the new infeed chain using the master link pin and master link plate Infeed chains with snap in pushers can be configured for different flight lengths by moving the pushers to different bases 1 Locate the master pusher which is installed in a blue base This pusher is n...

Page 28: ...e on the film reel holder 5 Replace and tighten the outer chuck against the film roll 6 Use the centering knob to fine tune the film roll position 7 If necessary reposition the inclination arm and or roller for proper film flow 8 Record settings on the data sheet for future reference When threading the film 1 Push the balance arm toward the center of the backstand until it locks into the down posi...

Page 29: ...ings are parallel to each other and to the centerline of the infeed conveyor If the wings are not parallel there will be prob lems with the film flow 3 Tighten the capscrews Note If product varies slightly in width set for the widest product Sealing Table Finseal To set the sealing table and finseal area 1 Set the correct sealing temperature for the film being run 2 Set the correct finwheel gap fo...

Page 30: ...oduct size requires a change of crimpers 1 Remove the crimper that is NOT the main crimper from the top and bottom shafts 2 Bolt the new crimper s to the appropriate posi tions on the top and bottom shafts 3 Replace the product spacers between the crimpers if needed 4 Adjust the cutting head height if needed Product Spacer Crimpers ...

Page 31: ..._________________ ____________________________________________________________________________________________________________________________ ____________________________________________________________________________________________________________________________ ____________________________________________________________________________________________________________________________ _______...

Page 32: ...el 9 4 5 1 Home 9 4 5 2 Operations 9 4 5 3 Diagnostics 9 4 5 4 Maintenence 9 4 5 5 Alarms 9 4 5 6 View 9 4 5 7 File 9 4 5 8 Recipe 9 4 5 9 Recipe 9 4 5 10 Functions 9 4 5 11 Functions On Off 9 4 6 HMI Screens 10 4 6 1 Description 10 4 6 2 Main Screen 10 4 6 3 Alarm Screen 11 4 6 4 File Screen 12 4 6 5 Recipe Screen 13 4 6 6 Cleaning Screen 14 4 6 7 Diagnostics Screen 15 4 6 8 Maintenance Screen 16...

Page 33: ... 21 Machine Cycle Count 29 4 6 22 E STOP Count 30 4 6 23 Following Error Count 31 4 6 24 Reject Count 32 4 6 25 Cycle Count 33 4 6 26 Pulse 34 4 6 27 Open Loop 35 4 6 28 Change Password 36 4 6 29 Reboot 37 4 6 30 Motor Tuning 38 4 6 31 Motor Control 39 4 6 32 Force Home 40 4 6 33 Configuration Viewer 41 4 6 34 Screen Level 42 4 6 35 Film Track 43 4 7 Parameter Definitions 44 4 8 Screen Messages 52...

Page 34: ...condition Used for normal opera tion There may be a slight delay before the wrapper completely stops Push button Reset Used to reset the machine after an alarm condition has been resolved Push button Emergency stop Causes the wrapper to stop immediately without regard to machine posi tion Used for emergencies or to disable wrapper for safety purposes Control circuits are active again Finwheel Open...

Page 35: ... on the following pages are prepresentative only and may vary according to each machine configuration Note The system operates with software cov ered by a user licence You are in breach of international law if you copy programs or parts thereof for use other than that for which they have been supplied Damage caused by changes and or modi fications to the software and hardware without the permissio...

Page 36: ...ing Technology Inc All rights reserved 2012 4 3 Screen sections The main screen Fig 1a appears a short time after the machine is switched on It is divided into four sections 1 Status bar 2 Main menu 3 Function buttons 4 Operating buttons 1 4 2 3 Figure 1a ...

Page 37: ... 1 3 2 4 5 6 7 1 2 The machine speed is shown on the left 4 in Fig 2 The next panel displays the name of the recipe loaded 5 in Fig 2 Next 6 in Fig 2 comes the panel showing the view used for the recipe The time is shown on the right 7 in Fig 2 4 3 2 Global Bar The user can go directly to the relevant screen by pressing the keys 1 in Fig 3 in the global bar The number of available keys depends on ...

Page 38: ...at the bottom of the screen A function can consist of several screens 1 Figure 4 4 3 4 Operating buttons The operating buttons 1 in Fig 5 are used to perform the associated actions Touch a button to either dis play a keypad used to enter a value run rate tempera ture setpoint etc or to change a current condition change operating mode reset splicer etc 1 Figure 5 ...

Page 39: ...ted access and Supervisor gives free access to settings The Factory access level contains factory and ma chine settings If a level other than Operator is selected a password will be needed to access that level This password can be changed in levels higher than Operator The machine will start with the last recipe saved Changing access level Proceed as follows to go to another access level 1 Press t...

Page 40: ... be saved in the recipe 4 5 11 Functions On Off This button allows the operator to turn various machine functions such as a splicer or power feed roll on or off When the On Off screen appears scroll up or down to the desired function It s current value is indicated at the right of the function Touching the function box will toggle the function on or off 4 5 Operator access level Several screens ca...

Page 41: ...in screen allows the operator to change the Run Rate or Product Position 1 Figure 7 The Temperature Setpoints for any heated devices 2 Figure 7 Allows access to the Diagnostics 3 Figure 7 Allows access to the Maintenance screen 4 Figure 7 1 2 3 4 5 6 7 Allows the operator to select the splicer knife 5 Figure 7 Allows the operator to reset the splicer knife 6 Figure 7 Allows the operator to change ...

Page 42: ... Technology Inc All rights reserved 2012 4 6 3 Alarm Screen The Alarms screen allows the operator to view the alarms that have appeared since the last power up 1 Figure 8 Use the arrows on the right end to scroll through the alarm list if necessary 1 Figure 8 ...

Page 43: ...ging Technology Inc All rights reserved 2012 4 6 4 File Screen The File screen allows proper level personnel to view and select a product recipe 1 Figure 9 Touch the desired recipe line the Recipe window above will display the new recipe number 1 Figure 9 ...

Page 44: ...screen allows access to the Functions screen 1 Figure 10 and the On Off screen 2 Figure 10 The Functions screen lists all the wrapper param eters and displays the current value for each The On Off screen displays the current status of various wrapper functions and allows proper level personnel to turn them on or off 1 2 Figure 10 ...

Page 45: ...Inc All rights reserved 2012 4 6 6 Cleaning Screen The Cleaning screen allows the operator to clean the HMI screen without activating any buttons Touch the Cleaning button and wipe the screen before the scroll bar 1 Figure 11 finishes ap proximately 10 seconds 1 Figure 11 ...

Page 46: ...ure 12 to return to the Diagnostics screen Touch the Maintenence button 4 Figure 12 to display the Maintenence screen 1 3 4 2 Note In the User Level and Product Name diagnostics it is necessary to close the diagnostic screen by touch ing the red X on the keypad to exit or the green check to save The dignostics listed will change according to the cur rent user level Supervisor level has access to a...

Page 47: ... change the machine HMI language Touch the Language button 1 Figure 13 to dis play a list of available languages Touch the desired language box Touch the Operation button 2 Figure 13 to return to the Home screen Touch the Diagnostics button 3 Figure 13 to display the Diagnostics screen Touch the Maintenence button 4 Figure 13 to return to the Maintenence screen 1 3 2 4 Figure 13 ...

Page 48: ...el access to the machine operating parameters Touch the desired parameter from the list 1 Figure 14 and use the keypad to enter or edit a value Touch the Description button 2 Figure 14 to return to the Recipe screen Touch the Functions button 3 Figure 14 to return to the Functions screen Touch the On Off button 4 Figure 14 to display the On Off screen 2 1 3 4 Figure 14 ...

Page 49: ...For instance if the wrapper is equipped with the No Gap No Seal op tion the screen will also list the NGNS Diagnostic The screens may appear slightly different on your machine than what is shown in this section OPERATOR LEVEL DIAGNOSTICS On initial power up the last reboot password level appears Press the DIAGNOSTICS key on the Home Screen the following screen is displayed assuming that operator l...

Page 50: ...su pervisor level has access to all diagnostics First select User Level Diagnostic on the Diagnostics screen To change from the current user level type in the new level password and touch the green check enter Initially the maintenance password is MAINTENANCE Operator is OPERATOR and the supervisor password is SUPERVISOR Once the level has been raised to Maintenance or Supervisor an additional scr...

Page 51: ...Packaging Technology Inc All rights reserved 2012 4 6 12 Part Number Touch the Part Number diagnostic in the list to display the screen below This screen displays the current software machine type and screen configure part numbers and revision levels ...

Page 52: ...low PD Touch the Watlow PD diagnostic in the list to display the screen below This screen displays current Walow temperature controller information for all the heated devices on the wrapper It also allows the operator to change the controller setpoint and run the Auto Tune function for any selected controller ...

Page 53: ...s Touch the Motors diagnostic in the list to display the screen below This screen displays various current conditions of all the wrapper servo motors This diagnostic allows the maintenance personnel to monitor a motor while it is running Control Status ON or stopped Control Status OFF This is a view only screen ...

Page 54: ...roduct Name Touch the Product Name diagnostic in the list to dis play the screen below To change from the current product name touch the appropriate key to select the first letter of the new name Continue until the entire name is selected then press the green check key to enter CLEAR will remove the new name ...

Page 55: ...display the screen below The Diagnostic Inputs Outputs screen displays the current status of various inputs and outputs to the I O boards in the wrapper This is a view only screen used to check the operation of electric eyes sensors switches etc Additional screens eight total are avail able by using the bottom Left Right arrows to scroll through them ...

Page 56: ...d 2012 4 6 17 Reject Blowoff Touch the Reject Blowoff diagnostic in the list to dis play the screen below This screen allows the operator to set the on and off positons that control the timing of a reject device when a reject option is present The Actual Degree value is used as an aid in setup ...

Page 57: ... 18 Discharge Reject Touch the Discharge Input Reject diagnostic in the list to display the screen below This screen allows the operator to set the on and off positons that control the timing of a discharge reject device when a reject option is present The Actual Degree value is used as an aid in setup ...

Page 58: ...chnology Inc All rights reserved 2012 4 6 19 Language Touch the Language diagnostic in the list to display the screen below To change from the current language touch the ap propriate area to select the new language The screens will change to the selected language ...

Page 59: ...Recipe Copy diagnostic in the list to display the screen below To copy a recipe touch the area Recipe To Copy From and enter the number of the recipe you want to copy on the keypad Touch the area Recipe To Copy To and enter a new number or a number of a recipe you want to change Touch the Recipe Copy button to complete the copy ...

Page 60: ...4 6 21 Machine Cycle Count Touch the Machine Cycle Count diagnostic in the list to display the screen below This diagnostic allows the user to check the total number of machine cycles and the total number of packages produced since the last power up Touch the Accept button to reset the counters to 0 ...

Page 61: ...Stop Count diagnostic in the list to display the screen below This diagnostic allows the user to check the number of emergency stop conditions that have occurred since the last power up It indicates the actual cause of the emergency stop and the number of stops for each con dition Touch the Accept button to reset the counters to 0 ...

Page 62: ...Count Touch the Following Error Count diagnostic in the list to display the screen below This diagnostic allows the user to check the number of following errors that have occurred since the last power up It indicates the location and the number of errors for each condition Touch the Accept button to reset the counters to 0 ...

Page 63: ...ect Count Touch the Reject Count diagnostic in the list to display the screen below This diagnostic allows the user to check the number of rejects that have occurred since the last power up It indicates the location and the number of rejects for each condition Touch the Accept button to reset the counters to 0 ...

Page 64: ... rights reserved 2012 4 6 25 Cycle Count Touch the Cycle Count diagnostic in the list to display the screen below This diagnostic allows the user to check the total number of servo motor cycles produced since the last power up Touch the Accept button to reset the coun ters to 0 ...

Page 65: ...apper such as a coder or tucker Touch the Pulse diagnostic in the list to display the screen below Touch the appropriate box to select the desired pulse Touch the On area to change the On value then press the green check to enter The value displayed in the Actual Deg line is the current machine position and is used to determine the On and Off values The Off value is changed ion the same manner The...

Page 66: ...ance person nel to select a motor enter a voltage using the keypad and run the motor Enable All servo motors use the same style screen Pull out the Emergency Stop button Press and hold in the Start button The selected motor will run in an open loop mode as long as the Start button is held in It is necessary to push in the Emergency Stop button when first starting this diagnostic Motors will rotate...

Page 67: ...e list to display the screen below To change from the current password first touch the Change Maintenance Password box then use the keypad to enter the letters of the new password then press the green check to save You must be in Supervi sor level to change the supervisor password and either supervisor or maintenance level to change the mainte nance level password ...

Page 68: ...ersonnel to select the user level that the wrapper will be in whenever it is turned on To change from the current user level simply touch the appropriate box to select the desired level on the Select Which User Level To Reboot In box You cannot reboot to a level higher than the current level You must go to the User Level Diagnostic and change to a higher user level first then you can use the Reboo...

Page 69: ...ropriate box to select a motor and move to the next column on the screen PROPORTIONAL GAIN A larger value entered here will cause the motor to respond more aggressively when it is out of position Too large a value will lead to noisy unstable operation FEED FORWARD GAIN This parameter is not used for all axis It allows more accurate control especially for axis that change speed during operation cut...

Page 70: ... 31 Motor Control Touch the Motor Control diagnostic in the list to dis play the screen below This diagnostic allows supervisor level personnel more control over certain motors Touch the appro priate box to either increase or decrease the Maxi mum Error or Maximum Error Time value for the selected motor ...

Page 71: ...ging Technology Inc All rights reserved 2012 4 6 32 Force Home Touch the Force Home diagnostic in the list to display the screen below With this screen supervisor level personnel can touch the Force Home area and Home all the servo motors at the next start ...

Page 72: ...Packaging Technology Inc All rights reserved 2012 4 6 33 Configuration Viewer Touch the Configuration Viewer diagnostic in the list to display the screen below This screen allows supervisor lever personnel to view various machine configuration values ...

Page 73: ...2 4 6 34 Screen Level Touch the Screen Level diagnostic in the list to display the screen below This diagnostic allows supervisor level personnel to change the access level of each screen Touch the de sired diagnostic and on the next screen that appears touch the box to select the new access level ...

Page 74: ...Pack201 Operator Interface Section 4 EN 43 Bosch Packaging Technology Inc All rights reserved 2012 4 6 35 Film Track Touch the Film Track diagnostic in the list to display the screen below ...

Page 75: ...a cycle where the missing product eye stops checking for a product Angle Off NPNP deg This is the position in a cycle where the missing product eye stops checking for a product Angle Off Pulse X deg This is the position in a cycle where pulse X ends Angle Off Reject Verify deg This is the position in a cycle where the verification eye stops checking for a product Angle Off Short Product Reject deg...

Page 76: ...backlog belt base rate used to set the high speed required while product is fed into the sweep area Backlog Belt Lo Rate This is a percent of the backlog belt base rate used to set the low speed required during the product transfer Backlog Gap Close Eye Enable In the ON position the backlog gap closing eye is active In the OFF posi tion the eye is disabled Backlog Gap High Delay mm This is the dis...

Page 77: ...per can correct when the sealing material is out of registration Film Max Error Reg This is the maximum amount that a registered package can be out of registration without being rejected Film Run Rate This is the desired film speed in packages per minute when the machine is in film jog mode Film Stop Value This value a percentage of the package length is used to stop the film when the No Product N...

Page 78: ...added to change the position of the device being driven by the lineshaft Lineshaft X Rotary Offset This is a correction that may be added to change the position of the device being driven by the lineshaft Lineshaft X Rotary Ratio Cycles Product This is the number of cycles the lineshaft driven device must turn for each product Long Product To Reject This is the desired number of packages to reject...

Page 79: ...eject when a missing prod uct gap is detected NGNS Reject Shifts This is the number of cycles from the NGNS reject eye to the reject device No Gap No Seal NGNS Enable In the ON position the No Gap No Seal option is active In the OFF posi tion the option is disabled No Gap No Seal NGNS Reject on off In the ON position the NGNS reject eye is active In the OFF position the reject eye is disabled No G...

Page 80: ...e pulse is active In the OFF position the pulse is disabled Pulse X Speed Compensation This allows for mechinacal delays at higher speeds to keep the pulse X window in position Rate At 10 Volts This is the speed that the machine will run with a 10 volt signal from the feeder Registration Enable In the ON position the registration eye is active In the OFF position the registration eye is disabled R...

Page 81: ... the OFF position the reject eye is disabled Splicer Enable In the ON position the splicer option is active In the OFF position the option is disabled Splicer Offset This is a correction that may be added to change the position of the splice Splicer Reject Shifts This is the number of cycles packages from the splicer to the reject device Splicer Shifts This is the number of cycles packages from th...

Page 82: ...ble In the ON position the tucker option is active In the OFF position the option is disabled Uncut To Reject prod This is the desired number of packages to reject when an uncut package is detected Uncut Reject Enable In the ON position the uncut reject eye is active In the OFF position the reject eye is disabled Uncut Reject Shifts prod This is the number of cycles from the uncut reject eye to th...

Page 83: ...ptions will not appear unless the machine is equipped with the option Message Action MACHINE NOT HOMED PRESS THE START BUTTON TO RE HOME THE MACHINE MACHINE NOT IN SYNCHRONIZATION PRESS THE START BUTTON TO SYNCHRONIZE THE MACHINE CUTTING HEAD FOLLOWING ERROR CHECK THE FEEDBACK PUSH THE ESTOP BUTTON TO RESET THE FOLLOWING ERROR OR PRESS START BUTTON TO RUN FILM FOLLOWING ERROR INFEED FOLLOWING ERRO...

Page 84: ...FILM BROKEN STOP CHECK THE FILM PATH OR THE PROXIMITY SENSOR PRESS START TO RUN RESET SPLICER PRESS THE RESET SPLICER BUTTON ON KEY PAD TO RE ARM THE SPLICER INFEED INCREASING THE INFEED IS INCREASING TO THE NEW OFFSET INFEED DECREASING THE INFEED IS DECREASING TO THE NEW OFFSET TEMPERATURE FAULT STOP LOOK AT TEMPERATURE CONTROLLER OR ITS MANUAL FOR MORE INFORMATION DISCHARGE FOLLOWING ERROR CHECK...

Page 85: ...VALID STOP MACHINE CYCLE STOPPED BY DATA VALID SIGNAL NOT TRANSI TIONING CHECK THE WIRING AND VISION SYSTEM FOR ERRORS VISION SYSTEM CONSECUTIVE STOP THE MACHINE HAS CYCLE STOPPED BECAUSE MORE REJECTS HAVE CONSECUTIVELY OCCURED THAN THE PRESET AMOUNT AL LOWS SHORT PRODUCT CONSECUTIVE STOP CHECK THE PRODUCT FOR SHORT MISSING CHECK THE PROD UCT FLOW FOR ERRORS VISION SYSTEM NOT READY MACHINE CYCLE S...

Page 86: ... START BUTTON TO RUN CONSECUTIVE REJECT STOP THE PRESET AMOUNT OF CONSECUTIVE REJECTS HAS BEEN REACHED AND THE MACHINE HAS STOPPED SOFT E STOP X SOFT E STOP X HAS BEEN DETECTED SIDEBELT INCREASING DECREASING THE SIDEBELT IS INCREASING DECREASING TO THE NEW OFFSET HEAD AND DISCHARGE GUARD DOOR OPEN CLOSE THE GUARD DOOR TO ENABLE WRAPPER START FIN AND REC GUARD DOOR OPEN INFEED GUARD DOOR OPEN FEEDE...

Page 87: ...__________________ __________________________________________________________________________________________________________________________ __________________________________________________________________________________________________________________________ __________________________________________________________________________________________________________________________ ____________...

Page 88: ... All rights reserved 2012 EN 1 5 Contents 5 Functional Descriptions 2 5 1 Sequence of Operation 2 5 2 Backstand 3 5 3 Former 4 5 4 Finseal 4 5 5 Endseal Crimpers 5 5 6 Discharge Conveyor 7 5 7 Temperature Controls 8 5 8 Sensors 8 5 9 Light Tower 9 5 10 Pneumatics 9 Notes 10 ...

Page 89: ...eels serrates and compresses the sealing area The second set of finwheels heats the material and the third set of finwheels presses them together into a finseal The tube of material with the enclosed product then moves through a fold over plate or an optional set of auxiliary finwheels which folds the finseal against the bottom of the tube The tube then enters the endseal area In the endseal area ...

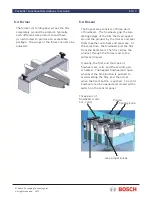
Page 90: ...er between a rear centering cone and a removable chuck The rubber knob is used to find adjust the film crosswise during operation One burn moves the reel 1 75 mm resulting in a film movement of 3 5 mm Balance Arm The spring loaded balance arm acts as a brake to keep the film constant tension while running It can be locked in position which threading the film unlock it by removing the pin Guide Rol...

Page 91: ...ges of the film that is wrapped around the product by the former and seal them together with heat and pressure At the same time the finwheels pull the film from the backstand The film carries the product through the former and to the endseal crimpers Typically the first and third pair of finwheels are cold and the second pair is heated The heated finwheel will open whenever the Stop button is push...

Page 92: ...g and proximity sensor located on the upper shaft The machine control module uses the signal from the sensor to determine endseal crimper position for proper timing If the crimpers stop with the proximity sensor tripped by a flag the crimpers will reverse direction and stop in the open position If they stop with the sensor not tripped the crimpers will rotate forward and stop in the open position ...

Page 93: ...so allow the upper crimper to give slightly if they happen to close on an obstruction Spring pressure has been set at the factory and should not require adjustment Cutoff Knife And Anvil The upper crimper contains a cutoff knife and the lower crimper has a backup plate called an anvil For the knife to cut properly it should extend beyond the sealing surface only far enough to achieve a good cutoff...

Page 94: ...yor The discharge conveyor is located directly after the endseal It has a drive motor and roller assembly two nose roller assemblies and a belt This conveyor is designed to be easily removed from the wrapper There is adjusment hardware to tension and properly track the belt Tracking Screws and Jam Nuts Tension Adjust Bolts ...

Page 95: ...re Controls 5 8 Sensors The following sensing and monitoring equipment is in the wrapper Film registration The film registration photoelectric eye monitors the position of the printed image on the sealing material and provides input for any necessary correction Cutting head position The cutting head proximity sensor signals the wrapper when it detects the cutting head flag Infeed chain position Th...

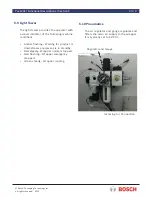
Page 96: ...f the following machine conditions Amber flashing Waiting for product or downstream equipment is in standby Red steady Wrapper normal stopped Red flashing Wrapper emergency stopped Green steady Wrapper running 5 10 Pneumatics The air regulator and gauge regulates and filters the main air supply to the wrapper It is typically set to 60 PSI Regulator and Gauge Incoming Air Connection ...

Page 97: ...___________________________________________________ ______________________________________________________________________________________________________ ______________________________________________________________________________________________________ ______________________________________________________________________________________________________ _______________________________________...

Page 98: ...Weekly Maintenance Checklist 8 6 4 3 Monthly Maintenance Checklist 12 6 4 4 Annual Maintenance Checklist 12 6 4 4 Finwheels Set Mesh and Height 13 6 4 5 Finwheels Set Gap 14 6 4 6 Finwheels Change Heat Element Thermocouple 15 6 4 7 Crimpers Set Mesh 16 6 4 8 Crimpers Change Heat Element Thermocouple 18 6 4 9 Crimpers Set Heat and Clearance 19 6 4 10 Crimpers Center 19 6 4 11 Crimpers Set Knife and...

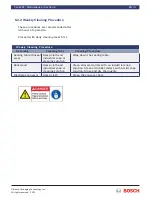
Page 99: ...h off the compressed air Open all covers and doors Allow heated elements to cool sufficiently CAUTION NEVER use compressed air to clean the machine Always use a vacuum cleaner or a brush Dust could be stuck in bearings or in gears increasing the risk of premature wear INFORMATION Any Cleaning or maintenance work should only be carried out by trained personnel Do not remove parts for cleaning unles...

Page 100: ...roduct Remove any film residue Endseal crimpers Brass brush see below Remove any burnt sealing material buildup from the serrations in both the upper and lower crimpers If it is necessary to clean the knife and anvil slots in the crimpers remove the knife and anvil Finwheels Brass brush see below Remove any burnt sealing material buildup from the serrations in the wheels WARNING The crimpers and f...

Page 101: ... Weekly Cleaning Procedure Assembly Cleaning Tool Cleaning Procedure Sealing table finseal area Damp cloth and industrial soap or cleaning solution Wipe down the sealing table Backstand Damp cloth and industrial soap or cleaning solution Clean all metal rollers with an industrial soap solution Clean all rubber rollers with a mild soap solution Rinse and dry thoroughly Discharge conveyor Damp cloth...

Page 102: ...soap solution Endseal crimpers Brass brush see below Remove knife and anvil for thorough cleaning of slots Electric eyes Soft cloth Clean the lenses Proximity sensors Soft cloth Clean the sensor ends Collector rings on both Endseal and Finseal Electrical spray cleaner and soft cloth Spray with electrical cleaner and wipe with soft cloth WARNING The crimpers and finwheels are best cleaned while hot...

Page 103: ...een lubricated and sealed at the factory and should require no further lubrication However some components may require lubrication periodically The lubrication schedule applies to normal production conditions In the case of very dusty products or in extremely dry packaging departments shorter lubricating intervals are necessary 6 3 3 Lubricant Specifications When lubrication is necessary use the f...

Page 104: ... ALUMINUM COMPLEX THICKENER CONTENT 8 10 CORROSION TEST PASS 1 WATER STABILITY PENETRATION AFTER 1 000 000 STROKES 10 WATER 400 EXCELLENT OXIDATION BOMB TEST MAXIMUM DROP IN 100 HOURS 5 PSI ADDITIVE TYPE ZINC OXIDE ADDITIVE CONTENT APPROX 5 OIL VISCOSITY 100 F SUS 300 350 VISCOSITY INDEX 90 POUR POINT F 0 COMPATIBILITY PENETRATION AFTER 1 000 000 STROKES WATER 10 400 WATER 5 385 TOMATO JUICE 50 40...

Page 105: ...s recommended the air supply also be disconnected before starting 6 4 1 Daily Maintenance Checklist Daily Maintenance Checks Assembly Cleaning Procedure Former Folding Box Check bearing operation Discharge Belt Check belt tension Adjust if necessary 6 4 2 Weekly Maintenance Checklist General Assembly Maintenance Check Film splicer Inspect for proper operation Reject systems Check for proper setup ...

Page 106: ... If they are too tight it will cause premature wear on the sprockets and chain Backstand Section Assembly Maintenance Check Rollers Clean all rollers and related components Check for wear and free rotation Main Spindles Inspect for wear and condition Bearings Inspect for wear and condition Lubricate Power feed roll Inspect for wear proper setup and operaton Gear box Inspect for leaks Splicer Inspe...

Page 107: ...ection Collector ring assembly Check components for wear and alignment Vacuum tube Inspect and adjust for proper fit Cutting Head Section Assembly Maintenance Check Mechanical drive components and sprockets or gears Inspect for wear Chain Inspect for stretch and wear Check chain tension Shafts Inspect for excessive endplay Cutting head Check hight adjustment in relation to product being run produc...

Page 108: ...nical components sprockets torque limiters Inspect for wear Gear boxes Check for leaks Check oil level and refill if necessary Bearings Check and lubricate Perform oil change on machines with oil bath Motors encoders and cables Inspect for damage and for tight connections Electrical Section Assembly Maintenance Check Terminals and components Inspect for damage and tight connections Power down befo...

Page 109: ...arings turn freely Finseal Clean the slip rings and check them for wear Replace the carbon brushes if needed Crimpers Clean the gear wheels on the crimper shafts and apply grease if needed Check the shaft bearings for play Clean the slip rings and check them for wear Replace the carbon brushes if needed 6 4 4 Annual Maintenance Checklist Annual Maintenance Checks Assembly Maintenance Check Geared ...

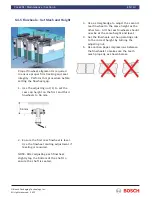
Page 110: ... 56mm 1 2 Ensure the first rear finwheel is level Use the finwheel canting adjustment if leveling is required NOTE After adjusting each finwheel slightly tap the bottom of the shaft to ensure the shaft is seated 3 Use a straightedge to adjust the second rear finwheel to the same height as the other two All the rear finwheels should now be at the same height and level 4 Set the finwheels on the ope...

Page 111: ...old finwheels 5 Starting with the first finwheel gradually turn the knob until the finwheel gap is too small to prevent the two layers of film from being pulled through Adjust the gap between each set of finwheels by turning the knob 1 clockwise to reduce the gap counterclockwise to increase the gap 6 Repeat with the third finwheel 7 Open the middle hot finwheels and bring them to operating temper...

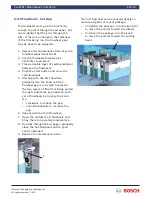
Page 112: ...e finwheel 6 Feed the wires for the new part down through the shaft and seat the new part in the finwheel 7 Connect the wires to the collector ring assembly 8 Replace the deck plates To replace a collector ring brush 1 Place the main disconnect into the off position to remove all power 2 Remove the bottom guard 3 Locate the bad brush and loosen the screw on the brush holder 4 Remove and replace wi...

Page 113: ... and valleys on the crimpers are properly meshed the shafts are parallel so that there is uniform pressure across the crimpers 5 Use two spacers that are the same width as the knife and slide them into the knife and anvil slots at the end of the crimpers 6 Tighten the mouting screws 2 in a diagonal pattern 7 Rotate a piece of carbon paper to take an impression of the crimper mesh Adjust as needed ...

Page 114: ...per shaft check the drive gears for backlash Backlash will cause improper crimper alighment 1 Disconnect and lockout the main power while performing this procedure 2 Access the drive gears and loosen the seven hexhead screws in the upper gear 3 3 Turn the front half of the top gear forward and hold it firmly while re tightening the 7 hexhead screws 4 Replace the guarding 3 ...

Page 115: ...Be careful not to damage the crimper if this step is necessary 6 After the element is removed the hole in the crimper should be reamed to clean any excess material from the hole NOTE Do not ream the hole too large or it will not heat properly when the new element is installed Use a ream 9 525mm 375 in diameter 7 Coat the new element with WATLUBE heat release and heat transfer agent Doboy Part 2150...

Page 116: ...to test the film seal If the crimper seal pulls apart too easily increase the crimper temperature 5 10 degrees Wait for about 15 minutes before performing a new seal test Raise or lower the crimper shaft as needed to fine tune the seal The crimper should form a good seal with the least amount of contact with the lower crimper 6 4 11 Crimpers Center The crimpers must be on the centerline of the pac...

Page 117: ...ife style The adjusting screw style knives use a tapered adjusting screw which acts like a wedge to extend the cutting edge of the knife The knife should extend beyond the sealing surface only far enough to achieve a good cutoff 1 Loosen the setscrews 1 and the adjusting capscrews 2 to remove the old knife 2 Install a new knife Make sure it is fully seated against the adjusting screws then tighten...

Page 118: ...mple use one 010 shim instead of five 002 shims 1 Install the knife in the knife crimper without any shims and tighten the setscrews 2 Turn on the heat to the crimpers and allow the crimpers to come up to temperature to allow for any thermal expansion NOTE If using cold seal film disregard all reference to temperature settings 3 Place a single layer of film between the crimpers 4 Close the operato...

Page 119: ...ainst the stop or if the cone is gripping too lightly adjust the film chuck tension 1 Remove the recessed head bolt 1 2 Remove the handgrip 3 Remove the bolt 2 4 If the cone is gripping too hard remove one washer 3 if it is gripping too lightly add one washer 5 Replace the bolt 6 Fit the handgrip 7 Tighten the recessed head bolt 8 Check the operation and repeat the set up procedure if necessary 1 ...

Page 120: ...ng screws in or out to bring the belt back to the center of the rollers 3 Adjust one side at a time in small increments and allow time for the belt to react 4 Tighten the jam nuts securely once the belt is tracking properly 6 4 16 Discharge Conveyor Adjust Belt Tension The belt must have enough tension so that it will not slip on the rollers Avoid excessive tension 1 Loosen four capscrews on each ...

Page 121: ... manner 1 Disconnect the power cord to the discharge motor 2 Disconnect the conveyor and remove it from the wrapper 3 Place the conveyor on a bench on its side 4 Remove the bottom guard 5 Lift up the nose roller at each end and slide the nose roller assemblies out of the mounting brackets 6 Slide the old belt off and replace with the new belt 7 Reassemble in reverse order ...

Page 122: ...___________________________________________ _______________________________________________________________________________________________________ _______________________________________________________________________________________________________ _______________________________________________________________________________________________________ ____________________________________________...

Page 123: ...Pack201 Appendix Section 7 EN 1 Bosch Packaging Technology Inc All rights reserved 2012 7 Contents 7 Appendix 2 7 1 Glossary of Terms 2 7 2 Optional Equipment 6 Notes 7 ...

Page 124: ...ts of a shaft or a drive mechanism A clutch allows a machine s motor to remain running while its drive shaft stops code date A group of letters and numbers printed onto a package that tell where and when the package was made collector ring A ring made of coin silver used to convey electrical energy to a rotating object without the use of wires conveyor A mechanical device for transporting product ...

Page 125: ... with another toothed part to transfer mo tion to other machine components gear box A metal enclosure housing a group of gears and shafts Gear boxes are usually sealed and filled with lubricant guards Shields that protect the operator from dangerous parts of a machine or system gussets Tucks made in the sides of a film tube to ensure an even cut and seal height The distance from the base of an obj...

Page 126: ...e presence or absence of an object by detecting the presence or absence of light pneumatic A device that uses compressed air to perform its work and movements proximity sensor An electronic sensor that monitors the closeness of an object without actually touching the object In some cases a proximity sensor might be called a proximity switch proximity switch An electronic sensor that detects the pr...

Page 127: ...nting the equipment from becoming energized tension The stress caused when a material such as film is extended stretched or pulled tight tolerance The maximum permissible deviation from a specified standard trailing edge The upstream edge of a product or package upstream In or toward the beginning stages of a machine or packaging line valve A device that regulates the flow of gases liquids or loos...

Page 128: ...Pack201 Appendix Section 7 EN 6 Bosch Packaging Technology Inc All rights reserved 2012 7 2 Optional Equipment Optional Equipment for this equipment is explained on the following pages ...

Page 129: ...__________ ____________________________________________________________________________________________________________________________ ____________________________________________________________________________________________________________________________ ____________________________________________________________________________________________________________________________ ______________...

Reviews: