Pack201 | Maintenance | Section 6
EN | 16
© Bosch Packaging Technology, Inc.
All rights reserved 2012
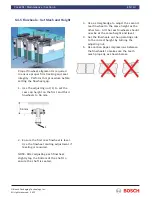
6.4.8 Crimpers - Set Mesh
Typically, this procedure should be
performed when mounting new crimpers
on the shafts.
1. Lockout and tagout the power while
performing this procedure.
2. Remove the knife and anvil from the
new crimpers.
3. Place four layers of film in the center of
the crimpers and rotate the crimpers to
the closed sealing position.
4. Turn the spring adjusting nuts (1) on
both sides of the shaft until:
•
the peaks and valleys on the
crimpers are properly meshed
•
the shafts are parallel so that there
is uniform pressure across the
crimpers.
5. Use two spacers that are the same
width as the knife, and slide them into
the knife and anvil slots at the end of
the crimpers.
6. Tighten the mouting screws (2) in a
diagonal pattern.
7. Rotate a piece of carbon paper to take
an impression of the crimper mesh.
Adjust as needed.
8. Remove the spacers and install the
knife and anvil.
9. With the power ON and the crimpers
at operating temperature, run some
sample packages and check the seal.
Fine adjust the pressure and clearance
as necessary.
NOTE: When the crimpers heat, they will
expand slightly and fine adjustments will
be necessary.
1
2


