Bohle GlassBuddy Basic Operating Instructions Manual Download Page 33

EN

33

In case of dealing with very large measuring units 

or if the results obtained are very unreliable, we 

recommend carrying out average measurements on 

at least 4 spots distributed over the whole surface of 

the glass pane. 

The analysis of glass with additional coatings (Solar 

reflective films or splinter protection films) can lead 

to incorrect results. 

In the case of insulated glass units, measurements 

should always be taken 5 cm away from the edge, as 

the panes tend to “bend“ depending on the surface 

and air pressure, which means that measurements 

taken from the centre may be inaccurate. 

When analysing resin laminated glass, where the 

resin has the same refraction index as the glass, the 

Glass

Buddy

 will measure the total thickness.  

In a very small number of cases, detailed analysis of 

laminated safety glass is not possible. In this event, 

the Glass

Buddy

 displays an exclamation mark in 

front of the individual result. In the graphic display 

of the Glass

Buddy

 and in the PC software, results 

of this kind are indicated by two horizontal lines in 

the bottom part of the respective pane. To achieve 

better measuring results, we recommend a new ana-

lysis on the opposite side.

14 Software Update

A software update is available both for Glass

Buddy


Basic and Glass

Buddy

 Plus. 

Troubleshooting updates can be carried out by the 

user. They can be found on our website www.bohle-

group.com with the article numbers BO 51 647 60 for 

Glass

Buddy

 Basic and BO 51 647 55 for Glass

Bud-

dy

 Plus. For this purpose, the updated version found 

under Downloads must be saved on your PC. 

Please connect your Glass

Buddy

 Basic or Glass-

Buddy

 Plus to your PC or laptop and connect the 

device to the PC software (see point 6). 

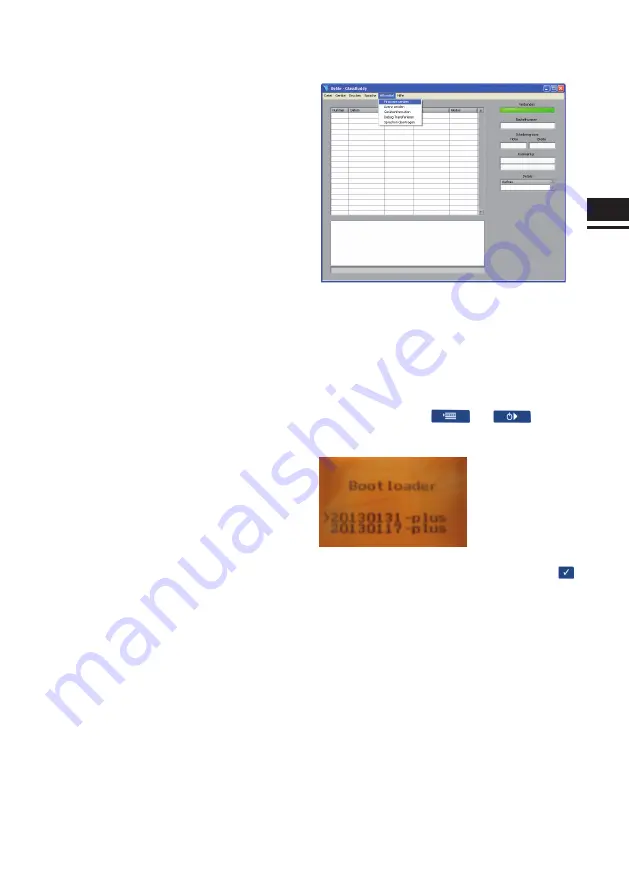
Click on "auxiliary options" for installing the update 

and choose the submenu "send firmware".

Now you have to choose the previously stored soft-

ware version. 

Confirm the completed download of the Glass

Buddy


update with "OK". 

To activate the updated version on your Glass

Bud-

dy

, first switch off the device. 

Afterwards press keys 

 and 

 at the 

same time for approximately 4 seconds. In this way 

you reach the boot loader menu.  

You can choose between two software versions. The 

newer one can be recognised via the date. Press   

key to load the chosen version. 

15 Software Upgrade

It is possible to upgrade Glass

Buddy

 Basic to 

Glass

Buddy

 Plus. This can not be done by the user. 

Please send your Glass

Buddy

 Basic to BOHLE AG. 

These upgrades are not free of charge.

Summary of Contents for GlassBuddy Basic

Page 1: ...GlassBuddy Plus GlassBuddy Basic...

Page 2: ......

Page 3: ...EN Bedienungsanleitung Seiten 4 18 Operating Instructions Pages 20 34 DE...

Page 4: ...lation und Bedienung der PC Software 07 Erste Schritte Grundlagen zum Arbeiten mit dem GlassBuddy Erkl rung der Men punkte 08 Glasanalyse mit dem GlassBuddy 09 Ablesen der Messergebnisse 10 Fehler und...

Page 5: ...essergebnissen n USB Schnittstelle n Einfache und selbsterkl rende Men f hrung n hochwertiger Li Ion Akku 03 Die Tastenbelegung Der GlassBuddy kommt trotz seiner umfangreichen Funktionen mit wenigen T...

Page 6: ...rache ausgeliefert M chten Sie die Sprache dauerhaft umprogrammieren gehen Sie bitte wie folgt vor Verbinden Sie den GlassBuddy ber das mitgelie ferte USB Kabel mit Ihrem PC oder Laptop Bitte verwende...

Page 7: ...ere Programmmaske mit folgenden Bereichen Scheibenliste Hier werden die aus dem GlassBuddy bertragenen Messungen nach laufender Nummer angezeigt Zus tzlich werden noch das Datum der Messung die Uhrzei...

Page 8: ...dy wird nun hergestellt Wenn die Verbindung erfolg reich war leuchtet in der Programmmaske der Bereich unter Verbunden hellgr n Sollte dieser Bereich nicht hellgr n leuchten klicken Sie den Punkt Ger...

Page 9: ...en Scheibenliste Hier werden alle aufgef hrten Messungen aus der Scheibenliste als Liste ausgedruckt Markiertes Detail Wenn Sie eine Messung aus der Scheibenliste an gew hlt haben k nnen Sie hier die...

Page 10: ...GlassBuddy durch den Nutzer perso nalisiert werden Debug Transferieren Dieser Punkt ist noch nicht aktiviert hier k nnen keine nderungen vorgenommen werden 07 Erste Schritte Grundlagen zum Arbeiten m...

Page 11: ...f hren n ISO3 Glas Men anzeige ISO3 f r die Analyse von 3 fach Isolierglas aus 3 x Einfachglas f r die Analyse von 3 fach Isolierglas mit VG f r die Analyse von 3 fach Isolierglas mit VSG Hinweis Wenn...

Page 12: ...is Nach dem Ausschalten wechselt der GlassBuddy in die Grundeinstellung zur ck F r die dauerhafte nderung der Einheiten verbinden Sie den GlassBuddy mit dem mitgelieferten USB Kabel mit Ihrem PC siehe...

Page 13: ...unden geht die Beleuchtung wieder an und Sie k nnen den GlassBuddy vom Glas ent fernen Das Ergebnis der Messung wird auf dem Display angezeigt Durch das Messergebnis k nnen Sie mit den Tasten bl ttern...

Page 14: ...ucht wird einen anderen Aufbau als kein ISO Glas zu messen L sung Bitte berpr fen Sie die Einstel lung und ndern diese bei Bedarf n Kein ISO Glas Diese Meldung kann in der Ein stellung ISO erscheinen...

Page 15: ...auer bis zum einem Akkustatus von 100 ca 120 Minu ten wenn der GlassBuddy w hrend des Ladevor ganges eingeschaltet bleibt verl ngert sich die Ladezeit Der GlassBuddy zeigt an wenn der Lade vorgang abg...

Page 16: ...cherheiten Spezifikation GlassBuddy Basic GlassBuddy Plus Einfachglas ja ja Monolithisches Verbundglas VG ja ja Monolithisches Verbundsicherheitsglas VSG ja ja Monolithisches Mehrfachverbundglas MVG j...

Page 17: ...s zu erhalten Die auf der Website www bohle group com unter den Artikelnummern BO 51 647 60 f r den Glass Buddy Basic und BO 51 647 55 f r den Glass Buddy Plus in unregelm igem Turnus erscheinenden Up...

Page 18: ...tstemperatur 0 C bis 40 C 17 Sicherheitshinweise Der GlassBuddy ist ein Produkt der Laser Klasse 2M Es m ssen somit keine zus tzlichen Laserschutzma nahmen zum Betreiben des Ger tes getroffen wer den...

Page 19: ...DE 19...

Page 20: ...allation and Operation of the GlassBuddy Software 07 First Steps Basic information about working with the GlassBuddy 08 Glass Analysis with the GlassBuddy 09 Reading the Measurement Results 10 Error a...

Page 21: ...mber of layers the thickness and the position n Memory to store 99 measurement results n USB interface n Simple and self explanatory menu operation n Top quality Li ion rechargeable battery 03 The Key...

Page 22: ...ssBuddy is first supplied with a German menu If you want to change the language please proceed as follows Connect the GlassBuddy to your PC or laptop using the supplied USB cable Please only use the s...

Page 23: ...e program has started you will see the empty program screen with the following areas Pane list The measurements transferred from the Glass Buddy are listed here according to the sequential number The...

Page 24: ...nnected to the GlassBuddy Once the connection has been established the field in the program screen below Connected will turn light green If this field does not turn light green click Devices Update ag...

Page 25: ...t Pane List Here all listed measurements from the pane list will be printed as a list Marked Detail If you have selected a measurement from the pane list you can print out the details relating to the...

Page 26: ...can customise the settings of the GlassBuddy Transfer Debug The option has not yet been activated no changes can be made here 07 First Steps Basic information about working with the GlassBuddy To swi...

Page 27: ...1 gap insulating glass with laminated glass for the analysis of 1 gap insulating glass with laminated safety glass for the analysis of 1 gap insulating glass with multi laminated glass with the excep...

Page 28: ...e menu item Language you can reach the submenu by pressing after making a selection Here you can change the settings using the keys Confirm your changes with Note After it is switched off the GlassBud...

Page 29: ...wn on the display of the GlassBuddy Note The GlassBuddy should not be moved during the measuring procedure as this could lead to inac curate measuring results After 1 2 seconds the light will turn on...

Page 30: ...ting not ISO if you try to analyse a glass structure other than not ISO Solution Please check the settings and change them if necessary n Not ISO glass This message can appear for the setting ISO if y...

Page 31: ...iving from one building site to the next When the battery is almost empty it takes approxi mately 120 minutes to charge it to 100 again if the GlassBuddy remains switched on during char ging the charg...

Page 32: ...ass lam safety yes yes Monolithic multi laminated glass multi lam yes yes Monolithic multi laminated glass for fire protection no yes 1 gap insulating glass with monolithic glass yes yes 1 gap insulat...

Page 33: ...esults we recommend a new ana lysis on the opposite side 14 Software Update A software update is available both for GlassBuddy Basic and GlassBuddy Plus Troubleshooting updates can be carried out by t...

Page 34: ...Working temperature 0 C to 40 C 17 Safety Information The GlassBuddy is a product of the 2M laser class Therefore no additional laser protection measures need to be taken before the device is used De...

Page 35: ...B Pyramidbacken 3 SE 14175 Kungens Kurva info bohle se United States Bohle America Inc 10924 Granite Street Suite 200 Charlotte NC 28273 info bohle america com Russia Bohle Moskau Leninsky Rayon Busin...

Reviews: