6 BT-CMTS Series
Setup Guide
Section 3 - Pre-Requisites
This guide assumes a router is already configured on the WAN side; the LAN side of the router should have DHCP turned off.
During the initial set up the only devices that should be on the network; connected to the router are the CMTS.
Before beginning the configuration of the CMTS, we need some required information.
• The IP address of the router; ensure the router has internet access (example 192.168.9.1)
•
The DNS used on the router (example: 4.2.2.3)
• Verify DHCP is turned off on the router
• The desired IP of the address for the CMTS; this should be on the same subnet of the router (example: 192.168.9.2)
•
All the static IP address “living” on the LAN (example: 192.168.9.xx)
• Provisioning/configuration file for the Cable Modems; this is required for setting the Upload and Download speed of the
modems (example: <myfile.cfg>)
• The required RF power output and desired QAM channel frequencies to be entered into the CMTS. The desired QAM
channels should be open on the RF network and the RF power output should be enough to distribute through your RF
network and effectively hit all modems with 0 dBmV
Section 4 - Connecting the CMTS
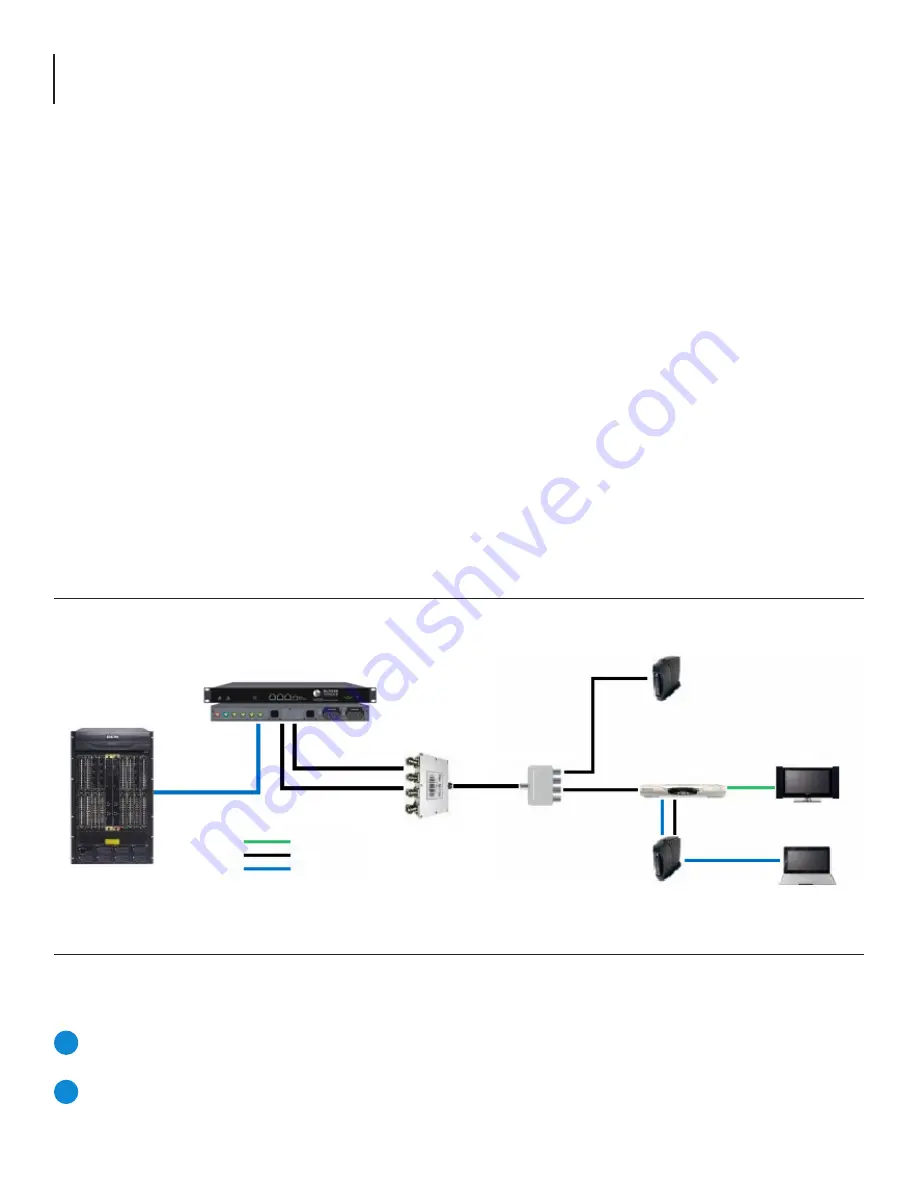
CM
CM
VOD
PC
TV
STB
192.168.9.1
192.168.9.2
CMTS
Internet/Router
Distributor
HDMI
Cable
Ethernet
4.1 Physical Connections
Physically wire the system. While all systems are different, below is an example of a typical CMTS diagram.
4.2 Ethernet Access
Local or remote communication with the unit is only possible through a GUI-based menu via web browser
(Chrome or Firefox
is recommended)
. Before you can communicate with the unit, you must configure the unit’s IP address to conform with your
existing IP network or LAN. To do so, follow these steps:
Connect one end of the Ethernet cross cable, provided in the hardware bag, to the front-panel RJ45 interface labeled
“
GIGE
”. Connect the other end of the cable to your computer.
The factory default IP address of the Control port is
192.168.168.100
. In order to communicate with the unit port, you
must first change your computer’s IP address.
1
2


