11
MAINTENANCE
Maintenance
WARNING
Disconnect the power supply to the appliance
before cleaning or servicing.
CAUTION
Live steam and accumulated hot water in the
compartment may be released when the door
is opened.
CAUTION
The appliance and its parts are hot. Use care
when operating, cleaning and servicing the
appliance.
COLD WATER CONDENSER
The steamer is equipped with a cold water condenser
in the rear of the cooking chamber which helps to con-
dense the steam prior to discharge into the drain. The
steamer freely vents itself by the negative pressure cre-
ated by the condensate water drainage. This negative
pressure prevents steam leakage around the door gasket
and helps draw the steam through the cooking compart-
ment. Steam leakage at the door may indicate a plugged
or improperly installed drain.
REMOVAL OF SCALE DEPOSITS
It is recommended that your steamer be delimed once a
month, or more often if necessary.
Should your steamer develop a heavy buildup of lime
scale deposits, use CLR.
Before beginning deliming procedures, ensure that water
is not overflowing into the cooking compartment.
The generator tank has a removable sealed tank cover.
The main purpose of the removable cover is for inspec-
tion of the interior of the tank for lime build up and easy
removal of large pieces of lime that will not flush out drain.
Should the tank cover have to be removed, check condi-
tion of sealing gasket before replacing cover. The hold
down bolts are to be tightened to 160 inch pound torque
each.
NOTICE
Contact the factory, the factory representative
or local service company to perform mainte-
nance and repairs.
WARNING
Read and follow instructions on the CLR
bottle. Use plastic or rubber gloves to avoid
skin contact. If CLR comes in contact with
skin, rinse with clean water.
1. Drain steam generator by setting the main power
switch to OFF. Set cooking timer to “0FF”.
2. Set the main power switch to DELIME.
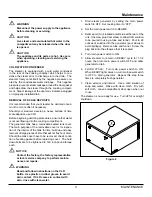
3. Delime port (A) is located on left side at the rear of the
unit. Unscrew plug from elbow to allow CLR solution
to be poured in using a tube and funnel. Pour in 28
ounces of solution into the generator (pour slowly to
avoid spillage). Remove tube and funnel. Screw the
plug back into the elbow so that it is sealed.
4. Turn main power switch to ON.
5. Allow steamer to remain in READY cycle for 1-1/2
hours, then turn main power switch OFF and allow
generator to drain.
6. FLUSH CYCLE: Turn main power switch to ON.
When READY light comes on, turn main power switch
to OFF to drain generator. Repeat this step three
times to completely flush generator.
7. Clean exterior and interior. Use a mild solution of
soap and water. Rinse with clean cloth. Dry with
soft cloth. Leave compartment door open when not
in use.
The steamer is now ready for use. Turn off for overnight
shutdown.
Figure 4


