


Lit. No. 43991, Rev. 01
19
November 1, 2012
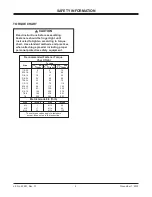
FUSE REPLACEMENT
See the Harness Wiring Diagrams on the following
pages for fuse ratings and locations.
If a problem should occur and fuse replacement is
necessary, the replacement fuse must be of the same
type and amperage rating as the original. Installing a
fuse with a higher rating can damage the system and
could start a
fi
re.
RECYCLE
When your spreader has performed its useful life,
the majority of its components can be recycled as
steel. Gear oil shall be disposed of according to local
regulations. Balance of parts made of plastic shall be
disposed of in customary manner.
BEARING AND SET SCREW
MAINTENANCE
Disconnect the electrical plug between the spreader
and the truck before performing any maintenance.
1. Tighten all set screws shown after every 60 hours
of use.
2. Grease the top and bottom drive shaft bearings as
shown, using a good quality multipurpose grease.
Due to the harsh environment of the bottom
bearing, it will require more maintenance than the
top bearing.
MAINTENANCE
Lubricate drive shaft bearings with
a good quality multipurpose grease.
Top Bearing
Set Screw
Shaft Pulley
Set Screw
Motor Pulley
Set Screw
Bottom Bearing: Grease
after every 8 hours of use.
Top Bearing: Grease after
every 60 hours of use.
Bottom
Bearing
Set Screw
Thru Bolt
Auger
Set Screw


