background image

398

©

 2008 All rights reserved by Blaupunkt. This material may be reproduced, copied or distributed for personal 

use only.

This product is protected by certain intellectual property rights of Microsoft. Use or distribution of such technology 
outside of this product is prohibited without a license from Microsoft.

EA_NJerseyMP68_Buch1.indd   398

EA_NJerseyMP68_Buch1.indd   398

28.10.2008   15:35:55 Uhr

28.10.2008   15:35:55 Uhr

Summary of Contents for New Jersey MP68

Page 1: ...ting and installation instructions Mode d emploi et de montage Istruzioni d uso e di installazione Gebruiksaanwijzing en inbouwhandleiding Bruks och monteringsanvisning www blaupunkt com Car Radio CD MP3 WMA New Jersey MP68 7 648 498 310 ...

Page 2: ...ing to other regional programmes REGIONAL 85 Receiving the programme type 86 Selecting a programme type or switching off PTY PTY TYPE 86 Selecting the programme type language PTY LANG 86 CD mode audio 87 Starting the audio CD mode 87 Contents About these instructions 70 Symbols used 70 Use as directed 70 Declaration of conformity 70 Safety Notes 71 If you are installing device yourself 71 Observe ...

Page 3: ...IN socket 101 Rear AUX input 101 Adjusting the rear AUX input mode 101 Connecting other external audio sources to the rear AUX input 102 Switching the external audio source on off and selecting it 102 Naming external audio sources AUX EDIT 103 Mixing an external audio source with another audio source MIX AUX 103 Managing several C n C ready devices 104 Bluetooth phone call 105 Bluetooth preparatio...

Page 4: ...power on volume ON VOL LAST VOL 117 Changing volume presettings for TA TEL and MUTE 117 Activating deactivating the signal tone BEEP ON 118 Setting the speed dependent volume increase AUTO SND 118 Changing display settings 119 Adjusting the display viewing angle ANGLE 119 Changing the day night brightness D DAY D NIGHT 119 Mixing the color for the display illumination DISP COL 119 Selecting the co...

Page 5: ...ym bols DANGER Warns about injuries DANGER Warns about accidents DANGER Warns about hearing loss CAUTION Warns about laser beam CAUTION Warns about damaging the CD drive The CE mark confirms the compliance with EU directives Identifies a sequencing step Identifies a listing 쏅 Use as directed Thisdeviceisintendedforinstallationandopera tion in a vehicle with 12 V vehicle system voltage and must be ins...

Page 6: ... 001 535 All protruding parts incl straight plugs or adapters lead to an increased injury risk in case of an accident Operate the device only if traffic situation permits it Stop at a suitable location to perform extensive settings To protect your hearing always listen at a moderate volume During mute phases e g when changing Travelstore CD changer changing the volume is not audible until after the...

Page 7: ...cope of delivery includes 1 New Jersey MP68 1 Operating installation instructions 1 Support frame 2 Disassembly tools 1 USB connecting cable 1 Microphone for Bluetooth phone calls 1 Microphone connecting cable 1 Plug housing 1 Set of small parts ...

Page 8: ...nd the microphone connector allow the hands free use of a phone via the car sound system In addition the follow ing external audio sources can be connected and used C n C ready Blaupunkt interfaces via the rear AUX socket Either a CD changer or an external audio source e g MiniDisc or MP3 player via the rear AUX socket REAR AUX IN socket only if no C n C ready Blaupunkt interface is connected An a...

Page 9: ...e e g MP3 browse mode in MP3 display AUDIO button Calling up the audio menu for sound settings TUNER button Changing to radio mode Radio mode Opens menu for selecting the waveband memory bank Volume control On Off button Switch on muting sound press short Switch off press for longer than 2 sec onds Rocker switches and as well as and In menus and in radio mode Selecting submenus and menu items func...

Page 10: ...case of repairs the display shows PLEASE ENTER CODE and _ _ _ _ after switch on and you can enter the code Notes You have 6 attempts to enter the correct code before the device is blocked and can only be enabled with the master code You can switch off the device again without having entered the code Enter the code by pressing the correspond ing buttons of the A keys Press the OK button to confirm t...

Page 11: ...evice on and off adjusting the volume performing menu settings and resetting the de vice to the factory settings It also provides infor mation about connecting a USB medium and cor rectly inserting a CD in the device Switching the device on off The device is switched on or off with the igni tion The introductory animation starts and can be cancelled with the OK button The device plays the audio so...

Page 12: ...rrent operating mode and select functions To open a menu press the MENU button 9 By default the menu of the current operating mode is opened e g the tuner menu if the de vice is in tuner mode when you press the MENU button 9 쏅 쏅 쏅 쏅 Note You cannot call up the menu if the device is muted MUTE A E B C D A Option of the selected menu item B Selected menu item C Menu items of the selected menu D Arro...

Page 13: ...쏅 쏅 쏅 쏅 쏅 쏅 Resetting the device NORMSET You can reset the device to the factory settings see appendix A1 Your personal settings e g your welcome text will be deleted in the proc ess Press the MENU button 9 Press the rocker switch to open the Syst system menu Press the rocker switch or to select the NORMSET function Press and hold the OK button for longer than 4 seconds The display briefly shows NO...

Page 14: ...er Windows 2000 XP the FAT32 formatting creates a maximum partition size of 32 GB If you are using a USB medium with more than 32 GB it may result in read errors for additional parti tions If a large number of files is stored on your USB medium the speed of the file search may be re duced Selecting the USB as audio source Press the SOURCE button 8 repeatedly until USB appears on the display READING ...

Page 15: ... Label CDs only by using a marker since it does not contain any caustic materials Permanent markers can damage CDs If a CD is in the drive press the button 1 The CD is ejected Remove the CD If you do not remove the CD it is automatically pulled in again after a few seconds Insert the CD with its printed side upper most into the CD drive 2 until you feel some resistance The CD is automatically draw...

Page 16: ...tuner setting EUROPE Starting tuner mode Press the SOURCE button 8 repeatedly until TUNER appears on the display OR Press the TUNER button The playback starts immediately with the previ ously played station if the vehicle is within the reception area of this station 쏅 쏅 쏅 쏅 쏅 The tuner display B A E C D F A Waveband memory bank B Memory location of the current station if stored C Traffic informatio...

Page 17: ... or memory bank is adjust ed After a short period of time the display auto matically returns to the regular tuner mode You can now perform the following actions in this waveband memory bank Adjusting stations Storing stations Adjusting stations There are 3 ways of tuning into a station Tuning into stations automatically station seek tuning Tuning into stations manually Selecting stored stations St...

Page 18: ...velstore Storing stations manually After tuning into a station it can be stored as follows Press one of the station buttons 0 9 A for approx 2 seconds to which you want to assign the station Or in the List menu To change to the menu mode press the DIS ESC button Press the rocker switch or to select a memory location in the list Press and hold the OK button for approx 2 seconds The list displays th...

Page 19: ...s searching for stations As soon as the tuner has located a station it is played 쏅 쏅 쏅 쏅 쏅 쏅 쏅 쏅 쏅 쏅 To continue listening to the currently scanned station Press the OK button After a complete search of the frequency band scanning stops The previously set station is played Displaying radio text In addition to your programme stations can broadcast text news radio text that can be shown on the displ...

Page 20: ...ng off the priority of traffic announcements press the DIS ESC button The previously active audio source is played again If a traffic announcement is broadcast again the device automatically switches it through again 쏅 쏅 쏅 쏅 쏅 쏅 Receiving an alternative frequency of a station The device can automatically switch to the best alternative frequency of the same station if the reception becomes poor Allow...

Page 21: ...ff are displayed Press the rocker switch or to select the desired programme type or the NO PTY setting Press the OK button to select a different function or press the DIS ESC button to exit the menu 쏅 쏅 쏅 쏅 쏅 쏅 쏅 쏅 You can locate a station that broadcasts the se lected programme type by using the automatic station seek tuning For instructions please read the section Station seek tuning in this cha...

Page 22: ... CD display A C B D E A Traffic information priority B Bluetooth status C Display area for track number and CD text album artist track name if available and switched on D Random playback MIX or repeat function RPT E Playing time or time 쏅 The CD menu The CD menu provides functions such as MIX and REPEAT see the lower table on the next page To select a function and its desired option in the CD menu ...

Page 23: ...d chapter User settings Press again briefly Switches scan off Playing time time Press the DIS ESC but ton Change between display of playing time and time The functions of the following table can be called up in the CD menu For further details please read the preceding section The CD menu Function Menu item Options Random play back MIX MIX CD Mixing the tracks on the CD MIX CD Regular playback Repea...

Page 24: ...3 WMA In CD USB mode you can play CD Rs or CD RWs or a USB medium with MP3 or WMA tracks The chapter Startup describes what you must observe when connecting and disconnecting USB media It also contains information about inserting and removing CDs Starting the CD USB mode You can select an already inserted CD R or CD RW or a connected USB data carrier as audio source Press the SOURCE button 8 repea...

Page 25: ...n 2 seconds SCAN Scans all tracks on the CD USB scan time can be adjusted chapter User settings Press again briefly Switches scan off The functions of the following table can be called up in the MP3 menu For further details please read the following section The MP3 menu Function Menu item Options Random playback MIX MIX FOLDER Mix tracks of the current folder MIX ALL Mix all the tracks Repeating tr...

Page 26: ...ut having to interrupt the current playback The browse display A B E D C 쏅 쏅 쏅 쏅 쏅 쏅 A Marked directory or track open or playback with rocker switch B Directory C Up and down arrows indicate in which direction you can scroll D Currently playing track E Track Selecting tracks in Browse mode During MP3 WMA playback press the DIS ESC button repeatedly until the Browse mode is displayed It shows all f...

Page 27: ...MP3 WMA playback press the DIS ESC button repeatedly until Playlist mode is displayed It shows all playlists stored in the root folder of the data carrier To select a track from a playlist press the rocker switch or to scroll through the playlists Fast scrolling is achieved by pressing the rocker switches for a longer time Press the rocker switch to open a playlist Press the rocker switch or to sc...

Page 28: ...a C n C ready interface 쏅 The C n C display B A C D G E F H A Name of audio source B Traffic information priority C Bluetooth status D Name of current directory E Directory and track number F Display area for the track names as well as artist and album G Random playback MIX or repeat function RPT H Playing time You can switch between the following modes with the DIS ESC button C n C display C n C d...

Page 29: ...p in the C n C menu For further details please read the following section The C n C menu Function Menu item Options Random play back MIX MIX FOLDER Mix tracks of the current folder MIX ALL Mix all the tracks MIX MAG 1 Mix the tracks of all CDs in the CD changer MIX SONG 2 Mix all the tracks with the same track name MIX ALBUM 2 Mixx all the tracks with the same album name Repeating tracks REPEAT RE...

Page 30: ...ect the desired function press the rocker switch or Press the OK button To select the desired option among several options press the rocker switch or Press the rocker switch to switch on the selected option or the rocker switch to switch it off Press the OK button to select a different function or press the DIS ESC button to exit the menu 쏅 쏅 쏅 쏅 쏅 쏅 ...

Page 31: ...e CD must be in the magazine To select a connected CD changer as audio source press the SOURCE button 1 repeatedly until CDC appears on the display If you select a CD changer as audio source for the first time MAG SCAN appears on the display until the CD changer is operational The CD changer display appears The playback starts Selecting a CD To select a CD press the rocker switch or LOADING CD brie...

Page 32: ...ndom play back MIX MIX CD Mix the tracks on the current CD MIX ALL Mix all the tracks Repeating tracks REPEAT REPEAT TRACK Repeat the current track REPEAT DISC Repeat the current CD The CD changer menu To select a function and its desired option in the CD changer menu press the MENU button 9 The CD changer menu opens To select the desired function press the rocker switch or Press the OK button To ...

Page 33: ...he Bluetooth player Enter the number sequence by pressing the corresponding buttons of the A keys 쏅 쏅 쏅 쏅 쏅 쏅 쏅 쏅 After entering one digit the device automatically switches to the next one To correct any entry er rors select the corresponding digit by pressing the rocker switch or again After entering the complete PIN number press the OK button The display briefly shows START PAIRING Note Entering ...

Page 34: ... in the chapter Bluetooth phone call CONNECTION FAILED PLAY FROM THE DEVICE VIA BLUETOOTH The car sound system can establish a Bluetooth connec tion to the Bluetooth player but the Bluetooth player can transfer audio data e g since you currently have a menu open on the Bluetooth player If the transfer of audio data fails you can se lect on the Bluetooth player or the stream ing ready cell phone wh...

Page 35: ...h streaming mode Functions in the Bluetooth streaming mode Function Action Display response Selecting tracks Press the rocker switch or Playing the next track Repeats the track Press again Plays the previous track ...

Page 36: ...ternal audio sources such as portable CD players MiniDisc players MP3 players or a non C n C ready Blaupunkt interface The C n C interface from Blaupunkt C n C Command and Control allows an even more convenient control of devices and data carriers that are connected to the car sound system via a C n C ready Blaupunkt interface This device is factory set for the connection of C n C ready Blaupunkt ...

Page 37: ... connect other external audio sources via the rear AUX input such as portable CD players MiniDisc players or MP3 players Note An adapter cable is needed to connect an external audio source via the rear AUX input You can obtain this cable Blaupunkt no 7 607 897 093 from your Blaupunkt dealer If you want to connect such an external audio source proceed as follows Check whether the non C n C mode is ...

Page 38: ... You can play an external audio source simultane ously with any other audio source of the radio radio CD USB or Bluetooth streaming This function allows you e g to connect a mobile Blaupunkt navigation device as external audio source and to play the navigation announce ments via the radio loudspeakers while listening to one of the other audio sources Note that the other audio source is not muted i...

Page 39: ...open the Syst system menu Press the rocker switch or until the CNC EDIT menu item is selected Press the OK button to call up the menu item Themenudisplaysthe3C n Cdevices DEVICE 1 to DEVICE 3 Select a device with the rocker switch or Press the OK button You can now enter the four digit PIN number of the device Enter the number sequence by pressing the corresponding buttons of the A keys 쏅 쏅 쏅 쏅 쏅 ...

Page 40: ...ntly established This connection remains in effect as long as the cell phone is within range If the connection is interrupted e g because you moved the cell phone outside the range the con nection is automatically re established as soon as you are back within range If you want to connect another registered cell phone with the car sound system you can do so manually pleasereadthesection Managingreg...

Page 41: ...tion or the cell phone that was connected last If the cell phone is not available the display briefly shows NO DEVICE FOUND BLUETOOTH CONNECTION FAILED 쏅 쏅 쏅 쏅 Determining the master telephone If you register several telephones with the de vice you can determine a master telephone The master telephone has a higher priority than the other registered telephones If the device is switched on it first at...

Page 42: ...er all registered Bluetooth devices and return to the Bluetooth menu OR Use the rocker switch or to select the menu item NO or EXIT Press the OK button to retain all registered Bluetooth devices and return to the Bluetooth menu 쏅 쏅 쏅 쏅 쏅 쏅 쏅 Managing registered Bluetooth devices in the device list To mange the registered Bluetooth devices in the device list open the Bluetooth menu Press the rocker...

Page 43: ...number stored in the phone book of the connected cell phone see the section The phone book of the cell phone 쏅 쏅 Selecting a phone number from the history see the section Calling a phone number from the history To enter a phone number and make a call or to save it open the Bluetooth menu Press the rocker switch or until the DIAL NEW menu item is selected Press the OK button to call up the menu ite...

Page 44: ...ook of the device is selected Press the OK button to call up the menu item The ADD NEW menu item is selected Press the OK button 쏅 쏅 쏅 쏅 쏅 쏅 You can now enter your the name of the entry with up to 20 characters Enter the name by pressing the correspond ing buttons of the A keys Select the desired letter if necessary by pressing a button several times After entering one letter the device automatica...

Page 45: ...Bluetooth menu 쏅 쏅 쏅 쏅 쏅 쏅 쏅 쏅 쏅 쏅 쏅 쏅 쏅 쏅 Press the rocker switch or until the RADIO menu item phone book of the device is selected Press the OK button to call up the menu item Press the rocker switch or until the DELETE menu item is selected Press the OK button The entries of the phone book of the device are displayed Select the desired entry with the rocker switch or Press the OK button The sel...

Page 46: ...numbers are available under the entry e g an office or cell phone number it is indicated by means of corresponding symbols on the display To call the first number of the entry press the button 5 쏅 쏅 쏅 쏅 쏅 To call a different number of the entry Press the OK button All numbers stored under this entry are dis played Select the desired number with the rocker switch or Press the button 5 The call is bei...

Page 47: ...The menu for the number entry is automatically opened with the first button pressed 쏅 쏅 쏅 쏅 쏅 쏅 To call a number stored under a number key press and hold the corresponding button of the keys A for approx 2 seconds To use voice dialing use the rocker switch or to select the VR DIAL menu item Press the OK button The voice recognition is activated The display shows SPEAK NOW Say the name for the desir...

Page 48: ...letter the device automatical ly switches to the next one To correct any entry errors select the corresponding digit by press ing the rocker switch or again After entering the complete name press the OK button The new Bluetooth name is stored 쏅 쏅 쏅 쏅 쏅 쏅 쏅 Sound settings The following sound settings can be changed in the Audio menu Adjusting bass treble and volume distribu tion Selecting the sound...

Page 49: ... the OK button to select a different function or press the DIS ESC button to exit the menu 쏅 쏅 쏅 쏅 쏅 쏅 쏅 쏅 쏅 쏅 Notes Only one sound preset can be switched on at any time To activate no sound preset switch off the currently switched on sound preset To obtain a perfect sound the presettings can be supplemented further by the equalizer settings according to personal preferences If you change the leve...

Page 50: ... or repeatedly until the EN AUDIO Enhanced menu menu item is selected 쏅 Press the OK button to call up the menu item The Enhanced menu appears in the Enhanced menu press the rocker switch or to select one of these menu items EBASS Bass ETREBLE Treble EMIDDLE Middle EXBASS Increasing bass at low volume Press the OK button to call up the menu item Press the rocker switch or to switch between the ava...

Page 51: ...ter entering the complete welcome text press the OK button to store the welcome text entered 쏅 쏅 쏅 쏅 쏅 쏅 Notes To quit the text input without changing the welcome text press the DIS ESC button If the text entry is interrupted e g by a traffic announcement the previous changes are not stored Changing time settings The following settings can be changed in the System menu Switching time display on off...

Page 52: ...e BEEP ON Speed dependent volume increase AUTO SND 쏅 쏅 쏅 쏅 쏅 쏅 쏅 쏅 Adjusting power on volume ON VOL LAST VOL To adjust the power on volume in the System menu press the rocker switch or repeatedly until the ON VOL menu item is selected Press the OK button to call up the menu item The current power on volume is displayed Set the power on volume with the rocker switch or Press the OK button to select...

Page 53: ...ating deactivating the signal tone BEEP ON You can deactivate the signal tone that sounds as a confirmation in the menus or when storing the stations on the station buttons in the System menu press the rocker switch or repeatedly until the BEEP ON menu item is selected Press the OK button to call up the menu item Switch between the settings with the rocker switch or BEEP ON Signal tone on BEEP ON S...

Page 54: ...connection as described in the installation instructions You can adjust the display brightness separately for day and night In the System menu press the rocker switch or repeatedly until the D DAY 쏅 쏅 쏅 쏅 쏅 쏅 day brightness or D NIGHT night brightness menu item is selected Press the OK button to call up the menu item The current setting is displayed Use the rocker switch or to select the desired s...

Page 55: ... press the rocker switch or repeatedly until the CONTSCAN menu item is selected Press the OK button to call up the menu item Switch between the settings with the rocker switch or CONTINUOUS COLSCAN Colour change is on CONTINUOUS COLSCAN Colour change is off Press the OK button to select a different function or press the DIS ESC button to exit the menu 쏅 쏅 쏅 쏅 쏅 쏅 쏅 Changing the scan time SCANTIME ...

Page 56: ...to 7 FREQ 80 Hz 120 Hz or 160 Hz Press the rocker switch or to change the setting 쏅 쏅 쏅 쏅 쏅 쏅 쏅 After you performed the settings for all menu items Press the OK button to select a different function or press the DIS ESC button to exit the menu Activating deactivating demo mode The Demo mode uses animations to show you which functions the device offers To switch the demo mode on or off switch off t...

Page 57: ...talling the new software To start the installation connect the USB data carrier with the new software to the device Press the MENU button 9 Press the rocker switch to open the Syst System menu Press the rocker switch or to select the SW DNL software download function Press the OK button to start the installation of the new software 쏅 쏅 쏅 쏅 쏅 Note If a USB data carrier is not connected the display ...

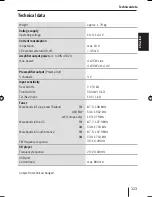
Page 58: ...er output Preamp Out 5 channels 3 V Input sensitivity Rear AUX IN Front AUX IN Tel Navi input 2 V 6 kΩ 500 mV 6 kΩ 10 V 1 kΩ Tuner Wavebands in Europe and Thailand FM AM MW LW Europe only Wavebands in the US FM AM Wavebands in South America FM AM FM frequency response 87 5 108 MHz 531 1602 kHz 153 279 kHz 87 7 107 9 MHz 530 1710 kHz 87 5 107 9 MHz 530 1710 kHz 35 16 000 Hz CD player Frequency resp...

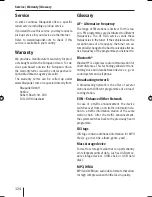
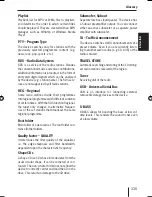
Page 59: ...le leaves the reception area of a frequency the tuner can au tomaticallychangetothebestreceivablealterna tive frequency of the programme you listened to Bluetooth Bluetooth is a wireless radio communication for short distances This technology allows for trans mitting voice and data between devices e g car sound system and cell phone Broadcasting network A broadcasting network is the offer of sever...

Page 60: ...The root folder con tains all other folders Quality factor QUALITY It determines the filter quality of the equalizer i e the edge steepness and filter bandwidth dependent upon the characteristic frequency Shape CDs A shape CD is a CD whose form deviates from the usual circular shape It can be cornered or con toured The non circular form does not allow the device to correctly center and read the CD i...

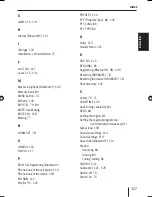
Page 61: ...io CD R CD RW 80 125 CD changer 96 97 CD mode Inserting removing a CD 80 Playing an MP3 WMA CD 89 Start 87 89 Changing the scan time 120 Cleaning 71 CLK MODE 12HR and 24HR 116 Clock time display 116 COL SCAN 119 Connection Bluetooth 105 106 Controls 73 CONTSCAN 120 Cut off frequency 121 D D DAY D NIGHT brightness for day and night 119 DEL ALL 107 DELETE 107 Demo mode 121 Device card 76 Device soft...

Page 62: ...evice 109 PIN NUM 112 Playlist 92 125 PRESETS 114 PTY Program Type 86 125 PTY LANG 86 PTY TYPE 86 Q QUAL 115 Quality factor 115 R RDS 85 125 REGIONAL 85 Registering Bluetooth 98 106 Resetting NORMSET 78 Resetting the device NORMSET 78 Root directory 125 S Safety 70 71 SCAN TIME 120 Seek tuning sensitivity 84 SENS 84 Setting the region 81 Setting the regional programme See Alternative frequency AF ...

Page 63: ...stations storing 82 Alternative frequency AF 85 Seek tuning sensitivity 84 Selecting a programme type 86 Selecting a region 81 Selecting a waveband 82 U USB medium 125 Connecting 78 Requirements 79 Selecting 79 89 V Version numbers 121 Volume 74 76 Changing presettings 117 Increase speed dependent 118 W Waveband 82 Welcome text 116 WMA 79 89 X X BASS 113 125 ...

Page 64: ...ory settings listed here apply only to the tuner region Europe EU USA US or South America S AM TA VOL EU only 20 ON VOL 15 MUTE VOL 0 TEL VOL 17 SENS SENS HIGH 6 OFF CLOCK OFF CLOCKSET 0 00 CLK MODE 24 HR MODE BEEP ON ON D DAY D NIGHT 16 15 ANGLE 0 AUTO SOUND OFF SCAN TIME 10 MIX AUX OFF DEMO MODE OFF PIN NUM Bluetooth 1234 RDS EU only ON TRAFFIC EU only OFF PTY EU US S AM only OFF REG EU only ON ...

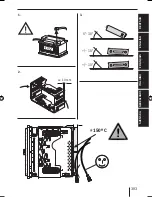
Page 65: ...eSteckerfürdieLine In oder Line Out Buchse kontaktiert werden Fremdgerätemassen dürfen nicht an der Autoradiomasse Gehäuse angeschlossen werden Installation instructions Safety instructions When carrying out installation work and making connections please observe the follow ing safety instructions Disconnect the negative terminal of the bat tery When doing so please observe the ve hicle manufactur...

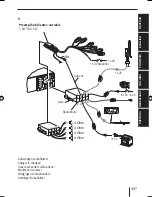
Page 66: ...en Medföljande monteringsdetaljer B USB cable D Als Sonderzubehör erhältlich Available as an optional accessory Disponible en option Reperibili come accessori extra Als speciale accessoire verkrijgbaar Tillval Preamp Sub Center out cable 7 607 001 512 A 7 607 621 C 7 608 Einbausätze Installation kits Kits de montage Set di montaggio Inbouwsets Monteringssatser E BLAUPUNKT A ...

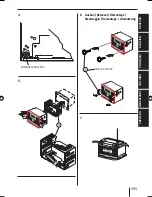
Page 67: ...ENGLISH DEUTSCH FRANÇAIS ITALIANO NEDERLANDS SVENSKA 393 3 12V 1 2 ca 10 mm 0 30 10 10 15 mm 150º C ...

Page 68: ...394 Mikrofon E New Jersey MP68 Pin 10 MIC INPUT Pin 9 MIC GND C D rot red rouge rosso rood röd schwarz black noir nero zwart svart BLAUPUNKT ...

Page 69: ...ENGLISH DEUTSCH FRANÇAIS ITALIANO NEDERLANDS SVENSKA 395 12V 7 5 6 Ausbau Removal Démontage Smontaggio Demontage Urmontering 8 613 150 002 B 4 antenna connection A ...

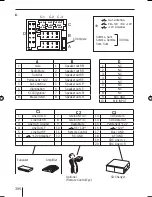
Page 70: ...ub Out 3 Speaker out RF 4 Permanent 12V 4 Speaker out RF 5 Aut antenna 5 Speaker out LF 6 Illumination 6 Speaker out LF 7 Kl 15 Ignition 7 Speaker out LR 8 Masse GND 8 Speaker out LR C1 C2 C3 1 Line Out LR 7 Telefon NF in 13 CDC Data In 2 Line Out RR 8 Telefon NF in 14 CDC Data Out 3 Line Out Ground 9 Radio Mute 15 Permanent 12V 4 Line Out LF 10 RC 12V 16 12V 5 Line Out RF 11 Remote Control 17 Bus...

Page 71: ... Subject to changes Sous réserve de modifications Modifiche riservate Wijzigingen voorbehouden Ändringar förbehålles 12V 1 3 5 2 4 6 8 A Relais 7 RR RF LF LR 4 Ohm 4 Ohm 4 Ohm 4 Ohm BN Preamp Sub Center out cable 7 607 001 512 12V Sub out Kl 15 12V 12V Amplifier 12V 12V Radio Mute Gala ...

Page 72: ...s material may be reproduced copied or distributed for personal use only ThisproductisprotectedbycertainintellectualpropertyrightsofMicrosoft Useordistributionofsuchtechnology outside of this product is prohibited without a license from Microsoft ...

Page 73: ...ed in radio pass in a safe place Prière de conserver soigneusement la carte d autoradio remplie Tenete per favore il libretto di apparecchio debitamente riempito in un posto sicuro Bewaar de ingevulde apparaatpas op een veilige plaats Vänligen förvara ifyllt apparatpass på säker plats ...

Page 74: ...66 700 01 46 66 706 Italy I 02 369 62331 02 369 62464 Luxembourg L 40 4078 40 2085 Norway N 47 64 87 89 60 47 64 87 89 02 Portugal P 2185 00144 2185 00165 Spain E 902 52 77 70 91 410 4078 Sweden S 08 7501850 08 7501810 Switzerland CH 01 8471644 01 8471650 Czech Rep CZ 02 6130 0446 02 6130 0514 Hungary H 76 889 704 Poland PL 0800 118922 022 8771260 Turkey TR 0212 335 07 23 0212 346 00 40 USA USA 80...

Reviews: