15
FUNCTION SETTING Menu
The FUNCTION SETTING menu is used to set the items relat-
ed to the camera functionalities.
OSD
EXPOSURE
WHITE BALANCE
PICTURE
LENS PARAMETERS
SYSTEM SETUP
FUNCTION SETTING
SAVE AND EXIT
EXIT
FUNCTION SETTING MENU
PRESET SETUP
TOUR SETUP
PATTERN SETUP
SCAN SETUP
IDLE TIMER
IDLE ACTION
EXIT
003
OFF
Note: The number of available presets may be limited by
the head-ins, controllers, and DVRs that are connected to
your dome system.
PRESETS SETUP:
Preset is to store the PTZ information (such
as: Pan and Tilt positions, focal length etc.) under the specific
condition, and call the camera PTZ quickly to shoot to the
specified location that you want the camera to move to.
Note: Presets not only save desired image positions, var-
ious picture settings such as brightness, exposure val-
ues, white balance and other variables are also saved and
stored.
This function allows you to achieve the desired status instant-
ly, even without adjusting the following items each time.
Pan/Tilt Position, Zoom Position, Digital Zoom On/Off,
Focus Auto/Manual, Focus Position, AE Mode, Shutter
control parameters, Bright Control, Iris control parame-
ters, Gain control parameters, Exposure Compensation
On/Off, Exposure Level, Backlight Compensation On/
Off, White Balance Mode, R/B Gain, Aperture Control,
WD Parameter.
The menu is used to manage the presets.
PRESETS NUMBER:
The current preset number that you are
managing.
PRESET MEMORY: ON/OFF
When this feature is set to ON,
All presets store camera positions and image parameters.
When this feature is set to OFF, 1-16 presets still store camera
positions and image parameters, but 17-128 presets will only
store camera positions. You can set the presets to number
17-128 if you don’t want the preset to memorize the image
parameter settings.
SET NEW PRESET:
To set up the preset of the above preset
number.
1. Push the joystick to the right to enter this setting menu,
you will see “call preset 1 to end”.
2. Adjust the camera to the position that you want the cam-
era to be, and then call the preset 1 using the keyboard
to save the position to be the current preset.
3. Finished.
DELETE PRESET:
Delete the above preset.
1. Push the joystick to the right to delete this preset.
2. Finished.
EXIT:
Push the joystick to the right to exit this level menu.
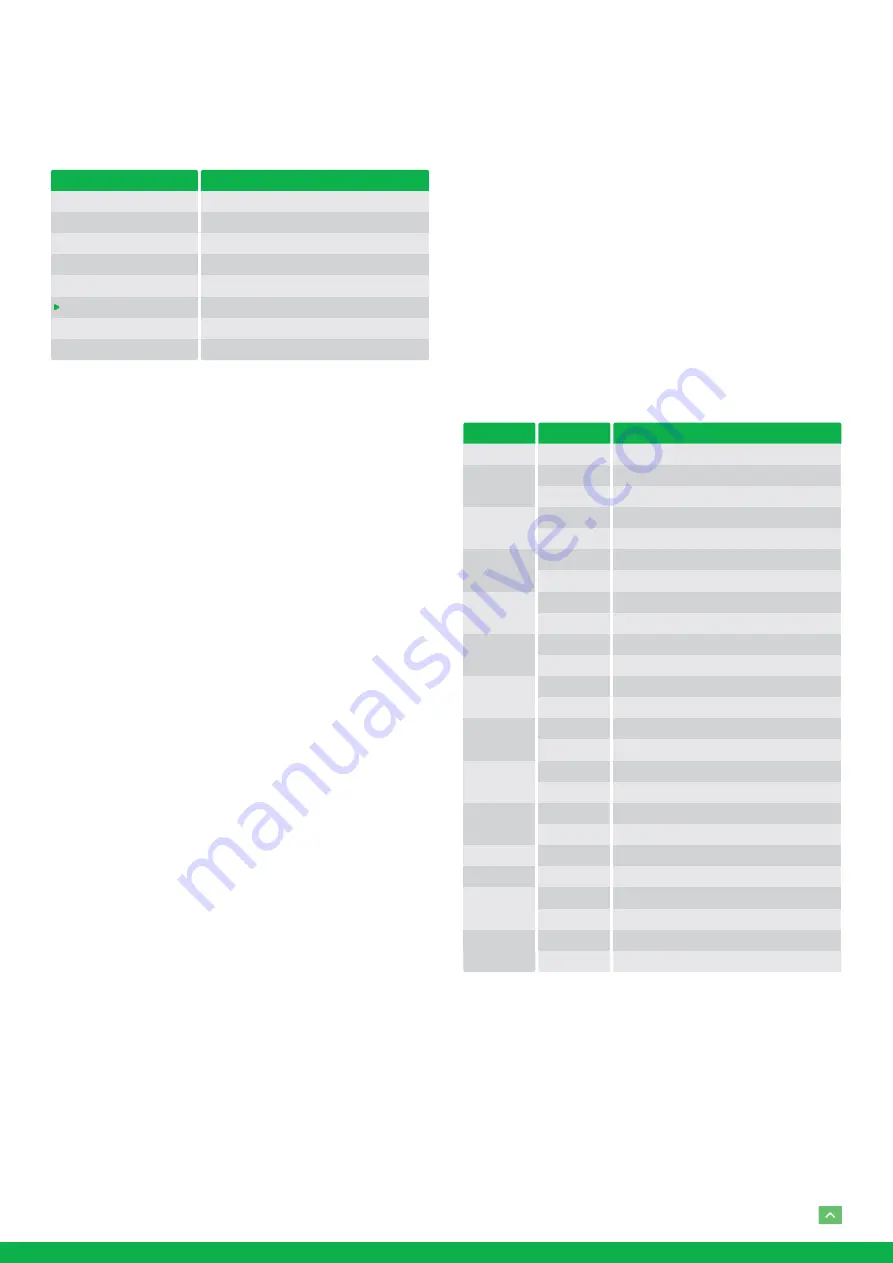
In order to use the special functions of the camera, the fol-
lowing presets are predefined for specific functions (You can
find the default predefined preset at Web interface, Setup
→
PTZ
→
Advanced Settings):
SYSTEM SETUP MENU
LENS RESET
OPEN BACKLIGHT
CLOSE BACKLIGHT
OPEN AUTO SHUTTER
CLOSE AUTO SHUTTER
OPEN SCREEN DISPLAY
CLOSE SCREEN DISPLAY
OPEN DIGITAL ZOOM
CLOSE DIGITAL ZOOM
DISABLE WDR
ENABLE WDR
AUTO IRIS
MANUAL IRIS
AUTO WHITE BALANCE
MANUAL WHITE BALANCE
IMAGE NORMAL
IMAGE FLIP
COLOR MODE
BLACK AND WHITE MODE
AUTO DAY/NIGHT MODE
OPEN MENU
START PATROL
SET PATROL ROUTE
AUTO FOCUS
MANUAL FOCUS
OSD
SET
CALL
SET
CALL
SET
CALL
SET
CALL
SET
CALL
SET
CALL
SET
CALL
SET
CALL
SET
CALL
SET
CALL
SET
CALL
SET
CALL
SET
OSD
54
55
56
57
58
59
60
61
63
64
65
95
97
99
TOUR SETUP:
The menu is used to manage the tours. Total of
4 tours can be managed.
SEQUENCE NUMBER:
The current tour number that you
are managing.
DEFAULT DWELL:
Set the interval time between each of
presets in the above tour, the value can be selected from
3 to 255 sec.


