7
Set Up a Purification
Warning
»
Never exceed the maximum pressure or flow rate for the
used column.
»
Always use Biotage Safety Valve (P/N 417115SP) when
processing columns or combinations (e.g. column and dry
load vessel) with a total CV larger than 0.8 L.
»
Never use columns or combinations with a total CV larger
than 3.1 L.
»
Never use the system without a column mounted or the column
inlet and outlet tubing coupled together.
1. To base the purification on a previous run, press
Runs
and
then see “Base a New Run on a Previous Run” on page 19.
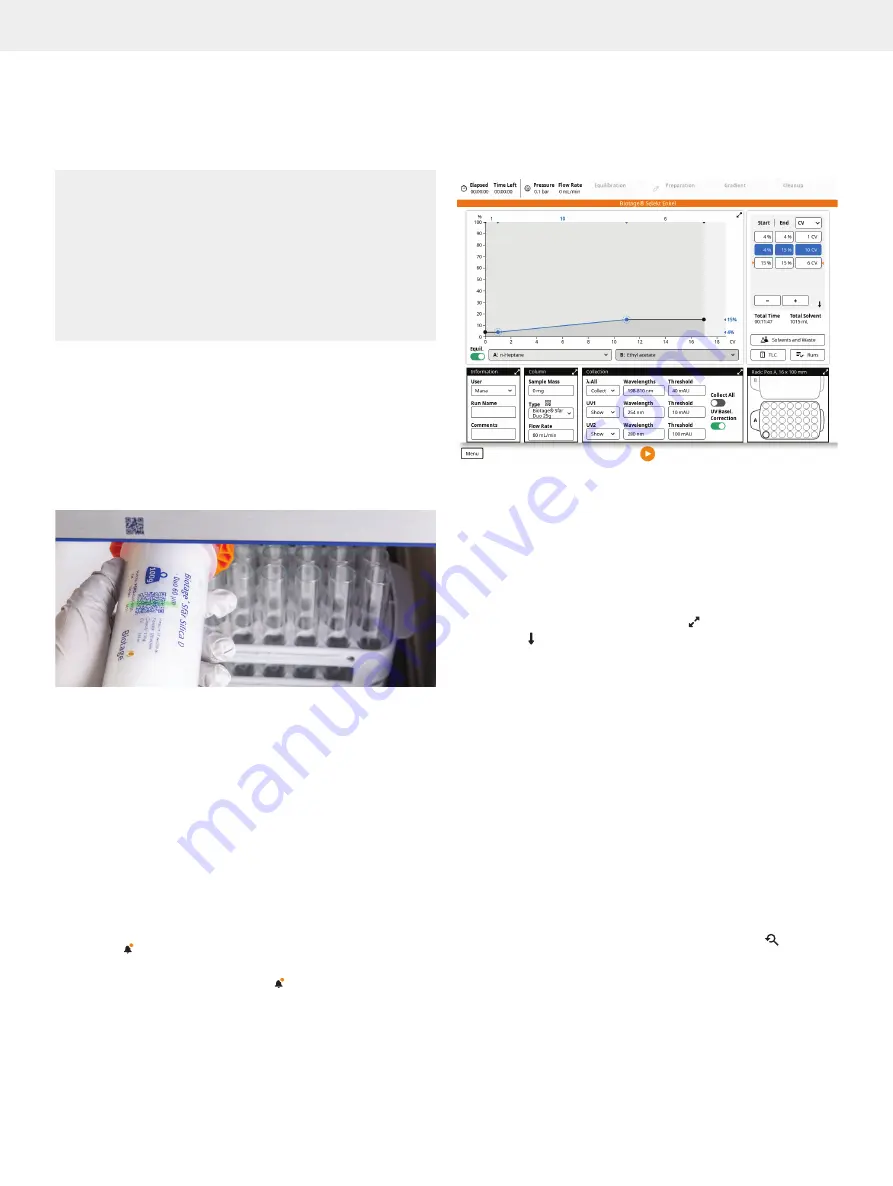
2. Either scan your column using the QR reader underneath the
touch screen (see Figure 15) or select the column type from
the
Type
drop-down list in the
Column
panel (see Figure 16).
Note:
If using a column or a combination of a column and
e.g. dry load vessel with a total CV larger than 0.8 L, a safety
valve supplied by Biotage (P/N 417115SP) must be used.
Figure 15.
The QR reader is located underneath the touch screen.
3. Place the column in a column holder on the right side of the
system or on the front (up to 50g).
4. Connect the inlet and outlet tubing to the column.
5. Place the collection rack(s) that you want to use on the
collection bed. Racks with vessel volumes up to 120 mL
require the collection tray. Racks are chosen by selecting the
correct type from the
Select Rack
drop-down list in the
Rack
panel or automatically identified by RFID when placed on the
collection bed
R
. (See more in “Specify the Rack Parameters”
6. Set up the run parameters as described in the following
sections.
Note:
If the button is visible in the bottom right corner, the run
cannot be started due to e.g. that one or more run parameters
are either missing or incorrect. Press for more information.
Figure 16.
The run setup view.
Specify the Gradient
The gradient can be set up using the gradient graph or the
gradient table. It is also possible to calculate a gradient from
R
f
values obtained from TLC analysis (see page 8).
Gradient Graph and Table
Expand the gradient graph by pressing and the gradient table
by pressing .
Change the length unit by selecting
CV
,
mm:ss
, or
mL
from the
unit drop-down menu in the gradient table or the expanded
gradient graph.
To add a gradient segment, press the
+
button in the gradient
table or the expanded gradient graph. The new segment will be
added after the selected segment or node or at the end of the
gradient if nothing is selected.
To delete a node or segment, select it and press the
–
button in
the gradient table or the expanded gradient graph.
To increase or decrease the length of a gradient segment or
change the solvent mix, either 1) drag the segment or node to
the desired position in the gradient graph, or 2) change the
value in the gradient table.
Note that it is possible to zoom in and out of the gradient using
the pinch-to-zoom feature. To reset the zoom, press .
Set Up a Purification
Summary of Contents for Selekt Enkel
Page 1: ...Biotage Selekt Enkel User Manual...
Page 42: ...40 Biotage Selekt Enkel User Manual Biotage 2022 Notes Notes...
Page 43: ......


