background image

BGS technic KG

Bandwirkerstr. 3

D-42929 Wermelskirchen

Tel.: 02196 720480

Fax.: 02196 7204820

[email protected]

www.bgstechnic.com

© BGS technic KG, Copying and further use not allowed

BGS 3255 

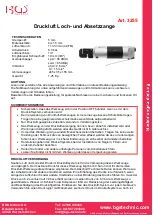
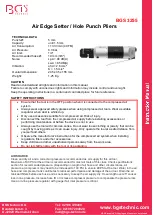
Air Edge Setter / Hole Punch Pliers 

TECHNICAL DATA 

Punch-Ø: 

5 mm 

Capacity: 

until 1.5 mm 

Air Consumption: 

113.3 l/min (4 CFM) 

Air Pressure:   

6.3 bar 

Air Inlet: 

1/4" 

Recommended hose Ø: 

10 mm (3/8") 

Noise:   

LpA = 90 dB(A) 
LwA = 85 dB(A) 

Vibration: 

ahd = 2.6 m/s² 
K = 1.5 m/s² 

Overall dimensions: 

245 x 35 x 155 mm 

Weight: 

1.25 Kg


CAUTION 

Read and understand all rights and information in this manual. 
Failure to comply with unconscious rights and information may include control and oversight. 
Keep the operating instructions in a certain and controlled place for future reference. 

SAFETY INSTRUCTIONS 

Ensure that the tool is in the OFF position when it is connected to the compressed air
system.

Always wear approved safety glasses when using compressed air tools. Wear a suitable
respirator when dust is whirled up.

Only use accessories suitable for compressed air. Risk of injury.

Disconnect the tool from the compressed air supply before installing accessories or
performing maintenance or before the device is not in use.

Always use the tool with common sense. Do not wear loose clothing or jewelry that can be
caught by moving parts as it can cause injury. Only operate the tool at a safe distance from
yourself and others.

Observe the manufacturer's instructions for the compressed air system when installing
regulators, filters and other accessories.

Keep children and other unauthorized persons away from the work area.

Do not let children play with the tool or its packaging.

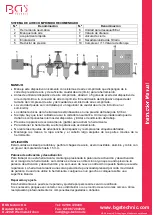
AIR SOURCE 

Clean and dry air and a correct air pressure is recommended as air supply for this air tool. 
Maximum of 90 PSI at the air tool is recommended for most air tools of this class. Check specifications 
section for recommended pressure. (Depending on length of air hose and other circumstances, air 
pressure at compressor may need to be increased to 100 PSI to ensure 90 PSI at the tool. Water in the air 
hose and compressor tank contributes to reduced performance and damage of the air tool. Drain the air 
tank and filters before each use and as necessary to keep the air supply dry. Hose length over 25” causes 
loss in line pressure. Increase hose ID or increase compressor pressure to compensate the pressure loss

Use an in-line pressure regulator with gauge if air inlet pressure is critical.


Summary of Contents for 3255

Page 1: ...rt wird oder Wartungen durchgef hrt werden oder das Ger t nicht in Gebrauch ist Immer das Werkzeug mit gesundem Menschenverstand betreiben Tragen Sie keine weite Kleidung oder Schmuck die von beweglic...

Page 2: ...k nnen innere Bauteile des Ger tes besch digt und die Arbeitsleistung eingeschr nkt werden Zur Bet tigung des Werkzeugs den Bet tigungshebel Ausl ser dr cken Zum Stoppen des Werkzeugs Bet tigungshebel...

Page 3: ...ompressor Anforderung an Luftvolumen und Luftdruck erf llt Undichtigkeit Verwenden Sie Teflonband zum Abdichten aller Armaturen und Verbindungsst cke O Ringe und Dichtungen berpr fen Verschlissene bzw...

Page 4: ...s or performing maintenance or before the device is not in use Always use the tool with common sense Do not wear loose clothing or jewelry that can be caught by moving parts as it can cause injury Onl...

Page 5: ...tool refer to a working pressure of 6 3 bar Always be careful when using the Air Grinder In case of negligent operation internal components of the device can be damaged and the work performance can b...

Page 6: ...essure make sure compressor matches tool s air pressure and consumption needs Air leakage Use Teflon tape at all fittings and joints Check tool for worn or damaged O rings seals Worn damaged wear tear...

Page 7: ...ppliquant le bon sens Ne portez pas de v tements amples ou des bijoux qui peuvent tre happ s par des composants en mouvement et pourraient provoquer des blessures Tenez l outil une distance s re de vo...

Page 8: ...nts internes de l appareil et limiter les performances de travail Pour faire fonctionner l outil appuyez sur le levier de commande g chette Pour arr ter l outil rel chez le levier de commande Ne retir...

Page 9: ...tes Utilisez de la bande en T flon pour tablir l tanch it de toutes les armatures et raccords V rifiez les joints toriques et autres joints Remplacez si n cessaire les pi ces us es ou endommag es Acce...

Page 10: ...o est en uso Maneje la herramienta siempre y cuando se encuentre en perfecto estado de salud No lleve puestas prendas o joyas que puedan quedar atrapadas en partes m viles ya que puede causar lesiones...

Page 11: ...o inadecuado puede da ar los componentes internos del dispositivo y limitar el rendimiento de trabajo Presione la palanca de accionamiento gatillo para activar la herramienta Para detener la herramien...

Page 12: ...en t rminos de caudal y presi n de aire Fugas Utilice una cinta de tefl n para sellar las v lvulas y los puntos de conexi n Comprobar las juntas t ricas y el resto de juntas En caso necesario sustituy...

Page 13: ...producto folgenden einschl gigen Bestimmungen entspricht complies with the requirements of the est en conformit avec les r glementations ci dessous esta conforme a las normas Angewandte Normen Norme...

Reviews: