Beta Three TQ-22 Reference Manual Download Page 10

-2-

UG-TQ22-EN (V2.2-211226)
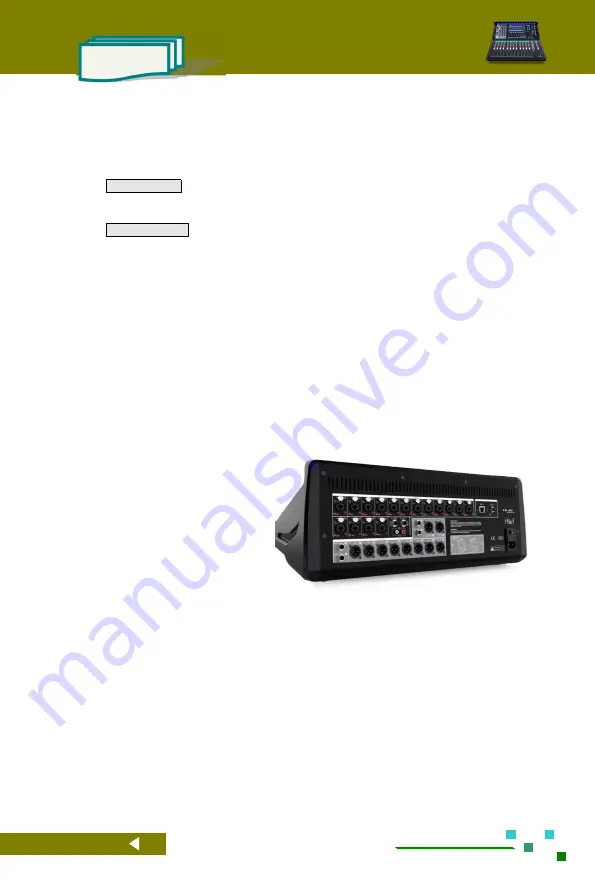
TQ-22

Mixer Reference

manual

1.2.1. Main features

With the digital signal processors ( DSP ) of the fourth generation ( SIMD core ), precise 450MHz

/

40bit floating-point mathematical operation,24bit

/

48KHz high performance ADC

/

DAC, Concerned

about the details of the sound you care about, showing a rich sound content.

TQ-22

digital mixer is configured with:

Input (22ch)

of 16-channels Mic

/

Line with full digital control gain analog pre-processing

( XLR female plug and ¼" TRS combinatorial input interface ), 2 stereo Line-In channels,

1 stereo USB Media channel ( U disk playback or Bluetooth audio ).

Output (18ch)

of 8 channels AUX, 4channels MTRX, 1 stereo channel Main L

/

R

( Both

are XLR male plug interfaces, differential balanced output circuits )

1 stereo channel USB recording, 1 stereo headphone channel.

All Mic

/

Line input channels are made of high quality professional grade microphone pre-amplifier:

high dynamic, low distortion, full digital control 63-stage analog gain, that easily meet your

requirements, to achieve good signal matching.

All Mic

/

Line input channels are configured with 48V Phantom power supply, Polarity switching

(

Pol.

), Noise gate (

Gate

), Compressor (

Comp

), 4-band parametric frequency Equalizer (

PEQ

)

/

including high shelf filter(

HSF

)

low shelf filter(

LSF

), high pass filter (

HPF

), low pass filter

(

LPF

).

All output channels are configured with Delay, Compressor (

Comp

), graphic frequency Equalizer

(

GEQ

), 4-band parametric frequency Equalizer (

PEQ

)

/

including high shelf filter(

HSF

)

low shelf

filter(

LSF

), high pass filter (

HPF

), low pass filter(

LPF

).

Configuration 4 professional DSP effectors (

FX

), 6 effect types:

Chorus

,

Echo

,

Flanger

,

Pitch-Shift

,

Reverb

,

Stereo Delay

, totally over one hundred types of effect preset.

Use the functions such as wizards,

message indicators and [

Scenes

] /

[

Presets

] /

[

Copy to

]

help users easily

complete channel configuration, gain

settings, and effect selection. [

User

Scenes

]

and [

Presets

]

can be stored or

recalled from the internal or external

USB disk.

12 DCA volume groups and 8 MUTE

groups that can be easily operated with

one key.

Perfect switch "pop" sound automatic elimination function in the full voltage range ( 85Vac

~

240Vac), than no annoying switch impact sound .

USB Media playback, support

MP3

,

AAC

,

WAV

,

AIFF

,

APE

or

FLAC

file format. Direct use of

external USB disk recording.

USB Bluetooth interface, plug and play, connect to your phone's Bluetooth device at any time to

achieve wireless music playback.

With light entity touch switch and intelligent servo electric fader, give you the experience of smooth

hand feeling. More visual and quick control is obtained with the color capacitive touch screen, user

graphic operations interface combined with hardware physical buttons.

The large 1.44 "color TFT guide screen provides real-time channel parameter information at a

glance. The user-definable content includes:

(1). Eye-catching channel names. (2). Nine

channel colors You can choose one of them. (3). A large number of channel icons are

preset, you can click to change.

Summary of Contents for TQ-22

Page 1: ...TQ 22 DIGITAL LIVE SOUND CONSOLE Applicable to Firmware Version 2 2 Reference manual Digital mixer...

Page 2: ...UG TQ22 EN V2 2 211226 TQ 22 Mixer Reference manual...

Page 3: ...ion and maintenance of this product Please make sure to firstly read the Important Safety Information on page I of this Manual Revision history Revision Revision description and content updated V1 0 I...

Page 4: ...the power cord at places far away from the heat or otherwise the skin of the power cord will be softened and may cause a fire or an electric shock Please do not use the power cord whose electric cont...

Page 5: ...nerated in special installation conditions If the machine indeed brings harmful interference to radio or television reception can be determined by turn on or turn off the machine users are encouraged...

Page 6: ...TQ 22 Mixer Reference manual Packing content of TQ 22 Mixer TQ 22 Main Unit Not including tablet 1pcs AC power cord 1pcs WIFI wireless adapter USB interface 1pcs Bluetooth adapter USB interface 1pcs U...

Page 7: ...Monitor headphone 9 1 7 Restrictions on USB interface power 9 Chapter 2 Detailed Description of TQ 22 10 2 1 Input Channels 11 2 1 1 Home of the input channels 11 2 1 2 Overview of input channels 12 2...

Page 8: ...Bluetooth playback 38 2 6 Grouping shortcuts 39 2 6 1 DCA volume grouping 39 2 6 2 Mute Groups 41 2 7 User defined fader 42 2 8 SCENES 43 2 9 System settings 44 2 9 1 Automatic microphone mixing cont...

Page 9: ...tuning fun easily and contentedly Download the latest available firmware version of TQ 22 install The latest functions for your mixer or optimize and upgrade the performance Timely receive the latest...

Page 10: ...quency Equalizer GEQ 4 band parametric frequency Equalizer PEQ including high shelf filter HSF low shelf filter LSF high pass filter HPF low pass filter LPF Configuration 4 professional DSP effectors...

Page 11: ...ew scenes when needed Automix can be set on AUX1 8 and the input channels include microphones from CH01 to CH16 channels It has intelligent algorithms for weight distribution and gain sharing ISUeasyT...

Page 12: ...ric fader 03 Motorized faders Used to adjust the volume or gain 04 Mute the channel or mute the route In GEQ it is used to zero the gain of the current frequency 05 Monitor button 06 Channel selection...

Page 13: ...the current input channel Current input channel level meter The phantom power indicator and polarity indicator are on to indicate that it is valid 15 Gate Attack start time Release release time Thres...

Page 14: ...gle channel differential balanced output XLR male interface 05 Bus output Main L R single channel differential balanced output XLR male interface 06 Expansion interface reserved 07 AC power input inte...

Page 15: ...ct the input level or even lead to dramatically decay of input signal 4 Same way to setup other input channels single click other can setup other channels or you can use Copy to function to paste the...

Page 16: ...ny time and all the parameters of the TQ 22 digital mixer can be set as the value of the scene TQ 22 digital mixer includes a lot of preset scenes to be used in all kinds of performance occasions In a...

Page 17: ...he mixer it will produce interference Use the phone comes with the charger from other places to take power and the phone as the input source of the mixer will not be a problem 01 Rotate the headphone...

Page 18: ...Channel meter inactive Disabled channel Noise indication invalid Compressor meter invalid DCA channel Status DCA channel Channel icon DCA specific icon DCA Channel color user defined Channel No DCA01...

Page 19: ...and then adjust the knob on the panel 05 SOLO monitor switch 06 Channel gain Changed by fader adjustment 07 Channel linking indicator This indicator lights up when two adjacent channels are linked 08...

Page 20: ...as the same function as the button on the panel 04 Home button click to return to the channel home page 06 Click to switch to the noise gate control page 05 Click to switch to the PEQ control page 08...

Page 21: ...d then output the effect from AUX5 The steps are 1 Select the input channel where CH02 is located and click the button of channel CH02 to enter the edit page 2 Click any button of the bus button to sw...

Page 22: ...nd gain The dotted circle represents the current frequency band the right list shows the parameters click or slide to select the parameter to be adjusted displayed as green text when selected you can...

Page 23: ...he copy control page 07 Click to switch to the compressor control page 10 Click to switch to the channel setting page 09 Click to switch to the parameter preset page 12 The starting point for setting...

Page 24: ...or control page 10 Click to switch to the channel setting page 09 Click to switch to the parameter preset page 12 Threshold which sets the starting point for the limiter to start attenuating the signa...

Page 25: ...he button on the panel 04 Home button click to return to the channel home page 06 Click to switch to the noise gate control page 05 Click to switch to the PEQ control page 08 Click to switch to the co...

Page 26: ...ck to enter scene control page save or load the scene parameters you need It has the same function as the button on the panel 04 Home button click to return to the channel home page 06 Click to switch...

Page 27: ...ameter preset page 12 Channel name icon color user can choose or set Click to enter the setting interface see the next page for details 11 Click to switch to the channel overview page 13 Link the two...

Page 28: ...l name Click this area to manually enter the channel name The maximum is 8 English characters 03 Preset common channel name click to quickly select the channel name 04 Preset common channel icon click...

Page 29: ...ff 06 Channel linking icon when the adjacent two mono channels linked into a stereo channel the logo lights 05 Channel gain Changed by fader adjustment unit dB 07 The compressor icon lights up to indi...

Page 30: ...04 Home button click to return to the channel home page 06 Click to switch to the GEQ control page 05 Click to switch to the PEQ control page 08 Click to switch to the copy to control page 07 Click t...

Page 31: ...to switch to the GEQ control page 05 Click to switch to the PEQ control page 08 Click to switch to the copy to control page 07 Click to switch to the compressor control page 10 Switch to the channel c...

Page 32: ...4 Home button click to return to the channel home page 06 Click to switch to the GEQ control page 05 Click to switch to the PEQ control page 08 Click to switch to the copy to control page 07 Click to...

Page 33: ...to the copy to control page 07 Click to switch to the compressor control page 10 Click to switch to the channel configuration page 09 Click to switch to the parameter preset page 11 Click to switch t...

Page 34: ...age Same function as the button on the panel 03 Scene button click to enter scene control page save or load the scene parameters you need It has the same function as the button on the panel 04 Home bu...

Page 35: ...s displayed in brown and the TFT guide screen is also displayed in brown The color of channels that cannot be routed is not changed Step 3 Use the navigation bar 01 to select the group where the input...

Page 36: ...before the fader AUX4 wants to have all the processing and is controlled by the input channel volume and DCA then the access point is selected as Pst fdr after the fader The above is just an example E...

Page 37: ...parameter value and the system automatically measures two neighboring time you hit the button NOTE This operation can also be performed without the FX settings menu Only FX1 and FX2 have TAP function...

Page 38: ...to enter scene control page save or load the scene parameters you need It has the same function as the button on the panel 04 Mute switch The FX channel route is muted when red is lit and no signal is...

Page 39: ...control page Set the high low shelf filter for the effect 03 Switch to the FX setting menu 04 Switch to the channel parameter copy pages you can copy parameters of current channel to another channel...

Page 40: ...the amount of feedback Scaler Echo gain 2 4 6 Flanger effect Flanger effect can be used to create special effects such as short time delay chorus tremolo etc Frequency Modulation frequency Quick modul...

Page 41: ...riginal pitch Feedback The feedback of output delay signal to the input end Delay Basic delay unit ms RandDelay Random delay unit ms ModFreq The rate of random delay is affected and the decay quantity...

Page 42: ...sent out from the left and right channels through the different decay of the left and right channels like ping pong s motion trail effect Delay Create an effect of a sound that moves back and forth T...

Page 43: ...pages you can copy parameters of current channel to another channel effect 05 Switch to the FX preset parameter management page you can retrieve the pre saved effect parameters eliminating the troubl...

Page 44: ...rol menu 06 Click to switch to the Bluetooth playback menu 07 Click to open the preset management page 08 Click to switch to the channel configuration page 09 Click to switch to the channel overview p...

Page 45: ...nnel overview page 03 Click to switch to the PEQ control menu 04 Click to switch to the USB playback menu 05 Click to switch to the USB recording control menu 06 Click to switch to the Bluetooth playb...

Page 46: ...same time 01 Click the USB group on the navigation bar to switch to the home page and then click the channel label to enter the USB menu As shown above 02 Home button click to return to the home page...

Page 47: ...the button on the panel to quickly switch to the DCA overview page as shown below Operate the button of 02 or click the button on the panel to achieve one key group mute The fader or motorized fader o...

Page 48: ...CA settings menu as shown below 01 DCA group number 02 DCA mute switch The red light indicates mute All pre associated channels will be synchronized with one button mute 03 Input and output channels t...

Page 49: ...output channels will be muted In the system parameter setup menu you can set the mute group as follows Quick Setup Press and hold the mute group button for a long time more than 1 second and then cli...

Page 50: ...ick any fader page button to exit the custom editing menu SKILLS 1 On the main screen use your finger to press and drag the corresponding channel to the custom fader channel and then release to comple...

Page 51: ...to the home menu 02 Save all current parameters as user scenes according to the specified path and scene name 03 The name of the scene currently in use 04 User defined scene preset library placed ins...

Page 52: ...to enter the system upgrade menu 05 Click to enter the permission control management menu 06 Click to clear all mute settings including channel mute and mute grouping Click DCA to clear the DCA s mut...

Page 53: ...mixing channel and the channel that does not participate in the automatic mixing 05 Select the output bus for the automix feature 04 Auto mix on off 07 Input channel label 06 The bus name of the curre...

Page 54: ...commissioning calibration and external devices for the mixer 01 Return to the home page 02 Set the frequency of the sine wave from 20Hz to 20kHz 03 Select the signal type sine wave white noise pink n...

Page 55: ...eration authority control Authorization control is used for hierarchical management of operators 01 Return to the system parameter setting menu 02 Click Enter Password 03 Current user name click to en...

Page 56: ...evice information mainly provides the hardware version software version IP address and production date of the mixer which is convenient for future maintenance work 01 Return to the system parameter se...

Page 57: ...ing conditions 3 Enter the system settings menu Click Upgrade on the screen Start the firmware upgrade program ISUeasy TM Read the precautions carefully and confirm that it is correct Click Continue t...

Page 58: ...iPad 5 Run the app When the WIFI flag on the APP turns green it means that the APP has established a communication connection with the TQ 22 digital mixer and now it can be remotely operated Android t...

Page 59: ...e machine is still working normally the parameters and status are frozen unchanged all faders buttons shuttles and touch screens are forbidden to operate The channel guide screen displays as usual and...

Page 60: ...ll mixer parameters from the internal and U disk to mixer Channel presets User channel presets can be saved or recalled from the internal and U disk to mixer Scene mode 6 quick scene quick buttons can...

Page 61: ...inimum input level of output 4dBu 1 23V can be generated when the mixer is set to the maximum gain all faders and level controllers are at the maximum position Output channel gain is 0dB Analog port i...

Page 62: ...TQ 22 Mixer Reference manual 54 UG TQ22 EN V2 2 211226 Appendix 2 The Mixer Block Diagram...

Page 63: ...55 UG TQ22 EN V2 2 211226 TQ 22 Mixer Reference manual Appendix 3 Dimensions 553mm 550mm 206mm 61mm...

Page 64: ...guan 3G Audio Technology Co Ltd Add Building 3 No 1 Nanqi street Qiaodong road Qiaotou town Dongguan City Guangdong province 523800 China Website www beta3pro com MIX TQ 22 Showing rich sound connotat...

Reviews: