


3
Thank you for buying a Bestway pool. In order to ensure that you gain maximum enjoyment and safe use of your pool
please follow the installation instructions in the DVD enclosed (except 244cm x 66cm / 8’ x 26”; 305cm x76cm / 10’ x 30”;
366cm x 76cm / 12’ x 30”; 366cm x 91cm / 12’ x 36’’ pool) in your retail box along with the important safety guidelines in
your owner’s manual.
Assembly usually takes approximately 10 minutes with 2-3 people.
See below for part descriptions.
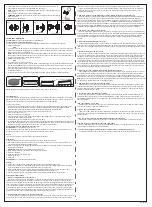
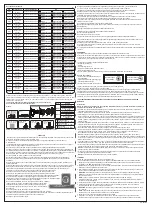
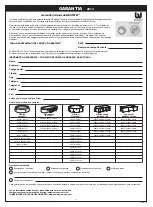
Parts:
No.
P6D510
Name
Control Valve
O-ring
Control Valve Gasket
P6D511
Connector Nut
Gasket
Connector
Debris Screen
#F4D019B-01
Drain valve
E
Heavy-duty repair patch
C
#F4D032B-01
(blue)/
#F4H032B-01(grey)
Drain valve
F
Hose Adaptor
#F4D019B-03A
D
Liner
B
A
E
F
Except 549cm x 122cm
(18’ x 48”) model
Except 457cm x 122cm
(15’ x 48”) model
457cm x 122cm
(15’ x 48”) model only
Please see FAQ’S for additional information. Drawings not scaled to size.
WARNING
Read the manual and follow the instructions relating to safety tips, correct and complete product assembly, setting into
service, use and maintenance.
The use of a kit swimming pool implies the respect of the safety instructions described in the manual of maintenance
and use.
The safety of your children depends entirely on you! Children under 5 years old are at greatest risk. Please take care to
avoid accidents.
Continuous and competent adult supervision of children and the handicapped is required at all times.
Assign at least one person in charge of safety. Increase supervision if there are several people in the swimming pool.
Teach your children to swim if possible. Your children’s safety is your responsibility! The risk is the greatest when
children are under five. Remember accidents don’t just happen to others! Be prepared to react. Without adult
supervision, your child’s life is in danger.
For safety, please do not set up your pool on a terrace / balcony.
Remember to place our pool where it’s possible to drain it easily avoiding flooding.
Never let children enter or remain in the pool or pool area without adult supervision or if they
are not wearing life saving devices.
Do not allow access to the pool without a lifejacket or vest for a child not knowing
how to swim well and not accompanied in the water.
Test the water temperature before entering the pool by splashing water
on your neck, arms and legs.
Under no circumstances should any user jump or dive into the pool,
serious injury or death could result.
Prohibit running and playing games and other strenuous exercise near the swimming pool.
Pool and accessories should only be assembled by competent adults.
Do not use an air compressor to inflate the pool. Use a hand or foot pump.
Before use, always make sure that all of the inflatable compartments are properly inflated and that there are no folds. If
not, repeat the inflation procedure.
Your pool should be filled by low pressure water flow in order to prevent undue stress to the liner. Bestway will not be
responsible for damage to the pool due to filling via water-truck. (See FAQ’s)
Do not straddle, sit, stand, lean over or put pressure onto the inflatable top ring, doing so could result in collapse of the
pool and flooding, causing serious personal injury and/or damage to personal property.
Do not leave toys near or in an unsupervised swimming pool.
Do not swim alone.
Do not use your pool under the use of alcohol, drugs or medicaments.
Store chemicals and accessories out of the reach of children.
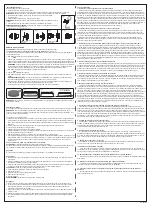
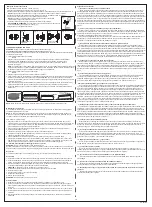
Children will be in danger without
adequate supervision.
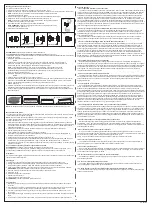
No Jumping
Shallow Water
No Diving
Shallow Water
Preparation
NOTE: The pool must be set up on a completely flat and level surface. Please do not install the pool if the
surface is inclined or slope.
• Check with your local city council for by-laws relating to fencing, barriers, lighting and safety requirements and
ensure you comply with all laws.
• Take the pool and accessories out of the carton with care. If the pool set comes with a ladder, the ladder requires a
crosshead screwdriver or an adjustable wrench ( not included ) to assemble.
• Locate your pool with a minimum of 122cm (4 feet)space on all sides so that a child can not use an object to climb
into the pool. Do not set up directly under overhead power lines or trees and be sure the location does not contain
underground utility pipes, lines or cables of any kind.
• It is essential the pool is set up on solid, level ground. If the pool is set up on uneven ground it can cause collapse of
the pool and flooding, causing serious personal injury and/or damage to personal property. Setting up on uneven
ground will void the warranty and service claims.
• Sand should not be used to create a level base, the ground should be dug out if necessary.
• Do not set pool up on driveways, decks, platforms, gravel or asphalt. Ground should be firm enough to withstand the
pressure of the water; mud, sand, soft / loose soil or tar are not suitable.
• The ground must be cleared of all objects and debris including stones and twigs.
NOTE:
Lawn or other vegetation under the pool will die and may cause odors and slime, therefore we recommend
removing all grass from where
the pool will be located. Avoid locating your pool over or beside areas prone to aggressive plant and weed species
as they may grow through the ground cloth or liner.
• We highly recommend that once the pool is unfolded on the ground cloth to let it sit exposed to direct sunlight for 1
hour or more so that the pool is more flexible during set up.
• If purchased with a pump, the pump should be installed after pool is fully assembled. Remember to locate the intake
and return outlets towards the outside power source.
NOTE:
If you bought a filter pump, this element has a separate manual instructions. Please open its relative box for details.
• If you bought a separate ladder for your pool, make sure it matches the pool size.
• Regularly check to make sure the ladder is properly assembled.
NOTE:
The ladder is only to be used for entering and exiting the pool.
Installation
Note:
It is important to assemble pool in the order shown below.
1. If pool was purchased with a ground cloth, spread carefully at the desired location. Ensure the pool is located within
distance of a 220-240volt AC outlet protected by a RCD (Residual Current Device).
2. Spread out the pool and make sure the pool is right side up, let it sit exposed to direct sunlight for 1 hour or more so
that the pool is more flexible during set up.
3. Turn the pool so the drain valve is near the area where your plan to drain the water and pump valves are facing the RCD outlet.
ATTENTION:
Do not drag the pool on the ground in order to avoid puncturing from sharp objects. Bestway Inflatables
will not be responsible for damage caused to the pool due to mishandling or failure to follow these instructions.
NOTE:
The base or bottom of the pool should be laid out properly (flat without wrinkles).
For 549cm x 122cm (18’ x 48”) pools, please refer to the connection valve installation on following page.
4. Insert the blue stopper plug into the inlet and outlet on the wall of the pool from the inside of the pool.
5. Inflate the top ring of the pool with an air pump (not included). Ensure the safety valve is closed securely after
inflation.
ATTENTION:
Do not use high pressure air hose or over inflate the top ring, it should be slightly stiff to the touch.
NOTE:
Hot temperatures cause air to expand the ring and may cause damage. Leave some room for expansion.
Please see FAQ’s for additional information.
6. Ensure drain valve is firmly closed.
7. Put 1” to 2” water in the pool to cover the floor. Once pool floor is slightly covered, gently smooth out all wrinkles.
Start in the center of the pool and work your way clockwise to the outside.
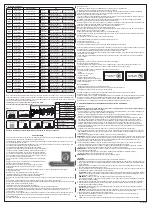
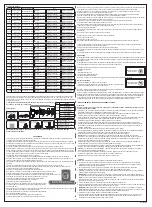
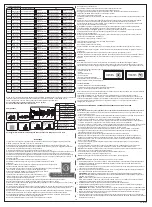
Connection Valve Assembly
For 549cm x 122cm (18’ x 48”) pool model
1. Screw the Debris Screen onto the Connector. (See Fig. 2)
2. From inside the pool, insert this assembled Unit to the pool’s inlet A and outlet B. (See Fig. 3)
NOTE:
Ensure the Gasket is properly in place on the assembled Unit inside of the pool liner.
#F4D018B-02(blue)/
#F4H018B-02(grey)
Stopper plug x 2
A
1.
2.
3.
4.
5.
6.
7.
2
1
3
4
5
6
7
549cm x 122cm (18’ x48”) model only
Never add chemicals to pool while it is occupied. Consult a specialist pool supply retailer to ensure correct chemical
usage.
Always keep the pool water clean.
Pool water should be tested regularly to ensure that the PH and chlorine concentration in the water is optimal for safe
and enjoyable use throughout the season.
Household pets should be kept clear of pool area to avoid structural damage to pool.
Surround your pool with a fence and ensure the gate is kept closed at all times.
Cover pool when not in use. Neither children nor adults can be seen inside the pool if the cover is in use.
Remove cover completely when in use.
A working electronic detector should be installed to alert you if someone has entered the pool area.
Under no circumstances should this equipment replace an adult’s nearby supervision.
Do not leave ladder in pool when pool is unattended. Remember to empty and store the pool during the winter times and
if the pool is not used.
Only use Bestway accessories with Bestway pools.
Properly maintain your pool in order to increase life span and safe use. (See Pool Maintenance Section)
Do not operate pump while pool is in use.
Forbid the access of the pool in case of damage of the filter pump.
Renew the water regularly.
Do not put the empty pool on the ground.
Do not call near the pool, avoid neglected supervision due to calling.
All equipment should be inspected frequently for signs of deterioration, corrosion, broken parts or other hazards which
may cause injury.
Remember to reapply sunscreen protection regularly and always after swimming.
Failure to follow these instructions can result in property damage, injury or death, especially for children.
Failure to comply with maintenance instructions may lead to serious health hazards, especially for children.
SAFETY
Learn the necessary rescue operations, especially those relating to rescuing children.
Rescue equipment should be located near the pool and the supervising adult should be fully trained to use it.
Rescue equipment should include but not limited to items such as coastguard approved ring buoy with attached rope
and strong, rigid Rescue Pole of at least 366cm (12’).
Post emergency numbers including:
• Fire (France 18)
• Police
• Ambulance (France 15)
• Poison Control Hotline
• Full home address
Keep a cordless water-resistant phone nearby pool during use.
In case of an accident:
• Take all the children out of
the water immediately.
• Call for emergency support
and follow their
instruction/advice.
• Replace wet clothing with dry clothing.
Watch and react! When supervising children stay close at hand and always be alert.
Teach your children to swim as soon as possible.
All filtering systems are compliant with installation standard NF C 15-100 stating that any electrical appliance located
less than 3.5 meters from the pool and freely accessible must only have a 12V supply. Any electrical appliance with a
220V mains supply must be located at least 3.5 meters from the edge of the pool. Always ask the manufacturer for
advice before making any change to one or more components of the filtering system(for France only).
PLEASE READ CAREFULLY AND RETAIN FOR FUTURE REFERENCE.
S-S-001476/21x28.5cm(
梯形水池A版
) JS-YF-2012-B-01906/
英
S-S-001476
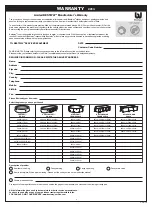
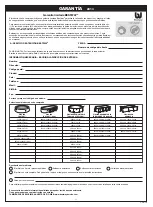
366cm x 91cm
(12’ x 36’’)
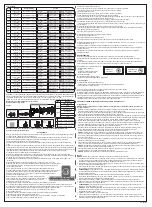
To be placed on the ground
Dimension
Installation Type
Kit
Type
57164
Ladder
Filtration System
Drain System
Ground Cloth
Pool Cover
Maintenance Kit
457cm x 107cm
(15’ x 42’’)
To be placed on the ground
57023
Ladder
Filtration System
Drain System
Ground Cloth
Pool Cover
Maintenance Kit
366cm x 91cm
(12’ x 36’’)
To be placed on the ground
57166
Ladder
Filtration System
Drain System
Ground Cloth
Pool Cover
Maintenance Kit
Ladder
Filtration System
Drain System
Ground Cloth
Pool Cover
Maintenance Kit
366cm x 91cm
(12’ x 36’’)
To be placed on the ground
57142
Ladder
Filtration System
Drain System
Ground Cloth
Pool Cover
Maintenance Kit
457cm x 91cm
(15’ x 36’’)
To be placed on the ground
57144
Ladder
Filtration System
Drain System
Ground Cloth
Pool Cover
Maintenance Kit
457cm x 91cm
(15’ x 36’’)
To be placed on the ground
57124
Ladder
Filtration System
Drain System
Ground Cloth
Pool Cover
Maintenance Kit
457cm x 91cm
(15’ x 36’’)
To be placed on the ground
57082
Ladder
Filtration System
Drain System
Ground Cloth
Pool Cover
Maintenance Kit
457cm x 107cm
(15’ x 42’’)
To be placed on the ground
57127
Ladder
Filtration System
Drain System
Ground Cloth
Pool Cover
Maintenance Kit
457cm x 107cm
(15’ x 42’’)
To be placed on the ground
57084
Ladder
Filtration System
Drain System
Ground Cloth
Pool Cover
Maintenance Kit
457cm x 122cm
(15’ x 48’’)
To be placed on the ground
57148
Ladder
Filtration System
Drain System
Ground Cloth
Pool Cover
Maintenance Kit
457cm x 122cm
(15’ x 48’’)
To be placed on the ground
57150
Ladder
Filtration System
Drain System
Ground Cloth
Pool Cover
Maintenance Kit
549cm x 122cm
(18’ x 48’’)
To be placed on the ground
57212
Ladder
Filtration System
Drain System
Ground Cloth
Pool Cover
Maintenance Kit
549cm x 122cm
(18’ x 48’’)
To be placed on the ground
57213
Ladder
Filtration System
Drain System
Ground Cloth
Pool Cover
Maintenance Kit
457cm x 122cm
(15’ x 48’’)
To be placed on the ground
57242
Ladder
Filtration System
Drain System
Ground Cloth
Pool Cover
Maintenance Kit
457cm x 91cm
(15’ x 36’’)
To be placed on the ground
57018
Ladder
Filtration System
Drain System
Ground Cloth
Pool Cover
Maintenance Kit
457cm x 91cm
(15’ x 36’’)
To be placed on the ground
57121
To be placed on the ground
Filtration System
Drain System
Ground Cloth
Pool Cover
Maintenance Kit
To be placed on the ground
Ladder
Filtration System
Drain System
Ground Cloth
Pool Cover
Maintenance Kit
To be placed on the ground
Ladder
Ladder
Filtration System
Drain System
Ground Cloth
Pool Cover
Maintenance Kit
Ladder
Filtration System
Drain System
Ground Cloth
Pool Cover
Maintenance Kit
To be placed on the ground
Ladder
Filtration System
Drain System
Ground Cloth
Pool Cover
Maintenance Kit
To be placed on the ground
Ladder
Filtration System
Drain System
Ground Cloth
Pool Cover
Maintenance Kit
To be placed on the ground
Ladder
Filtration System
Drain System
Ground Cloth
Pool Cover
Maintenance Kit
To be placed on the ground
Ladder
Filtration System
Drain System
Ground Cloth
Pool Cover
Maintenance Kit
To be placed on the ground
Ladder
Filtration System
Drain System
Ground Cloth
Pool Cover
Maintenance Kit
To be placed on the ground
57008
57100
57066
57009
57109
57072
57032
57112
57074
Product Description
244cm x 66cm
(8’ x 26’’)
244cm x 66cm
(8’ x 26’’)
244cm x 66cm
(8’ x 26’’)
305cm x 76cm
(10’ x 30’’)
305cm x 76cm
(10’ x 30’’)
305cm x 76cm
(10’ x 30’’)
366cm x 76cm
(12’ x 30’’)
366cm x 76cm
(12’ x 30’’)
366cm x 76cm
(12’ x 30’’)
Summary of Contents for FAST SET 57008
Page 2: ...2 S S 001476 ...


