background image

instruction manual

16

English

8.

11.

3.

6.

10.

1.

9.

4.

5.

7.

2.

operAtion   -  general

The appliance is intended only for domestic use,  

not for professional use.
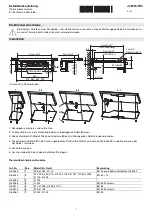
1.  Motor housing

2.  On/Off switch

3.  Stainless steel knife

4.  Food tray

5.  Food pusher

6.  Power cord with plug

7.  Thickness dial

8.  Thickness plate

9.  Sucker feet

10.  Sliding rod

11.  sliding rod interlocking


           Figure 1


operAtion   -  using for the first time

1.   Remove the packaging.

2.   Clean the appliance to remove any manufacturing residues (see “Cleaning and maintenance”).

operAtion   -  preparing the food slicer for use

1.   Place the food slicer on a clean and flat surface, such as a kitchen worktop. Make sure that the four 


suction cups on the base of the appliance are pressed firmly into place. Make sure that there is 


sufficient space to the right and left of the appliance.

2.   Remove the sliding rod by opening the interlocking of the sliding rod. Slide the food tray onto the    


sliding rod, and place the rod back into the interlocking. 

3.   Fit the food pusher onto the food tray.

4.   Insert the plug into the wall socket.

operAtion   -  slicing food

1.   Put a shallow dish or flat plate on the left-hand side of the machine to receive the sliced food.

2.   Set the thickness dial to the required slice thickness.

3.   Slide the food tray to the rear and the food pusher to the right.

4.   Put the food on the food tray between the thickness plate and the food pusher.

 The knife is very sharp; to avoid injuries please observe the following instructions.

5.   Turn on / off button and select the desired speed. The knife will now start to turn.

6.   Hold the food pusher’s grip with your right hand and push the food to the left against the thickness 


plate and to the front in the direction of the knife.

7.   The freshly-cut slice will now slide from the left-hand side of the appliance. Once the slice has been cut 


off move the food tray backwards with your right hand to cut the next slice.

 Do not use the food slicer for longer than three minutes without a pause. Allow the appliance to cool for 


five minutes before continuing.

operAtion   -  tips for the use of your food slicer

•   Do not use the food slicer to cut meat or fish with bones, or fruit with hard kernels.

•   Always remove the string from rolled meats and the skin or plastic from sausages before cutting them 


with the food slicer.

•   Do not use the food slicer to cut frozen food.

Summary of Contents for KITCHEN HEROES AFS9003

Page 1: ...iding snijmachine Gebrauchanweisung Allesschneider Mode d emploi trancheur Instruction manual food slicer Istruzioni per l uso affettatrice Manual del usuario cortadora de fiambres 150W 220 240V 50 60...

Page 2: ......

Page 3: ...aat het apparaat na een gebruik van drie minuten telkens vijf minuten afkoelen Zo verlengt u de levensduur van het apparaat Zorg ervoor dat het apparaat en het snoer niet in aanraking komen met hitteb...

Page 4: ...jden 1 Zet links van de machine een ondiepe schaal of plat bord om de plakken voedsel op te vangen 2 Stel de dikte van de plakken in met de dikte instelling 3 Schuif de snijplank naar achteren en de a...

Page 5: ...het mes terug in de snijmachine draai de bevestigingsschroef vast 6 Wikkel het snoer rond de onderzijde van de machine en berg deze op samen met de snijplank en de aandrukschuif in een hersluitbare p...

Page 6: ...spectievelijk reparatie van de defecte onderdelen De importeur kan nooit aansprakelijk gesteld worden voor eventuele vervolgschade of enigerlei andere consequenties die door of in relatie met de door...

Page 7: ...Sie das Ger t nach einer Benutzung von drei Minuten immer f nf Minuten abk hlen So verl ngern Sie die Lebensdauer des Ger ts Sorgen Sie daf r dass das Ger t und das Kabel nicht mit Hitzequellen wie h...

Page 8: ...Taste 3 Edelstahlmesser 4 Schlitten 5 Restehalter 6 Netzkabel mit Stecker 7 Schnittst rkeneinstellung 8 Schnitt Platte 9 Gumminoppen 10 Gleitschiene 11 Gleitschiene Verriegelung Abbildung 1 Funktion E...

Page 9: ...ndung Verwenden Sie zur Reinigung keine aggressiven Reinigungs oder Scheuermittel oder scharfen Gegenst nde wie Messer oder harte B rsten Tauchen Sie das Motorgeh use nie unter Wasser oder in andere F...

Page 10: ...Auf diese Garantiebestimmungen kann kein Anspruch erhoben werden im Falle von a Verlusten die w hrend des Transports auftreten b Entfernung oder nderung der Ger teseriennummer 8 Ausgenommen von der G...

Page 11: ...rs la dur e d utilisation maximale prescrite apr s 3 minutes d utilisation laissez toujours l appareil se refroidir pendant 5 minutes Ceci augmente la dur e de vie de l appareil Assurez vous que ni l...

Page 12: ...e 3 Montez le poussoir sur la planche trancher 4 Branchez la fiche Fonctionnement Trancher des aliments 1 Placez gauche de l appareil un plat ou une assiette pour recevoir les tranches coup es 2 R gle...

Page 13: ...guilles d une montre Retirez le couteau de la machine 3 Lavez la planche trancher le poussoir et la lame l eau tr s chaude additionn e de d tergent pour la vaisselle Les pi ces supportent le lave vais...

Page 14: ...ection et l emballage appropri s 7 Les pr sentes conditions de garantie ne peuvent pas tre invoqu es dans les cas suivants a pertes survenues pendant le transport b effacement ou modification du num r...

Page 15: ...iance to cool down for five minutes after every three minutes use This will increase the lifespan of the applicance Make sure that the appliance and the power cord do not come in contact with sources...

Page 16: ...food 1 Put a shallow dish or flat plate on the left hand side of the machine to receive the sliced food 2 Set the thickness dial to the required slice thickness 3 Slide the food tray to the rear and t...

Page 17: ...ss plate and knife in hot washing up water These parts can also be cleaned in a dishwasher 4 Clean the motor housing and other parts of the food slicer with a clean cloth moistened with a disinfectant...

Page 18: ...d parties f Careless transport i e without suitable packaging materials or protection 7 No claims may be made under this warranty for a Losses incurred during transport b The removal or changing of th...

Page 19: ...contatto con sorgenti di calore quali per es piani di cottura caldi o fiamme libere Assicurarsi che l apparecchio il cavo e la spina non entrino in contatto con l acqua Norme di sicurezza Utilizzo del...

Page 20: ...iaio inox 4 Piano di taglio scorrevole 5 Braccio premicibo 6 Cavo di alimentazione e spina 7 Manopola di selezione dello spessore di taglio 8 Piano di appoggio del carrello 9 Ventosa per pi stabilit 1...

Page 21: ...io premicibo Tenere la macchina al di fuori della portata dei bambini quando la stessa pronta per l uso o durante il suo utilizzo Quando non si utilizza l apparecchio accendere l interruttore on off i...

Page 22: ...trasporto eseguito in modo improprio privo dell imballaggio o delle protezioni idonee 7 Le presenti condizioni di garanzia non si applicano inoltre in caso di a perdite che si verificano durante il t...

Page 23: ...xceda la m xima duraci n de uso prescrita despu s de usar el aparato durante tres minutos consecutivos d jelo enfriar durante cinco minutos Con ello prolonga la vida til del aparato Aseg rese de que n...

Page 24: ...omida en la barra deslizante y coloque la barra en el enclavamiento 3 Coloque el elemento de presi n sobre la tabla de corte 4 Introduzca el enchufe en la toma de alimentaci n Funcionamiento Cortar al...

Page 25: ...el tornillo de montaje en el centro de la cuchilla en sentido horario Retire el cuchillo de la m quina de cortar los alimentos 3 Lave la bandeja con la comida el empujador de alimentos en agua calien...

Page 26: ...n el embalaje o protecci n adecuados 7 No podr apelarse a estas disposiciones de garant a en los siguientes casos a p rdida ocurrida durante el transporte b remoci n o modificaci n del n mero de serie...

Page 27: ......

Page 28: ...AFS9003 v 260615...

Reviews: