background image

user’s instructions

20

English

use   -  

dry ironing

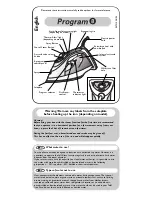
1.   Insert the plug (13) into the wall socket.

2.   Turn on the main on/off switch (11) by switching it to position 1. The pilot light turns on.

3.   Turn the iron temperature control dial (2) to the desired position (see the table in ‘Ironing instructions’). 


The pilot light (9) turns on.

4.   Place the iron in a vertical position (upright) and wait until the pilot light (9) goes out. The iron is now  


ready to iron.

Iron the fabric by sliding the iron over the fabric. While you are ironing, the heating element will 

automatically switch on and off to keep the soleplate at the set temperature. The pilot light (9) will, 

therefore, also turn on and off automatically.
5.   After use, rotate the iron temperature control to the 0 position, turn off the main on/ off switch by  


switching it to position 0. Remove the plug from the wall socket. Place the iron in a vertical position and  


allow it to cool down.

use   -  

steam ironing

1.   Fill the water tank (see ‘Filling the water reservoir’).

2.   Insert the plug (13) into the wall socket.

3.   Turn on the main on/off switch (11) by switching it to position 1. The pilot light turns on.

4.   Turn the boiler temperature control (12) to MAX. The pilot light (10) turns on.

5.   Turn the iron temperature control dial (2) to the desired position (see the table in ‘Ironing instructions’). 


The pilot light (9) turns on. The iron will be ready for use when the pilot light goes out and the 


temperature is reached.

6.  When both pilot light go out, you can start steam ironing. 

 When the steam pilot light (10) lits, you must wait until the boiler has built up sufficient steam 


pressure again.

 The steam spray of this product can only be smooth after pressing the steam iron button for several 


times.

 Leave the device steaming (for ca. 20 sec) before every use by pushing the steam release button (3)


to remove calcium deposits.

7.  After use, rotate the iron temperature control to the 0 position, turn off the main on/ off switch by  


switching it to position 0. Remove the plug from the wall socket. Place the iron in a vertical position and  


allow it to cool down.

 If the temperature is too low, drops of water can escape with the steam. This can cause stains. If this 


does happen, you should turn the temperaturecontrol dial to the recommended position. Never iron 


whilst there are drops of water on the soleplate.

use   -  Vertical s

team ironing

You can also release steam when the iron is held vertically, for example, to clean fabric. The best result is 

achieved by ironing in two stages: moisten the article of clothing with steam first by holding the soleplate 

approximately 20 cm above the clothing. Use more steam if the item of clothing contains a lot of creases. 

Next, iron the item of clothing dry.

use  -  

ironing instructions

•   Before ironing a garment check whether the garment has a label with ironing directions. Always follow 


the instructions on the label. The following table explains the meaning of symbols that may be shown 


on the label.

•   You can also use the following table when the garment does not have a label but you do know which 


fabric was used to make the garment.

Summary of Contents for AST8000

Page 1: ...station Mode d emploi systeme de vapeur Instruction manual steam station Istruzioni per l uso centro de planchado al vapor Manual del usuario sistema stirante a vapore con pressione AST8000 v 041011 0...
Page 2: ......

Page 3: ...men dat u zich verbrandt Het apparaat moet zijn warmte kwijt kunnen om brandgevaar te voorkomen Zorg er dus voor dat het apparaat voldoende vrij is en niet in contact kan komen met brandbaar materiaal...

Page 4: ...hoon zijn Doe dit ook als u het strijkijzer lange tijd niet heeft gebruikt De eerste keer dat u het apparaat in gebruik neemt kan er lichte rookontwikkeling en een specifieke geur ontstaan Dit is norm...

Page 5: ...kunt u beginnen met stoomstrijken door op de stoomafgifteknop te drukken Als het indicatielampje 10 voor de beschikbaarheid van stoom aan gaat moet u even wachten tot de boiler opnieuw voldoende stoom...

Page 6: ...en die op een lage temperatuur moeten worden gestreken en pas daarna de kledingstukken die op een hogere temperatuur moeten worden gestreken Het strijkijzer wordt namelijk sneller warm dan dat het afk...

Page 7: ...voordoen b het verwijderen of wijzigen van het serienummer van het apparaat 8 Uitgezonderd van garantie zijn snoeren lampen en glazen onderdelen 9 De garantie geeft geen enkel recht op vergoeding van...

Page 8: ...rgen Sie also daf r dass das Ger t ausreichend frei steht und nicht in Kontakt mit brennbarem Material kommen kann Das Ger t darf nicht abgedeckt werden Sorgen Sie daf r dass das Ger t und das Kabel n...

Page 9: ...n Bei der ersten Verwendung des Ger ts k nnen eine leichte Rauchentwicklung sowie ein spezieller Geruch entstehen Das ist normal und geht von selbst wieder weg Sorgen Sie f r ausreichende Bel ftung Be...

Page 10: ...eut ausreichenden Dampfdruck aufgebaut hat Sie erhalten einen gleichm igen Dampfsto nach mehrmaligem bet tigen des Dampfschalters Vor jedem Gebrauch die Drucktaste f r Dampfabgabe 3 ca 20 Sekunden bet...

Page 11: ...den m ssen und erst danach die Kleidungsst cke die bei einer h heren Temperatur geb gelt werden m ssen Das B geleisen wird n mlich schneller warm als dass es abk hlt Wenn ein Stoff beispielsweise aus...

Page 12: ...a Verlusten die w hrend des Transports auftreten b Entfernung oder nderung der Ger teseriennummer 8 Ausgenommen von der Garantie sind Kabel Lampen und Glasteile 9 Au er einem Ersatz bzw einer Reparatu...

Page 13: ...oir vacuer la chaleur produite Laissez donc suffisamment d espace autour de l appareil et vitez tout contact avec des mat riaux inflammables L appareil ne doit jamais tre recouvert Assurez vous que ni...

Page 14: ...le r servoir d eau sont propres Ceci vaut aussi lorsqu il y a longtemps que vous avez utilis le fer repasser pour la derni re fois Lorsque vous utilisez l appareil pour la premi re fois une l g re fum...

Page 15: ...leau sous Instruction de repassage Le lampe t moin 9 du chauffage s allume 4 Attendez que le t moin indicateur de chauffage 9 se soit teint Le fer est pr t aller de repassage 6 Si les deux voyants son...

Page 16: ...t ainsi de suite Commencez par les textiles repasser basse temp rature et poursuivez par ceux qui demandent une temp rature plus lev e En effet le fer repasser se r chauffe plus rapidement qu il ne se...

Page 17: ...survenues pendant le transport b effacement ou modification du num ro de s rie de l appareil 8 Les cordons ampoules et pi ces en verre ne sont pas couverts par la garantie 9 La garantie ne donne aucun...

Page 18: ...avoiding the risk of fire Make sure that the appliance has sufficient space around it and does not come in contact with flammable materials The appliance may not be covered Make sure that the applianc...

Page 19: ...used for a period of time The appliance may emit a little smoke and a characteristic smell when you switch it on for the first time This is normal and will soon stop Make sure the appliance has suffic...

Page 20: ...oth pilot light go out you can start steam ironing When the steam pilot light 10 lits you must wait until the boiler has built up sufficient steam pressure again The steam spray of this product can on...

Page 21: ...g on to the garments that need to be ironed at a higher temperature This is advisable because the iron heats up faster than it cools down Iron garments containing a mixture of fabrics for example 60 p...

Page 22: ...ction 7 No claims may be made under this warranty for a Losses incurred during transport b The removal or changing of the appliance s serial number 8 The guarantee does not cover power cords lamps or...

Page 23: ...e il proprio calore onde evitare eventuali rischi di incendio Assicurarsi pertanto che l apparecchio sia sufficientemente libero da ostacoli e non possa venire in contatto con materiali incendiabili L...

Page 24: ...caso in cui il ferro da stiro sia rimasto a lungo inutilizzato La prima volta che si utilizza l apparecchio pu verificarsi una leggera emissione di fumo accompagnata da un odore particolare Si tratta...

Page 25: ...caldaia Lasciare il dispositivo di vapore per ca 20 sec prima di ogni utilizzo premendo il pulsante di rilascio del vapore 3 per rimuovere i depositi di calcio 6 Stirare il tessuto passandovi sopra i...

Page 26: ...de unicamente per i tessuti indicati Assicurarsi di stirare i tessuti trattati o dotati di applicazioni e o stampe a temperature pi basse di quelle indicate in tabella Assicurarsi di raggruppare i tes...

Page 27: ...i identificazione d modifiche non autorizzate e riparazioni eseguite da terzi f trasporto eseguito in modo improprio privo dell imballaggio o delle protezioni idonee 7 Le presenti condizioni di garanz...

Page 28: ...rese de que el aparato est completamente libre y de que no haga contacto con materiales inflamables No cubra nunca el aparato Aseg rese de que ni el aparato ni el cable est n en contacto con fuentes...

Page 29: ...or largo tiempo Cuando se utiliza el aparato por primera vez ste puede producir un poco de humo y desprender un olor particular Esto es normal y tanto el humo como el olor desaparecer n autom ticament...

Page 30: ...upone Deje el dispositivo de vapor de aprox 20 segundos antes de cada uso pulsando el bot n de liberaci n de vapor de agua 3 para eliminar los dep sitos de calcio Deje el dispositivo de vapor de aprox...

Page 31: ...lantes o estampadas en relieve deben plancharse a una temperatura baja Clasifique los materiales seg n la temperatura de planchado lana con lana algod n con algod n etc tera Planche primero las prenda...

Page 32: ...de garant a en los siguientes casos a p rdida ocurrida durante el transporte b remoci n o modificaci n del n mero de serie del aparato 8 La garant a no cubre los cables las bombillas ni las partes de...

Page 33: ......

Page 34: ......

Page 35: ......

Page 36: ...AST8000 v 041011 08...

Reviews: